

Hardware components | ||||||
| × | 2 | ||||
Software apps and online services | ||||||
 |
| |||||
 |
| |||||
 |
| |||||
This is the third part of my IoT environmental station project that I've developed as part of the IoT course during my Engineering in Computer Science master's degree at Sapienza - University of Rome.
In the first part I configured an MQTT broker on AWS IoT together with a rule that saves the messages in a DynamoDB database. I also developed a web dashboard to display the data and a python script to simulate the environmental station.
In the second part the python script was replaced by a program for RiotOS, an operating system for embedded devices, that sent the sensors data using MQTT-SN, together with a python script that acted as a bridge replaying the messages from the MQTT-SN broker to AWS MQTT broker.
In this third part the environmental station is still a program for RiotOS, but it is designed to run on ST B-L072Z-LRWAN1 boards in order to use LoRaWAN for the communication.
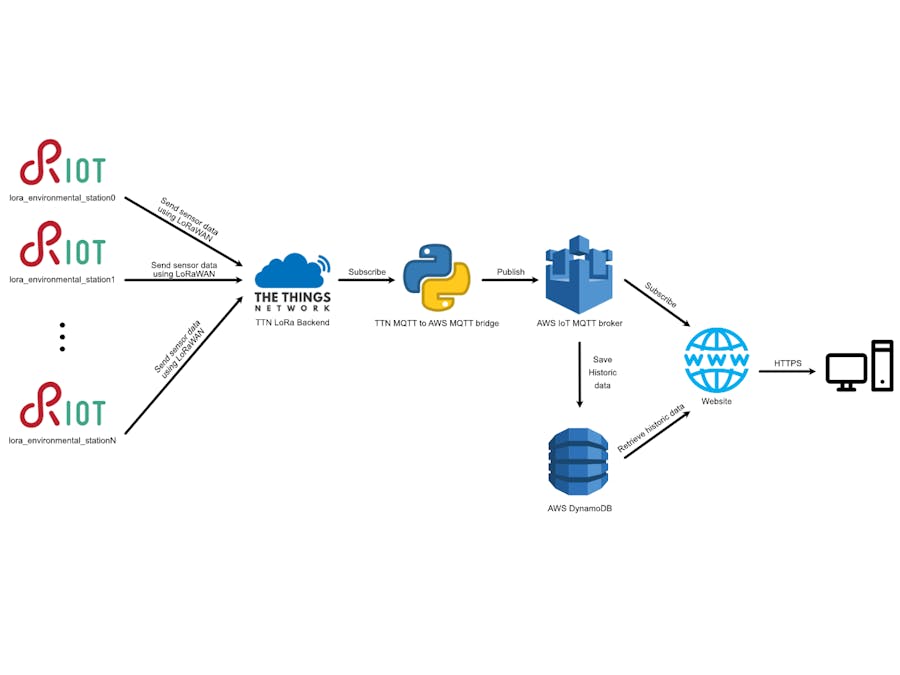
ArchitectureThe architecture of the project is the following:
- The IoT devices send the sensors data to the TTN backend using LoRaWAN;
- A python script acts as a bridge between TTN and AWS subscribing to the topics on TTN MQTT broker and republishing the messages over AWS IoT MQTT broker;
- As in the previous parts of the project AWS saves the messages received into a DynamoDB table;
- A web-based dashboard subscribes to the MQTT channels to display the current state of the sensors and queries the database to show the values received during the last hour.
If you haven't already done it, check the first part of the project and follow all of the steps for configuring AWS. We need to add only one thing: the policy for allowing the TTN to AWS bridge to publish.
Log-in to the AWS console website, go into the "AWS IoT" section, click on "Secure", Policies" and then "Create".
Give a name to the policy, then in the “Action” field write “iot:Connect”. AWS will automatically populate the “Resource ARN” field, replace the “replaceWithAClientId” part with “TTNbridge”. Now click on “Add statement” and write “iot:Publish” in the “Action” field of the new statement. This time replace “replaceWithATopic” in the Resource ARN section with “stations/*”. Finally, make sure to tick the “Allow” box under “Effect” in both statements and click on “Create”.
To associate this new policy to the certificate you created in the first part of the project go to the “Certificates” page, click on the three dots over your certificate and then click on “Attach policy”. Now select the policy for allowing the virtual stations of the python script created in the first part, the policy for allowing the MQTT-SN bridge created in the second part and this new policy and click on "Attach".
The web dashboard is the same as the first part, it's a simple html+javascript website that you can run locally or upload to a hosting service. Check the first part of the project for more information about how it works and how to configure it.
Configuration of The Things NetworkCreating the application
If you don’t already have a TTN account, create one from here. Once logged in click on "CONSOLE", "APPLICATIONS" and then on "add application".
Now just give a name to the application and click on "Add application".
Registering the devices
In this example we are going to use two devices but you can use how many you want.
To register a device from the application overview page click on "register device", give an ID to the device, click on the button near the "Device EUI" field to automatically generate it and then click on "Register".
Repeat the same process to register the second device.
Configuring the payload decoder
Go back to the application overview page and click on "Payload Formats". Here in the code editor paste this snippet of code:
function Decoder(bytes, port) {
  var result = "";
  for (var byte in bytes){
    result += String.fromCharCode(bytes[byte]);
  }
  return JSON.parse(result);
}
Then scroll down and click on "save payload function".
This function will decode the messages sent into JSON objects.
Testing the program on IoT-LABIoT-LAB is a testing facility that gives its users access to a vast IoT infrastructure in order to experiment and evaluate IoT applications.
Among other things, IoT-LAB offers the possibility to test LoRaWAN based applications. In this project we will use the ST B-L072Z-LRWAN1 boards in the Saclay site where it is also installed a TTN gateway that we will use to communicate with the TTN backend server.
Starting the experiment
Before starting you need to create an IoT-LAB account and to set up your ssh access to the IoT-LAB servers following this guide.
Now open a terminal and connect to the Saclay site host with this command:
ssh <login>@saclay.iot-lab.infowhere <login> is your IoT-LAB username.
Then type iotlab-auth -u <login> followed by your password to authenticate.
Now we are ready to start the experiment with the command
iotlab-experiment submit -n riot_ttn -d 60 -l 2,archi=st-lrwan1:sx1276+site=saclayHere we are asking IoT-LAB to give us access to two ST B-L072Z-LRWAN1 boards for one hour. If everything goes well it should return the ID of the experiment.
Now we can check the status of the experiment by typing iotlab-experiment get -i <exp_id> -s (Replace <exp_id> with the ID of your experiment).
Then issue the command iotlab-experiment get -i <exp_id> -r.
This will return the devices associated with the experiment. In the section "network_address" after the string "st-lrwan1-" there will be a number. This is the ID of the board IoT-LAB as given you access to. Save the IDs for both the boards, we will need them later.
Now clone my repository using this command:
git clone --recursive https://github.com/51m0n397/IoT2020Course.gitNext go into the folder "IoTEnvironmentalStation/lora_environmental_station", here there is the "main.c" file containing the code for the station and a makefile to compile it.
Before compiling let's give a brief look at the code.
The program uses RiotOS shell functionality so in the main() function it simply initializes the shell:
int main(void) {
    /* Start shell */
    char line_buf[SHELL_DEFAULT_BUFSIZE];
    shell_run(shell_commands, line_buf, SHELL_DEFAULT_BUFSIZE);

    /* Should be never reached */
    return 0;
}
The struct for the sensors data as well as the function for updating it are the same as in the previous part of the project. Since on IoT-LAB we don't have access to the sensors the function will generate random numbers for testing purposes.
/* Struct containing the sensors data. */
typedef struct sensors {
    int temperature;
    int humidity;
    int windDirection;
    int windIntensity;
    int rainHeight;
} sensors_t;

/* Function for updating the sensor data. */
static void update_sensors(sensors_t *sensors) {
    saul_reg_t *temp_dev = saul_reg_find_type(SAUL_SENSE_TEMP);
    if (temp_dev == NULL) {
        sensors->temperature = rand_int(-50, 50);
    }
    else {
        phydat_t temp_data;
        saul_reg_read(temp_dev, &temp_data);
        float temp = (float) *temp_data.val;
        sensors->temperature = (int)round(temp/100);
    }

    saul_reg_t *hum_dev = saul_reg_find_type(SAUL_SENSE_HUM);
    if (hum_dev == NULL) {
        sensors->humidity = rand_int(0, 100);
    }
    else {
        phydat_t hum_data;
        saul_reg_read(hum_dev, &hum_data);
        float hum = (float) *hum_data.val;
        sensors->humidity = (int)round(hum/100);
    }

    sensors->windDirection = rand_int(0, 360);
    sensors->windIntensity = rand_int(0, 100);
    sensors->rainHeight = rand_int(0, 50);
}
Finally, this is the code for the env_station command:
/* Enviromental station shell command.
 * It takes in input the Device EUI, the Application EUI, the App key
 * and the seconds to pass between each message.
 * It regularly updates the sensor data and sends it to the TTN backend
 * using LoRaWAN.
 */
static int cmd_env_station(int argc, char **argv) {
    if (argc < 5) {
        printf("usage: %s <deveui> <appeui> <appkey> <seconds>\n", argv[0]);
        return 1;
    }

    /* initialize the loramac stack */
    semtech_loramac_init(&loramac);

    /* use a fast datarate so we don't use the physical layer too much */
    semtech_loramac_set_dr(&loramac, 5);

    /* set the LoRaWAN keys */
    uint8_t deveui[LORAMAC_DEVEUI_LEN];
    uint8_t appeui[LORAMAC_APPEUI_LEN];
    uint8_t appkey[LORAMAC_APPKEY_LEN];

    hex_string_to_byte_array(argv[1], deveui);
    hex_string_to_byte_array(argv[2], appeui);
    hex_string_to_byte_array(argv[3], appkey);

    semtech_loramac_set_deveui(&loramac, deveui);
    semtech_loramac_set_appeui(&loramac, appeui);
    semtech_loramac_set_appkey(&loramac, appkey);

    /* start the OTAA join procedure */
    printf("Starting join procedure\n");
    while (semtech_loramac_join(&loramac, LORAMAC_JOIN_OTAA) !=
           SEMTECH_LORAMAC_JOIN_SUCCEEDED) {
        printf("Join procedure failed, retrying...\n");
        xtimer_sleep(10);
        continue;
    }
    printf("Join procedure succeded\n");

    sensors_t sensors;
    char data[128];

    while (1) {
        /* update the sensor data */
        update_sensors(&sensors);

        sprintf(data, "{\"temperature\": \"%d\", \"humidity\": \"%d\", "
                      "\"windDirection\": \"%d\", \"windIntensity\": \"%d\", "
                      "\"rainHeight\": \"%d\"}",
                      sensors.temperature, sensors.humidity,
                      sensors.windDirection, sensors.windIntensity,
                      sensors.rainHeight);

        /* send the message */
        uint8_t ret = semtech_loramac_send(&loramac, (uint8_t *)data,
                                           strlen(data));
        if (ret == SEMTECH_LORAMAC_TX_DONE || ret == SEMTECH_LORAMAC_TX_OK) {
            printf("Successfully sent message '%s'\n", data);
        } else {
            printf("Cannot send message '%s', ret code: %d\n", data, ret);
            xtimer_sleep(10);
            continue;
        }

        /* wait for any potentially received data */
        semtech_loramac_recv(&loramac);

        xtimer_sleep(atoi(argv[4]));
    }

    /* Should be never reached */
    return 0;
}
The user needs to provide in input the "Device EUI", the "Application EUI" and the "App key" for the TTN device plus the seconds to pass between each message. The program will configure the LoRa interface and then will enter a loop of updating the sensors data, sending the message and then waiting the inputted seconds.
Before compiling we need to load the right version of GNU ARM embedded toolchain with the command:
source /opt/riot.sourceTo compile just issue the command:
make clean allNow we need to flash the two boards. We can do this with this command:
iotlab-node --update bin/b-l072z-lrwan1/lora_env_station.elf -l saclay,st-lrwan1,<ID>Just replace <ID> with the ID of the board you want to flash.
Next to access the boards issue the command nc st-lrwan1-<ID> 20000 in two different terminals, replacing <ID> with the respective identifier.
Great! The last thing to do is to start the stations. To do that use the command env_station in the two terminals followed by the "Device EUI", the "Application EUI", the "App key" and the seconds to pass between each message.
To retrieve the "Device EUI", the "Application EUI" and the "App key" go to the application overview page on The Things Network, then click on "Devices" and finally click on one of the devices, in the next page you will find the codes. Do the same thing for both devices.
Starting the bridge
Now the boards are sending the sensors data to The Things Network. To make it reach our web dashboard we need to start the bridge.
If you have followed the first part of the project you should already have cloned my GitHub repo in your local machine and downloaded your certificates and the private key for AWS IoT in the folder "environmental_station".
Run the command git pull in the main folder of the repository to make sure it is updated to the latest code.
Now go in the folder "lora-MQTT-bridge" and open the file lora-MQTT-bridge.py in your favorite editor.
Find this section of the code:
# Athenticating with the AWS mqtt broker.
# MAKE SHURE to insert the correct name for your endpoit,
# your certificates and the key.
awsClient.configureEndpoint("a29wnmzjyb35x8-ats.iot.us-east-1.amazonaws.com",
                             8883)
awsClient.configureCredentials(certFolder + "AmazonRootCA1.pem.crt",
                               certFolder + "e0a2ae42f8-private.pem.key",
                               certFolder + "e0a2ae42f8-certificate.pem.crt")
Insert the correct name for your endpoint, your certificates and the key.
Next you need to add the credentials for The Things Network. Download the TTN CA certificate from here and put it in the "lora-MQTT-bridge" (make sure that the file is called "mqtt-ca.pem.crt").
Then create in the same folder a .txt file called "key.txt". In it you need to put in the first line the name you gave to your application on The Things Network and in the second line the "Access key" for that application (you can retrieve both from the "overview" page of the application on TTN).
Since the python script uses Eclipse Paho and the AWS IoT SDK make sure to have them installed with the commands
pip3 install paho-mqtt
pip3 install AWSIoTPythonSDK
Finally we can start the script with the command python3 lora-MQTT-bridge.py. It should automatically connect to the TTN broker and reply the messages sent by the devices to the AWS broker.
Now the data should arrive to the web dashboard.
DemonstrationFor a demonstration of the project check the video
LinksLinkedIn profile: https://www.linkedin.com/in/simone-bartolini-9628561a3
Github repo: https://github.com/51m0n397/IoT2020Course
Youtube video: https://youtu.be/epP26noZgYs


Comments