

Software apps and online services | ||||||
 |
| |||||
 |
| |||||
This is the second part of my IoT environmental station project that I've developed as part of the IoT course during my Engineering in Computer Science master's degree at Sapienza - University of Rome.
In the first part I configured an MQTT broker on AWS IoT together with a rule that saves the messages in a DynamoDB database. I also developed a web dashboard to display the data and a python script to simulate the environmental station.
In this second part the python script is replaced by a program for RiotOS, an operating system for embedded devices, running on the emulated "native" board.
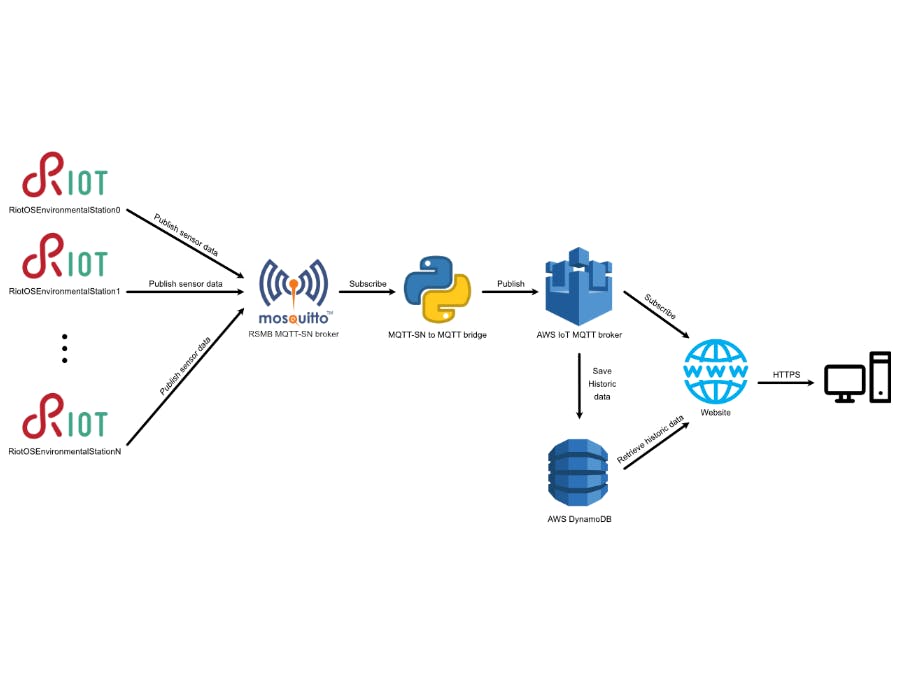
ArchitectureThe architecture of the project is the following:
- The IoT devices publish the sensor data on a topic using MQTT-SN;
- Eclipse mosquito RSMB is used as a MQTT-SN broker;
- A python script acts as an MQTT-SN to MQTT bridge subscribing to the topics on the MQTT-SN broker and republishing the messages on the same topics but over the AWS IoT MQTT broker;
- As in the first part of the project AWS saves the messages received into a DynamoDB table;
- A web-based dashboard subscribes to the MQTT channels to display the current state of the sensors and queries the database to show the values received during the last hour.
If you haven't already done it, check the first part of the project and follow all of the steps for configuring AWS. We need to add only one thing: the policy for allowing the MQTT-SN to MQTT bridge to publish.
Log-in in the AWS console website, go into the "AWS IoT" section, click on "Secure", Policies" and then "Create".
Give a name to the policy, then in the “Action” field write “iot:Connect”. AWS will automatically populate the “Resource ARN” field, replace the “replaceWithAClientId” part with “MQTTSNbridge”. Now click on “Add statement” and write “iot:Publish” in the “Action” field of the new statement. This time replace “replaceWithATopic” in the Resource ARN section with “stations/*”. Finally, make sure to tick the “Allow” box under “Effect” in both statements and click on “Create”.
To associate this new policy to the certificate you created in the first part of the project go to the “Certificates” page, click on the three dots over your certificate and then click on “Attach policy”. Now select both the previous policy for allowing the virtual stations of the python script and this new policy and click on "Attach".
The web dashboard is the same as the first part, it's a simple html+javascript website that you can run locally or upload to a hosting service. Check the first part of the project for more information about how it works and how to configure it.
Testing the code on RiotOS native emulatorRiotOS provides a "virtual board" that can be used to test the code before deploying it on real hardware. I assume you have already set-up your RiotOS development environment, you can check this for more information.
Let's start by cloning my Github repo with the command
git clone --recursive https://github.com/51m0n397/IoT2020Course.gitThis will download all of my code plus the RiotOS and the mosquito.rsmb repositories that I've added as submodules.
RSMB MQTT-SN broker
To compile mosquito.rsmb open a terminal inside the folder "MQTTSN-broker/mosquito.rsmb/rsmb/src" and issue the command make. To run it just type
./broker_mqtts ../../../config.confThis will start the broker on the port 1885 as written in the file "config.conf".
If you want to know more about rsmb check this Github repository https://github.com/eclipse/mosquitto.rsmb.
RiotOS environmental station
Go in the folder "riot_environmental_station". Here you can see a "main.c" file and a makefile plus the RIOT folder. The "main.c" is the environmental station. It uses RiotOS shell functionality so rather than starting as soon as the board is powered on it waits for the user to enter a command. In addition to the env_station command for starting the station and the basic RiotOS commands, I've included a few networking commands like ping6 and ifconfig.
Before using it let's give a brief look at the code.
In the main() function it initializes a message queue used by the ping6 command, it starts the thread that manages the emcute MQTT-SN library and then starts the shell.
int main(void) {
    /* The main thread needs a msg queue to be able to run `ping6` */
    msg_init_queue(queue, (sizeof(queue) / sizeof(msg_t)));

    /* Start the emcute thread */
    thread_create(stack, sizeof(stack), EMCUTE_PRIO, 0,
                  emcute_thread, NULL, "emcute");

    /* Start shell */
    char line_buf[SHELL_DEFAULT_BUFSIZE];
    shell_run(shell_commands, line_buf, SHELL_DEFAULT_BUFSIZE);

    /* Should be never reached */
    return 0;
}
This are the functions for connecting to and disconnecting from the broker and for publishing the messages:
/* Function for disconnecting from the mqttsn gateway. */
static int discon(void) {
    int res = emcute_discon();
    if (res == EMCUTE_NOGW) {
        puts("error: not connected to any broker");
        return 1;
    }
    else if (res != EMCUTE_OK) {
        puts("error: unable to disconnect");
        return 1;
    }
    puts("Disconnect successful");
    return 0;
}

/* Function for publishing data.
 * The first argument is the string of the topic,
 * the second argument is the message to send,
 * the third argument is the QoS level.
 */
static int pub(char *topic, char *data, int qos) {
    emcute_topic_t t;
    unsigned flags = EMCUTE_QOS_0;

    switch (qos) {
        case 1:
            flags |= EMCUTE_QOS_1;
            break;
        case 2:
            flags |= EMCUTE_QOS_2;
            break;
        default:
            flags |= EMCUTE_QOS_0;
            break;
    }


    /* Step 1: get topic id */
    t.name = topic;
    if (emcute_reg(&t) != EMCUTE_OK) {
        puts("error: unable to obtain topic ID");
        return 1;
    }

    /* Step 2: publish data */
    if (emcute_pub(&t, data, strlen(data), flags) != EMCUTE_OK) {
        printf("error: unable to publish data to topic '%s [%i]'\n",
               t.name, (int)t.id);
        return 1;
    }

    printf("published %s on topic %s\n", data, topic);
    return 0;
}

/* Function for connecting to the mqttsn gateway.
 * The first argument is the address the second is the port.
 */
static int con(char *addr, int port) {
    sock_udp_ep_t gw = { .family = AF_INET6, .port = EMCUTE_PORT };
    gw.port = port;

    /* Parse address */
    if (ipv6_addr_from_str((ipv6_addr_t *)&gw.addr.ipv6, addr) == NULL) {
        printf("error parsing IPv6 address\n");
        return 1;
    }

    if (emcute_con(&gw, true, NULL, NULL, 0, 0) != EMCUTE_OK) {
        printf("error: unable to connect to [%s]:%i\n", addr, port);
        return 1;
    }

    printf("Successfully connected to gateway at [%s]:%i\n", addr, port);
    return 0;
}
The sensors data is stored using a struct:
/* Struct containing the sensors data. */
typedef struct sensors {
    int temperature;
    int humidity;
    int windDirection;
    int windIntensity;
    int rainHeight;
} sensors_t;
This function updates the sensors data:
/* Function for updating the sensor data. */
static void update_sensors(sensors_t *sensors) {
    saul_reg_t *temp_dev = saul_reg_find_type(SAUL_SENSE_TEMP);
    if (temp_dev == NULL) {
        sensors->temperature = rand_int(-50, 50);
    }
    else {
        phydat_t temp_data;
        saul_reg_read(temp_dev, &temp_data);
        float temp = (float) *temp_data.val;
        sensors->temperature = (int)round(temp/100);
    }

    saul_reg_t *hum_dev = saul_reg_find_type(SAUL_SENSE_HUM);
    if (hum_dev == NULL) {
        sensors->humidity = rand_int(0, 100);
    }
    else {
        phydat_t hum_data;
        saul_reg_read(hum_dev, &hum_data);
        float hum = (float) *hum_data.val;
        sensors->humidity = (int)round(hum/100);
    }

    sensors->windDirection = rand_int(0, 360);
    sensors->windIntensity = rand_int(0, 100);
    sensors->rainHeight = rand_int(0, 50);
}
To get the values from the sensors it uses RiotOS saul library. By default this library does not support wind direction, wind intensity and rain height sensors but it can be expanded to support them. In this example the values for these three sensors are generated at random. For the temperature and the humidity sensors it will ask the OS if a sensor is connected to the board, if the answer is yes the real sensor value will be retrieved, otherwise it will be generated randomly. This means that when tested over the RiotOS native emulator the values of the sensors will be all random numbers. But if you run this code on a compatible board with temperature and humidity sensors connected to it, it will retrieve the real values. We are using random numbers simply for testing purposes, to check that the communication is working and that the correct values are displayed in the web dashboard, of course in a real deployment we would use real sensors.
Finally this it the code for the env_station command:
/* Enviromental station shell command.
 * It takes in input the address and the port of the gateway,
 * the id of the station and the seconds to pass between each publish.
 * It regularly updates the sensor data and publishes it to the topic
 * stations/RiotOSEnvironmentalStation + the id of the station.
 */
static int cmd_env_station(int argc, char **argv) {
    if (argc < 5) {
        printf("usage: %s <address> <port> <id> <seconds>\n", argv[0]);
        return 1;
    }

    char topic[64];
    sprintf(topic, "stations/RiotOSEnvironmentalStation%d", atoi(argv[3]));

    sensors_t sensors;
    char data[128];

    while (1) {
        if (con(argv[1], atoi(argv[2])))
            continue; /* If it cannot connect it retries */

        update_sensors(&sensors);

        sprintf(data, "{\"temperature\": \"%d\", \"humidity\": \"%d\", "
                      "\"windDirection\": \"%d\", \"windIntensity\": \"%d\", "
                      "\"rainHeight\": \"%d\"}",
                      sensors.temperature, sensors.humidity,
                      sensors.windDirection, sensors.windIntensity,
                      sensors.rainHeight);

        if (pub(topic, data, 0)) {
            /* If it cannot publish it disconnects and restarts the loop */
            discon();
            continue;
        }

        discon();

        xtimer_sleep(atoi(argv[4]));
    }

    return 0;
}
The user needs to provide the address and port of the broker, a number that will identify this station and the seconds to pass between each publish. The program will enter a loop of updating the sensors data, connecting to the broker, publishing, disconnecting and then waiting the inputted seconds. The data will be published on the topic "stations/RiotOSEnvironmentalStationID" where ID is the identifier of the station provided in the input.
To test the code on the native emulator we need first to configure the tap interface and assign a site-global prefix to it. Open a terminal in the riot_environmental_station folder and type the commands:
sudo RIOT/dist/tools/tapsetup/tapsetup -c 2
sudo ip a a fec0:affe::1/64 dev tapbr0
Before compiling we need to load the right version of GNU ARM embedded toolchain with the command:
source /opt/riot.sourceNow we can compile and run the code in the native emulator with this command (if it gives you the error ioctl TUNSETIFF: Operation not permitted try again with sudo):
make all term PORT=tap0You are now inside the RiotOS shell, you can see the commands available by typing help. This should be the output:
Command             Description
---------------------------------------
env_station         Environmental station
reboot              Reboot the node
ps                  Prints information about running threads.
ping6               Ping via ICMPv6
random_init         initializes the PRNG
random_get          returns 32 bit of pseudo randomness
nib                 Configure neighbor information base
ifconfig            Configure network interfaces
saul                interact with sensors and actuators using SAUL
The last thing we need to do before starting the station is assigning a site-global address with the same prefix as before to the tap interface with this command:
ifconfig 5 add fec0:affe::99Finally, we can start the environmental station:
env_station fec0:affe::1 1885 0 10It should start publishing to the topic "stations/RiotOSEnvironmentalStation0" (as we inputted the ID 0) at intervals of 10 seconds.
For testing purposes let's launch another station. Open another terminal in the same folder and issue the command:
make all term PORT=tap1Notice that we are using a different port this time (tap1 instead of tap0).
Once inside RiotOS type
ifconfig 5 add fec0:affe::99And finally launch the station with
env_station fec0:affe::1 1885 1 10Notice the different ID (1 instead of 0).
MQTT-SN to MQTT bridge
The messages are arriving to the MQTT-SN broker but not to the AWS IoT broker and thus to our web dashboard. To make this last step we need to start the MQTT-SN to MQTT bridge.
Before launching it you need to insert your AWS credentials. If you have followed the first part of the project you should already have downloaded your certificates and the private key and put them in the folder "environmental_station". Now go to the folder "MQTTSN-bridge" and open the file "MQTTSNbridge.py" in your favorite editor. Find this section of the code:
# Athenticating with the AWS mqtt broker.
# MAKE SHURE to insert the correct name for your endpoit,
# your certificates and the key.
mqttClient.configureEndpoint("a29wnmzjyb35x8-ats.iot.us-east-1.amazonaws.com",
                             8883)
mqttClient.configureCredentials(certFolder + "AmazonRootCA1.pem.crt",
                                certFolder + "e0a2ae42f8-private.pem.key",
                                certFolder + "e0a2ae42f8-certificate.pem.crt")
Insert the correct name for your endpoint, your certificates and the key.
The script uses AWSIoTPythonSDK so remember to install it if you haven't done it already with the command:
pip3 install AWSIoTPythonSDKNow open a terminal in the folder "MQTTSN-bridge" and run the python script with the command:
python3 MQTTSNbridge.pyIt will ask you to input the IDs of the station separated by ", " so write
0, 1Great! You should see now see the messages arriving to the web dashboard.
DemonstrationFor a demonstration of the project check the video
What's nextCheck the third part of the project were the environmental station program runs on ST B-L072Z-LRWAN1 boards and uses LoRaWAN for the communication.
LinksLinkedIn profile: https://www.linkedin.com/in/simone-bartolini-9628561a3
Github repo: https://github.com/51m0n397/IoT2020Course
Youtube video: https://www.youtube.com/watch?time_continue=3&v=aDZ3S6hlsIA&feature=emb_title


Comments