


Hardware components | ||||||
 |
| × | 1 | |||
| × | 1 | ||||
| × | 1 | ||||
| × | 1 | ||||
| × | 1 | ||||
| × | 1 | ||||
| × | 1 | ||||
| × | 1 | ||||
| × | 1 | ||||
| × | 1 | ||||
Software apps and online services | ||||||
| ||||||
| ||||||
| ||||||
| ||||||
Hand tools and fabrication machines | ||||||
| ||||||
| ||||||
 |
| |||||
Our team for Naval Artificial Intelligence Research (NAIR) Laboratory is associated with the Electrical Engineering Department of the R.O.C. Naval Academy (Kaohsiung, Taiwan, R.O.C.) and comprises a group of college students who enjoy conducting experiments and putting theories into practice. The team, led by Yi-Tung Chan, who is an Assistant Professor, has two sophomores (Chun-Hao Huang and Chun-Han Chen) and two juniors (Tai-Wei Hou and Yu-Lun Huang).
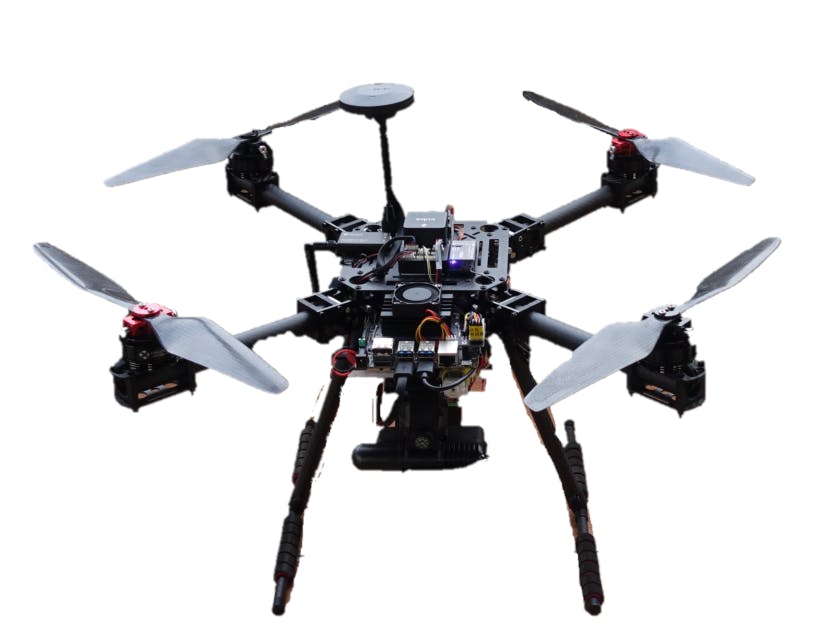
In this project, we have used the advanced technologies of artificial intelligence (AI) and deep learning to create an autonomous drowning-prevention edge device (ADED) for reducing the number of lives lost because of drowning. The ADED is implemented on the NVIDIA Jetson Nano Developer Kit (hereinafter to be referred as “Nano”), which is the smallest and most powerful GPU-based edge computing device for autonomous prevention from drowning. The device design is shown in Fig. 1. The ADED consists of three modules: 1) anti-drowning edge computing module as shown in Fig. 2, 2) drone, and 3) rescue module (lifebuoy and thrower).
In emergencies, the time, distance, and ability to provide floatation to a drowning person rapidly are critical. In this project, an implementation of deep-learning-based edge computing with the integration of Nano and drones is proposed to prevent drowning incidents. Unlike traditional lifebuoys, our proposed device, named autonomous drowning-prevention edge device (ADED), can not only actively prevent people from drowning, but also reduce the risk of rescue. The schematic illustration of the ADED is shown in Fig. 3.
The design diagrams of the proposed ADED drone are shown in Fig. 4. The ADED drones can be set up as a group of work units somewhere on the shore, using wireless charging stations to provide power. Each drone can take turn to patrol a safety responsibility area. If a drowning person is encountered during the patrol, a life-saving tool, such as a lifebuoy, is thrown to the person for adequate safety in the water until external help arrives. If one drone drains out of power, it returns to the wireless charging stations and another one takes its place. Any drone can take over the work of another drone at any time. The lifeguards on the shore only need to pay attention to any unexpected incidents for launching emergency rescues at any time. All of the processes, such as fighting, patrolling, drowning-prevention, and charging, can be integrated with the proposed ADED as a rescue system.
In Fig. 4, the design diagrams of ADED are as follows: (a)Wireless charging; (b)Automatic take off and cruise; (c)Automatic detection of a drowning person; (d)Actively throwing lifebuoy and warning lifeguards; (e) Once contact is made with the water, the lifebuoy inflates within seconds until help arrives; (f)Drone hand-off and charging.
2. BackgroundAccording to a report from the World Health Organization (WHO) [1], drowning is the 3rd leading cause of unintentional deaths worldwide, accounting for 7% of all injury-related deaths. More than 360, 000 people drown globally each year. Therefore, drowning is a major public health concern [1, 2]. Notably, over half of the world's drowning cases occur in the Western Pacific regions and South-East Asian regions.
Despite the development of various types of surveillance for object detection or recognition in maritime locations, maritime visual surveillance remains a challenge owing to the complex, unconstrained, and diverse nature of such environments. Electro-optical sensors are typically used for security-related visual surveillance purposes, such as ship tracking, counting, and classification [3-6]. However, as 24-hour manual surveillance is impractical, achieving automatic maritime surveillance using the object and foreground detection has become an important goal. Besides, the development of video surveillance applications, for utilization in maritime environments, has been hindered by the noise and complexity of sea scenes that arise from factors such as water motion, dynamic backgrounds, waves, sea-foam, water spray, reflections, wave ripples, and wake [5, 7]. Furthermore, because harbors comprise a vast area and are not patrolled or monitored all the time even if it is a naval port, the crucial period to rescue a drowning person is overlooked. Although numerous tools have been designed to supply lifeguards to save people from drowning, such as the remote-controlled lifebuoy, these tools are limited in action; this implies that these can be used only when the lifeguards notice that someone is drowning. However, in reality, drowning accidents occur in a fraction of time and are difficult to notice. Specifically, it is nearly impossible for security guards to always keep a close watch on all the monitors simultaneously, which renders them unable to immediately notice someone drowning. Furthermore, conventional warning systems cannot rescue people immediately using edge computing [8-14].
3. Project AnalysisThe product positioning is analyzed as shown in Fig. 5. As far as the current situation is concerned, we only need to rely on two ways for lifesaving on the water: first is to wear life-saving appliances such as life jackets and lifebuoys. Second, rely on lifeguards to find out promptly. Without considering the first way, the scenario of the second way is not optimistic. While the first way is safe, the second way has hidden risks. Lifeguards are professionally trained and can save people. However, the reality is cruel. Water doesn't tell if the person can swim, because people who can swim can also drown probably. So the risk of sending a lifeguard to a rescue operation when someone is drowning is considerable. While worrying about the safety of the drowning person, we often ignore the life-threatening risks of the lifeguards. The objective of our project is to reduce the life-risk factor of the lifeguards and ensure the safety of the drowning person.
Both the above ways have their own advantages. One is safe and convenient; the other can actively help the drowning person. However, either of the above two ways has two biggest problems. One is that it is too passive and the other is that it cannot work for long hours. So our design combines the individual advantages of these ways and reduces their respective disadvantages. We also enhance the performance of this project. It can provide faster assistance and rescue for long-range targets. With the continuous development of technology, AI-based drowning-prevention drones look forward to achieve success in the following facets as illustrated in Fig. 6:
1. Rescue Department—Timely positioning so as to reach an accident scene immediately after the accident.
2. Lifeguards—Rescue a drowning person with the aid of AI-based drowning-prevention drone, without entering the water.
3. Drowning person—Reduce the rescue time and immediate attention from rescue department.
Design Strategy: 5W1H
- WHAT— Autonomous drowning-prevention edge device (ADED)
- WHO— Recreational water industry operator, fire department. Water park, swimming pool, harbor, and rescue department.
- WHY— Reduce accidental mortality in the water.
- WHERE— Dangerous waters, sightseeing waters, harbors.
- WHEN— Drowning accident.
- HOW— To perform remote rescue through image recognition.
For this project, we use the SWOT analysis table as shown in Fig. 7 to analyze the performance.
From the analysis table, we can clearly understand our three strengths as shown in Fig. 7 (a). Reusability literally means, that the patrol drone water rescue system is reusable and does not worry about environmental issues. Secondly, fully automatic search and rescue system makes working hours unlimited. Thirdly, less in-water activities of lifeguards reduce risk to their lives. For example, drowning people are far from the shore, and there are barriers between lifeguards and drowning person. The ADED significantly achieves success in all the above grounds.
The analysis table also lists three weaknesses in Fig. 7 (b) of our project, i.e., Equipment cost, Endurance is limited by battery, Maintenance costs. Equipment cost is a fairly real problem. Since we use drones as a carrier for our identification technology, the cost of the drone itself is relatively expensive, making it applicable to small capital groups. Endurance is limited by the battery life, which obstructs long patrols. Whenever there is no power, one must recharge or replace another charged battery. This also leads to the empty window period for replacing the machine. The solution we propose for this is to use multiple drones to rotate operations. The third weakness is maintenance costs. All device shall be regularly maintained to ensure their effectiveness.
When we look into the future, we will find that we have many opportunities and threats. We have proposed three opportunities for our project: drowning is the 3rd leading cause for unintentional deaths worldwide, mature technique of edge computing device, and costly human resource. Firstly, as we mentioned earlier that more than 360, 000 people drown worldwide each year, ADED will undoubtedly alleviate this problem. Secondly, as the image recognition technology is maturing day by day, drowning-prevention technology can be highly benefited. Thirdly, since human resources are so much precious, they will be replaced in the future by machines, including lifeguards, in rescue operations.
Lastly, we proposed two threats for this project, namely bad weather and humanitarian issues. Bad weather leads to an unstable flight of our drone, or poor visibility of the camera, which will reduce the accuracy of the detection system. Finally, although slightly difficult to imagine that humanitarian issues can pose a threat, but after the system is popularized, no lifeguards on the beaches and still accidents occurring would be quite controversial. Increasing accuracy and strengthen edge computing capabilities to minimize the probability of misjudgment would be the way forward to focus on to eradicate this threat.
4. Project ImplementationThe flowchart of the proposed method is shown in Fig. 8. First of all, we take off our ADED drone, then enter the search mode, and use the routing system built in the flight control system to arrange the search route. The drone keeps searching on the prescribed path until it finds the object. The object detection deep learning model, YOLOv3-tiny, of this project has been used to determine whether this object is human. If not, it returns to the search mode and continue searching for objects; if it is a person, it returns the signal to the flight control system and control the drone to approach the target. After approaching the target, it enables the ADED to determine if the person is drowning.
If not, it returns to the preset course, return to search mode, and continue searching for objects. However, if it is a drowning person, it will confirm the target location and give lifesaving appliances to the drowning person. Since this time it is only designed to carry one lifesaving appliance on the drone, it must return to the starting point afterward, reload another lifesaving appliance and return to a search mode to search for the next target. Specifically, the main steps of our program are as follows:
- 1. After the program is started, we let the drone start patrolling around the four points.
- 2. Next, constantly capture images using the camera.
- 3. The captured image is processed by YOLOv3-tiny to determine whether there is anyone in the image.
- 4. When the image shows a person, the drone starts hovering for a few seconds at a fixed point. Furthermore, the image is send to AlexNet for processing. Otherwise, the drone continues patrolling. AlexNet calculates the drowning confidence by the image sequences.
- 5. When drowning confidence is greater than a certain value (default is 1), the drone considers someone is drowning, otherwise continue patrolling.
- 6. When the drone considers someone drowning, we throw lifesaving equipment and send a warning message to the guard.
- 7. The drone continues to hover at the fixed point to indicate the location of the drowning person.
Anti-drowning edge computing module, which is implemented with Nano, includes two deep learning models as follows: one is an object detection deep learning model, YOLOv3-tiny [17], for detecting human; the other is a drowning person classification deep learning model, proposed by our previous research [15] based on the AlexNet architecture. The drowning classification model is trained by our collected drowning image dataset. First, for collecting the required drowning image dataset, 30 volunteers, unrelated to the study, were asked to enter the water, and they were made to wear three kinds of costumes, which were the navy uniform, navy fatigue dress, and swimsuit, as shown in Fig. 9.
These volunteers were asked to make different poses, as shown in Fig. 10. The cameras chosen for photography were Canon 800D, Sony RX100M3, and Canon55D. The different cameras were used for simultaneous photographing, such that diversified images could be collected from different sensor sources for a robust training model. The drowning poses were classified into two groups: arms above the water and in the water, as illustrated in Figs. 10(a) and 10(b). The not-drowning poses were classified into six groups, including four styles of swimming: backstroke, breaststroke, butterfly stroke, and freestyle stroke, separately, as illustrated in Figs. 10(c), 10(d), 10(e), and 10(f). Further, the two remaining not-drowning poses were that of playing and wearing a lifebuoy or kickboard, as illustrated in Figs. 10(g) and 10(h).
Each pose was separated into four different shot angles as shown in Fig. 11: front view, back view, right view, and left view. Further, the images were divided into two categories of drowning and not-drowning datasets. Finally, the collected dataset had 1, 557 drowning images and 3, 110 not-drowning images. During the pre-processing step, each image was normalized to 224 × 224 resolution.
Next, convolutional neural networks (CNN) were considered in the state-of-the-art model in image recognition tasks. The well-known AlexNet [8] architecture, a CNN implementation, was applied to train the deep learning model for image classification in our study. AlexNet contains eight layers with weights; the first five are convolutional and the other three are fully connected, as depicted in Fig. 12. AlexNet had participated in the ImageNet Contest and had shown good results [8].
The training phase flowchart is illustrated in Fig. 13. Firstly, the collected drowning dataset was randomly partitioned into three-fourth for the training model, as illustrated in Fig. 13(a) and one-fourth for testing model. The training dataset contains 1, 168 drowning images and 2, 333 not-drowning images. The testing dataset contains 389 drowning images and 777 not-drowning images. Firstly, the samples were sent to a computer, as illustrated in Fig. 13(a). Secondly, the code was programmed in the Jupyter Notebook, as illustrated in Fig. 13(b), to create a model for identifying drowning and not-drowning images. Thirdly, as illustrated in Fig. 13(c), a model was deployed into Nano, which can be combined with the camera.
Further, we designed an operation GUI, as illustrated in Fig. 13(b), using Ipywidgets of Jupyter for the training procedure, as shown in Fig. 14. As seen in Fig. 14(a), “dataset” and “‘category” sheet can import the training images from the chosen category. Further, the computer shows the number of selected training images in the “count” text field. The “train” button, as shown in Fig. 14(b), trains our model with the selected training images, and the field of “‘progress” shows the progression made by the computer. Finally, we can save or load the training model using the buttons shown in Fig. 14(c).
In the training phase, as shown in Fig. 15, the training accuracy increases linearly over time, until it reaches approximately 100%, whereas the training loss keeps decreasing linearly until it reaches approximately 0. The training loss reaches its minimum after 13 epochs and then stalls. Specifically, after 13 epochs, the proposed model’s prediction accuracy reaches approximately 0.99 for the training dataset. Thus, we stop the training phase and use the “evaluate” button, as shown in Fig. 14(b), for testing the training model. Finally, the model’s accuracy is determined to be 0.85 for the testing dataset.
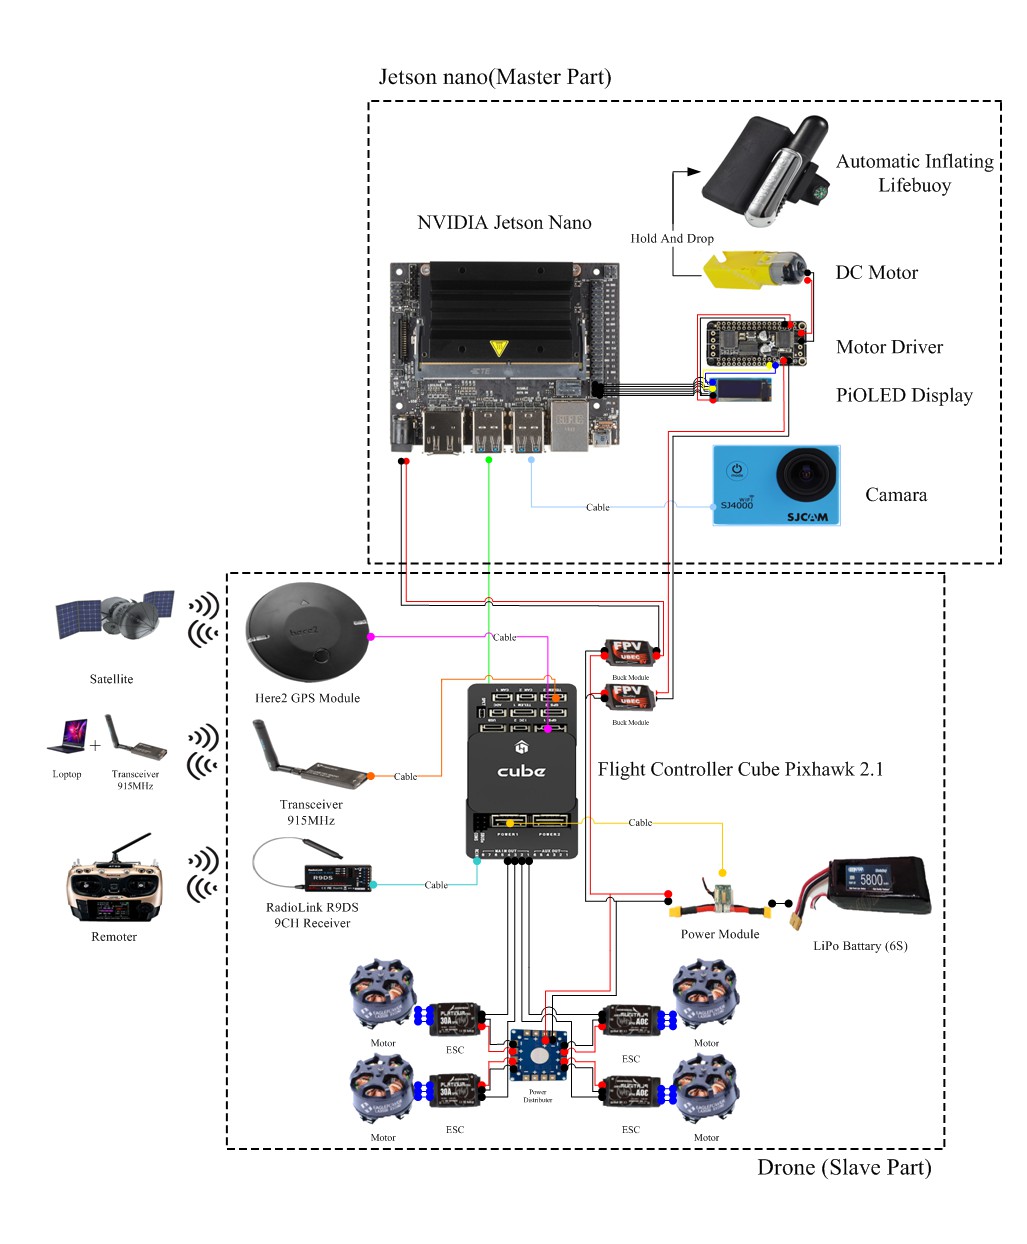
This ADED project of hardware design includes three main modules: 1) anti-drowning edge computing module, 2) drone, and 3) rescue module (life-saving appliance and thrower). As the top-2 modules are the core components, we introduce them and their integration in this section. The hardware architecture design is shown in Fig. 16.
The drowning prevention module was implemented on NVIDIA Jetson Nano, which is the smallest and most powerful GPU-based edge computing device, for validating the proposed method. The module design is shown in Fig. 17.
First, the Nano (Fig. 17-1) is secured to a platform with a double-sided foam tape to connect the drone main plate, power end of the Nano (Fig. 17-1) is welded on the two wires reserved as the power input (Fig. 17-1 lower-left corner), and small display board (Fig. 17-5) is inserted into the foot of the Nano (Fig. 17-1). The lens (Fig. 17-6) is connected to the Nano (Fig. 17-1) USB end, the signal end of Nano above the small display board (Fig. 17-5) is welded to the motor end (Fig. 17-3) with the motor drive module (Fig. 17-4), and the motor is secured with a double-sided foam tape under the Nano (Fig. 17-1) and motor drive module (Fig. 17-4) is fixed under the motor (Fig. 17-3).
4.2.2 DroneFirst, we build up the carbon fiber rack (shown in Figs. 18 and 19), next we install the drone rotor motor, make sure the head of the drone is facing forward, from the left front for the number one of a motor clockwise direction to the fourth motor. And then we determine that the screws are applied on glue and locked, make the wire invisible and put into the hollow rack and using the soldering iron weld the connector. Using the flight motor test instrument to test the motor steering and then install the motor referred to (Fig.20). We combine the motor (Fig. 21-4) and electronic speed controller (Fig. 21-5), electronic speed controller (Fig. 21-5) is tied with the wire with a strap and is pasted to the case, and then the power distribution panel (Fig. 21-6) is fixed in the middle of the case with double-sided foam tape, the distance from the four electronic speed controller to the power distribution panel (Fig. 21-6) is taken, and the excess wire is cut off. Using soldering iron, the wires of two sets of 5 V bucked mold (Fig. 21-10) and the power supply module are welded (Fig. 21-2) onto the power distribution panel. The power supply module (Fig. 21-2) and the buck module (Fig. 21-10) should be fixed with double-sided foam tape and the power supply module connector (Fig. 21-2) should be in the same direction as the battery connector (Fig. 21-3).
Secondly, the flight control (Fig. 21-1), GPS (Fig.21-9), digital transmission (Fig. 21-8), remote control reception (Fig. 21-7) are fixed into the drone for further flight control (Fig. 21-1). The GPS (Fig. 21-9) must be in the same direction as the machine, and the aforementioned wire of the instrument and electronic speed controller (Fig. 21-5) signal end in accordance with the number connected with the flight control (Fig. 21-1) (Refer to Fig. 21 for the port connection method). It should be made sure that the wire of the instrument is not higher than the operating range of the propeller blade, is fixed with a girdle, and all kinds of antennas have to face down to keep propeller blade out of the way.
4.2.3 System integrationFinally, the above mentioned modules for integration: 1. based on deep learning drowning detection edge computing module, 2. drone, and 3. rescue module (thrower and life-saving apparatus) are shown in Fig. 22.First, part A of the platform with screws is fixed to the machine and the Nano (A-1) interface surface is faced forward to operate conveniently. The lens (A-6) are mounted in the belly and they face the ground at approximately 30° and the excess wire roll is tied to the landing frame with a girdle attached to the main plate, a set of pressure-lowering modules (B10-1) output link Nano (A-1) power input end, and another set (B10-2) is welded to the motor drive module (A-4) (circuit access reference circuit diagram Fig. 17), the A and B partial integration circuit diagram is shown inFig. 22.
The life-saving apparatus is hung onto the thrower, as shown in Fig. 23, and make the inflatable life-saving device (A-2) is attached to the plastic linkage of the motor dropping device (A-3).
Finally, a final check is performed to ensure that each part is fixed and installed correctly as shown in Fig. 24 after fitting the pieces of all the models together.
The source code of the implemented project is divided into three parts: 1) main.py, 2) copter_control.py, and 3) implement.py. The architecture of the proposed code is shown in Fig. 25:
The main.py is main program in our ADED. The function of the code is to combe the processes of drowning inference (implement.py) and flight controlling (copter_control.py) by using multi-processessing way to run the main program.
from implement import image
from ctypes import c_bool
import torch.multiprocessing as mp
import multiprocessing as rmp
from copter_control import takeoff_and_patrolling

# Combining the processes of drowning inference (implement.py) and flight controlling (copter_control.py) by using
# multi-processessing way to run the main program.
if __name__ == '__main__':
    mp.set_start_method('spawn')
    stageA = mp.Value(c_bool, True)
    stageB = mp.Value(c_bool, True)
    p1 = mp.Process(target=image, args=(stageA,stageB,0))
    p2 = rmp.Process(target=takeoff_and_patrolling, args=(5,stageA,stageB))
    p1.start()
    p2.start()
    p1.join()
    p2.join()
The copter_control.py makes the drone patrolling around four points in a field, such as swimming pool, and hovering the drone in the sky while it detect someone. Then, if our device inference someone is drowning, it will throw the lifebuoy and hover overhead the drowning person to further indicate the position of drowning person.
from __future__ import print_function
import time
from dronekit import connect, VehicleMode, LocationGlobalRelative

def takeoff_and_patrolling(aTargetAltitude, stageA, stageB):
    """
    First, this function makes the drone patrolling around four points in a field, such as swimming pool, and hovering the drone in the sky while it detect someone. Then, if our device inference someone is drowning, it will throw the lifebuoy and hover overhead the drowning person to further indicate the position of drowning person.

    Args:
        aTargetAltitude: determine the altitude of the drone after takeoff
        stageA: A status condition of the drone. When the value is True, the drone will keep patrolling. When the drone detects a person, its value will become False and begin to hover at the fixed point.
        stageB: A status condition of the drone. When the value is True, the drone will keep patrolling. When the drone consider someone is drowning, its value will become False and start hovering at the fixed point to indicate the point of drowning person.
    Return:
         None
    """

    connection_string = '/dev/ttyACM0'
    print('Connecting to vehicle on: %s' % connection_string)
    vehicle = connect(connection_string, wait_ready=True)

    while not vehicle.is_armable:
        print(" Waiting for vehicle to initialise...")
        time.sleep(1)

    print("Arming motors")
    vehicle.mode = VehicleMode("GUIDED")

    while not vehicle.armed:
    # This code is an insurance for drone operator to have time to stay away from the drone before starting the flight.
        print(" Waiting for arming...")
        time.sleep(1)

    print("Taking off!")
    vehicle.simple_takeoff(aTargetAltitude)  # Take off to target altitude

    while True: # Break and return from function just below target altitude.
        print(" Altitude: ", vehicle.location.global_relative_frame.alt)
        if vehicle.location.global_relative_frame.alt >= aTargetAltitude * 0.95:
            print("Reached target altitude")
            break
        time.sleep(1)

    mark = 0
    while stageB.value:
        time.sleep(2)
        if stageA.value:
            location_frame = vehicle.location.global_relative_frame
            if mark == 0:
                print("Going towards first point")
                point1 = LocationGlobalRelative(22.703998, 120.288625, 5)
                vehicle.simple_goto(point1, groundspeed=1)
                if '%.5f' % location_frame.lat == '%.5f' % point1.lat:
                    if '%.5f' % location_frame.lon == '%.5f' % point1.lon:
                        if '%.0f' % location_frame.alt == '%.0f' % point1.alt:
                            mark = mark + 1
                        else:
                            pass
                    else:
                        pass
                else:
                    pass
            elif mark == 1:
                print("Going towards second point")
                point2 = LocationGlobalRelative(22.703687, 120.288624, 5)
                vehicle.simple_goto(point2, groundspeed=1)
                if '%.5f' % location_frame.lat == '%.5f' % point2.lat:
                    if '%.5f' % location_frame.lon == '%.5f' % point2.lon:
                        if '%.0f' % location_frame.alt == '%.0f' % point2.alt:
                            mark = mark + 1
                        else:
                            pass
                    else:
                        pass
                else:
                    pass
            elif mark == 2:
                print("Going towards third point")
                point3 = LocationGlobalRelative(22.703697, 120.288459, 5)
                vehicle.simple_goto(point3, groundspeed=1)
                if '%.5f' % location_frame.lat == '%.5f' % point3.lat:
                    if '%.5f' % location_frame.lon == '%.5f' % point3.lon:
                        if '%.0f' % location_frame.alt == '%.0f' % point3.alt:
                            mark = mark + 1
                        else:
                            pass
                    else:
                        pass
                else:
                    pass
            elif mark == 3:
                print("Going towards the forth point")
                point0 = LocationGlobalRelative(22.704047, 120.288444, 5)
                vehicle.simple_goto(point0, groundspeed=1)
                if '%.5f' % location_frame.lat == '%.5f' % point0.lat:
                    if '%.5f' % location_frame.lon == '%.5f' % point0.lon:
                        if '%.0f' % location_frame.alt == '%.0f' % point0.alt:
                            mark = 0
                        else:
                            pass
                    else:
                        pass
                else:
                    pass
        else:
            point = vehicle.location.global_relative_frame
            vehicle.simple_goto(point, groundspeed=1)
    point = vehicle.location.global_relative_frame
    vehicle.simple_goto(point, groundspeed=1)
The implement.py is the program for inferring drowning person by using camera mounted on the drone.
import time
import numpy as np
import tensorrt as trt
import pycuda.driver as cuda
import pycuda.autoinit
import cv2
import torchvision
import torch
import torch.nn.functional as F
import torch.multiprocessing as mp
from PIL import ImageDraw, Image, ImageFont
from run_motor.main import save_drowning
from image_support.utils import preprocess
from image_support import common
from image_support.data_processing import PreprocessYOLO, PostprocessYOLO, ALL_CATEGORIES
import os

def load_model():
    """
    Introduce the model of Alexnet
    Returns:
        the model of Alexnet
    """
    alx_categories = ['drowning', 'not_drowning']
    device = torch.device('cuda')
    model = torchvision.models.alexnet(pretrained=True)
    model.classifier[-1] = torch.nn.Linear(4096, len(alx_categories))
    model = model.to(device)
    model.load_state_dict(torch.load('image_support/my_model.pth'))
    return model


def draw_bboxes(image_raw, bboxes, confidences, categories, all_categories, model, stageA, stageB):
    global start, danger_index
    """
    Draw the danger index and the results of YOLOV3-Tiny detection on the image.
    Args:
        image_raw: a raw PIL Image
        bboxes: NumPy array containing the bounding box coordinates of N objects, with shape (N,4).
        categories: NumPy array containing the corresponding category for each object, with shape (N,)
        confidences: NumPy array containing the corresponding confidence for each object, with shape (N,)
        all_categories: a list of all categories in the correct ordered (required for looking up the category name)
        model: the model of Alexnet
        stageA: A status condition of the drone. When the value is True, the drone will keep patrolling. When the drone detects a person, its value will become False and begin to hover at the fixed point.
        stageB: A status condition of the drone. When the value is True, the drone will keep patrolling. When the drone consider someone is drowning, its value will become False and start hovering at the fixed point to indicate the point of drowning person.
    Returns:
        the processed image
    """
    original_image = image_raw
    draw = ImageDraw.Draw(image_raw)
    alx_categories = ['drowning', 'not_drowning']
    stageA.value = True
    font = ImageFont.truetype(font='home/jetbot/ttf/time_new_roman.ttf',size=22)
    try:
        for box, score, category in zip(bboxes, confidences, categories):
            x_coord, y_coord, width, height = box
            left = max(0, np.floor(x_coord + 0.5).astype(int))
            top = max(0, np.floor(y_coord + 0.5).astype(int))
            right = min(image_raw.width, np.floor(x_coord + width + 0.5).astype(int))
            bottom = min(image_raw.height, np.floor(y_coord + height + 0.5).astype(int))
            if all_categories[category] == 'person':
                draw.rectangle(((left, top), (right, bottom)), outline='green',width=3)
                draw.text((left, top - 12), '{0} {1:.2f}'.format(all_categories[category], score), fill='green',width=2)
                start = time.time()
            else:
                draw.rectangle(((left, top), (right, bottom)), outline='blue',width=3)
                draw.text((left, top - 12), '{0} {1:.2f}'.format(all_categories[category], score), fill='blue',width=2)
    except:
        pass

    if time.time() - start <= 7:
        image_ndarray = cv2.cvtColor(np.asarray(original_image), cv2.COLOR_RGB2BGR)
        image_ndarray = cv2.resize(image_ndarray, (224, 224))
        preprocessed = preprocess(image_ndarray)
        output = model(preprocessed)
        output = F.softmax(output, dim=1).detach().cpu().numpy().flatten()
        alx_category_index = output.argmax()
        draw.text((10,40), 'If someone is drowning: ' + str(alx_categories[alx_category_index] == 'drowning'),
                         fill=(255, 0, 0), width=8, font = font)
        print('If someone is drowning: ' + str(alx_categories[alx_category_index] == 'drowning'))
        if alx_categories[alx_category_index] == 'drowning':
            stageA.value = False
            danger_index = calculate_danger(danger_index, True, stageB)
        else:
            danger_index = calculate_danger(danger_index, False, stageB)
        draw.text((10,70),'danger confidence: ' + str(danger_index/20), fill=(255, 0, 0), width=8, font=font)
        print('danger_index:', danger_index)

    return image_raw

def get_engine(engine_file_path):
    """
    The aims of the function is used to include trt files of YOLOV3-Tiny.
     Args:
         engine_file_path: file location
     Returns:
         contents of yolov3-tiny.trt
    """
    TRT_LOGGER = trt.Logger()
    with open(engine_file_path, "rb") as f, trt.Runtime(TRT_LOGGER) as runtime:
        return runtime.deserialize_cuda_engine(f.read())


def calculate_danger(danger_index, if_drowning, stageB):
    """
    This function is used to calculate the drowning confidence. The higher confidence values the function inferences,
    the more danger the person is.
     Args:
         danger_index: the danger index is a counter used to calculate drowning confidence of target.
         if_drowning: Whether there is the drowning person in the image.
         stageB: A status condition of the drone. When the value is True, the drone will keep patrolling. When the drone inference someone is drowning, its value will become False and start hovering at the fixed point to indicate
                the point of drowning person.
     Returns:
         new risk index
    """

    if if_drowning:
        danger_index = danger_index + 1
    else:
        danger_index = danger_index - 1

    if danger_index < 0:
        danger_index = 0
    else:
        pass

    if danger_index > 20:
        save_drowning()
        danger_index = 0
        stageB.value = False
    else:
        pass

    return danger_index

def image(stageA,stageB,k=0):
    """
    Main function that combines the above functions can decide whether throw a lifebuoy or not.
     Args:
        stageA: A status condition of the drone. When the value is True, the drone will keep patrolling. When the drone
                detects a person, its value will become False and begin to hover at the fixed point.
        stageB: A status condition of the drone. When the value is True, the drone will keep patrolling. When the drone inference someone is drowning, its value will become False and start hovering at the fixed point to indicate the point of drowning person.
         k: Deciding the video will store in which folder in the Jeston Nano.
     Returns:
         None
    """

    global start, danger_index

    try:
        os.mkdir('video{}'.format(k))
    except:
        pass

    input_size = 416
    batch_size = 1
    engine_file_path = 'image_support/yolov3-tiny.trt'
    input_resolution_yolov3_HW = (input_size, input_size)
    preprocessor = PreprocessYOLO(input_resolution_yolov3_HW)
    output_shapes = [(batch_size, 255, 13, 13), (batch_size, 255, 26, 26)]
    postprocessor_args = {"yolo_masks": [(3, 4, 5), (0, 1, 2)],
                          "yolo_anchors": [(10,14),  (23,27),  (37,58),  (81,82),  (135,169),  (344,319)],
                          "obj_threshold": 0.5,
                          "nms_threshold": 0.35,
                          "yolo_input_resolution": input_resolution_yolov3_HW}
    postprocessor = PostprocessYOLO(**postprocessor_args)
    print('Finish the setting of yolov3-tiny')
    # The above is the setting of YOLOV3-Tiny

    model = load_model()
    print('Have loaded the model of alexnet')
    # Introducing the model of Alexnet

    danger_index = 0
    # the default of danger index

    start = -8
    # default value for countdown

    fourcc = cv2.VideoWriter_fourcc('m','p','4','v')
    # The filename extension of recorded video sequences.

    with get_engine(engine_file_path) as engine, engine.create_execution_context() as context:
        inputs, outputs, bindings, stream = common.allocate_buffers(engine)

        for i in range(60, 1800, 60):
            print('Start to record the video from {}th second to {}th second'.format(i-60,i))
            cap = cv2.VideoCapture(0)

            video_out = cv2.VideoWriter('./video{}/{}.mp4'.format(k, i), fourcc, 60.0, (640,480))

            start2 = time.time()

            while cap.isOpened():

                ret, image = cap.read()

                start1 = time.time()

                image = cv2.cvtColor(image, cv2.COLOR_BGR2RGB)
                camera_image = Image.fromarray(image)
                # Conversion the data format based on the difference between Opencv (cv2) and Pillow (PIL) package.

                image_raw, image = preprocessor.process(camera_image)
                inputs[0].host = image
                trt_outputs = common.do_inference(context, bindings=bindings, inputs=inputs, outputs=outputs, stream=stream, batch_size=batch_size)
                trt_outputs = [output.reshape(shape) for output, shape in zip(trt_outputs, output_shapes)]
                # Obtain the ROI by using YOLOV3-Tiny

                shape_orig_WH = image_raw.size
                boxes, classes, scores = postprocessor.process(trt_outputs, (shape_orig_WH))
                obj_detected_img = draw_bboxes(image_raw, boxes, scores, classes, ALL_CATEGORIES,
                                                            model, stageA, stageB)

                image = cv2.cvtColor(np.asarray(obj_detected_img), cv2.COLOR_RGB2BGR)

                end1 = time.time()

                fps = 1 / (end1 - start1)
                print('fps :', fps)
                cv2.putText(image, 'fps: '+str(round(fps,2)),(10,30),cv2.FONT_HERSHEY_COMPLEX_SMALL,1,(0,0,255),1)

                video_out.write(image)

                trt_outputs = []

                end2 = time.time()

                if end2 - start2 >= i:
                    video_out.release()
                    cap.release()
                    print('Have recroded the video from {}th second to {} second'.format(i-60,i))
                    break
                # The video is recorded every minute.
            else:
                print('Camera has wrong, please check it')
                video_out.release()
                cap.release()
breakThe implemented drowning detection device, as shown in Fig. 26(a), deployed the training model on Jetson Nano and conducted a realistic experimental application in a swinging pool. The volunteers mimicked drowning poses in the pool for evaluating the proposed device. The drowning detection device and laptop were mounted for the realistic experimental application purposes, as shown in Fig. 26(b).The laptop could remotely control the Jetson Nano using the router and Jupyter software. The prediction results of the model can be seen in Fig. 26(c).
Some examples of the obtained results are shown in Fig. 27. We can see that our drowning detection device can correctly classify the drowning person, as shown in Fig. 27(a). The results demonstrated that our implementation of deep-learning-based edge computing can classify drowning people using NVIDIA Jetson Nano.
As the crucial step of the ADED project is system integration for autonomous carrying while preventing drowning task, we further conducted the flight experiments of system integration of the ADED in realistic outdoor environments. Particularly, we focused on the drone flight control system with our program. The results of the experiment are shown in Figs. 28 and 29.
The ADED’s program were deployed on anti-drowning edge computing module and tested using the flight control system of the drone, as shown in Fig. 28(c). Notably, in addition to the surrounding guards, two people were required to conduct the drone experimental test. One of them was the drone status supervisory operator in charge of monitoring the status of the ADED, as shown in Fig. 28(a). The other was the drone flight control operator, who was responsible for manually intervening in the control of the drone using RC transmitters, to let the drone land safely and avoid serious consequences, as shown in Fig. 28(b), if the ADED went out of control because of a strong blast of wind or bugs in the test program.
The YOLOv3-tiny model, deployed on the anti-drowning edge computing module of the ADED, successfully detected the person and marked them with a green rectangle as regions of interest (ROI) in the flight, as shown in Fig. 29.It can be seen from Figs. 28 and 29 that our ADED can successfully perform drone flight controls such as take-off, patrol, and landing, and detection of people with the drone. The experimental results demonstrated that the system integration of our ADED was successful.
Furthermore, the monitoring software, ArduPilot’s Mission Planner, of flight control is shown in Fig. 30. The basic status of the drone including groundspeed, balance, and number of satellite connections is shown in Fig. 30(a). The complete flight path of the drone is shown in Fig. 30(b); the latitude, longitude, and altitude of the drone are shown in Fig. 30(c).
The implemented ADED, as shown in Fig. 31, deployed our programs and training models on Jetson Nano and conducted a realistic experimental application in a swimming pool. The equipment and staff personnel for the experiment are shown in Figs. 31 and 32, respectively.
First, the compass in the drone was re-calibrated before launching the drone in new environments. The main steps are as follows:
- 1. Open the Mission Planner GUI.
- 2. Enter the interfere of INITIAL SETUP.
- 3. Select the item of Compass.
- 4. Press the Start button, as shown in Fig. 33(a).
- 5. Start rotating the drone and let it calibrate itself in different orientations, as shown in Fig. 34. The calibrating progress is displayed in Fig. 33(b).
- 6. Reconnect the drone when the calibration is completed.
- 7. Start experiments using the ADED drone.
Subsequently, our ADED started to work, and the experiments were conducted using the ADED, as shown in Fig. 35. Please note that the entire take-off, patrolling, drowning person detections, and lifebuoy throwing were autonomous after the start of ADED programs. The operators were responsible for monitoring the status of the ADED, and ready to take over the drone in case the ADED went out of control.
Finally, examples of the obtained results captured by the drone are shown in Fig. 36. The detailed flowchart of the programs can be seen in Fig. 8. The main processes of the ADED are as described in detail below.
- 1. The image captured by the ADED is shown in Fig. 36(a). The experimental information, such as frame per second, is displayed in the upper left corner of the image.
- 2. The ADED denotes the ROIs with green rectangles, while the YOLOv3-tiny model detects people in the video sequences.
- 3. AlexNet classifies the ROIs and calculates the danger confidences. The results are displayed in the upper left corner, as shown in Fig. 36(b).
- 4. The device throws the lifesaving equipment, as shown in Fig. 36(c), when the danger confidence is greater than the threshold value, as shown in Fig. 36(d).
The recorded video of the experimental results using the ADED is shown in Fig. 36 and Video 1.
In this project, the most challenging part was to integrate our program with the flight control system of the drone and stably perform the autonomous processes such as take-off, patrol, hover, people detection, drowning person classification, lifebuoy throwing, and landing.
After many failed attempts in our experiments and modifications in the ADED, we finally obtained the abovementioned successful results. In all the experiments, the worst case was when our ADED drone almost rushed into the water in the process of autonomous control with the program, as shown in Video 2.
Fortunately, we manually intervened to control the drone to avoid serious consequences, and only crashed on the shore, as shown in Figs. 37 and 38. Therefore, based on our failures, we strongly suggest everyone to pay attention to the safety of drones in flight experiments. It is essential that there are sufficient staff personnel present to notice the surrounding conditions at all times and take manual flight control of the drones when necessary. It can ensure the safety of the experiments when the drones are out of control because of bugs in the source codes. Good luck!
7. Conclusion
In this project, we implemented a deep-learning-based edge computing device for the autonomous prevention of drowning. All our work is attributed to the development of the NVIDIA Jetson Nano Developer Kit, which greatly enhanced our edge computing capabilities. Our proposed device can immediately determine whether someone is drowning, thereby saving precious lives. In addition, we showed that edge computing with AI technology can be realistically applied in our lives. Apart from mounting the ADED drones on the shore, they also can be deployed in ships and autonomous boats as an active drowning-prevention system. This can reduce the complexity involved in saving people from drowning and significantly increase safety, both in the harbors and shores.
Appendix- [1] W. H. Organization and others: “Global report on drowning: preventing a leading killer”, World Health Organization, 2014
- [2] W. H. Organization and others: “Preventing drowning: an implementation guide”, World Health Organization, 2017
- [3] W. C. Hu, C. Y. Yang, and D. Y. Huang: “Robust real-time ship detection and tracking for visual surveillance of cage aquaculture, ” Journal of Visual Communication and Image Representation, Vol. 22, No. 6, pp. 543–556, 2011
- [4] D. K. Prasad, C. K. Prasath, D. Rajan, L. Rachmawati, E. Rajabally, and C. Quek: “Challenges in Video Based Object Detection in Maritime Scenario Using Computer Vision”, International Journal of Computer and Information Engineering, Vol. 11, No. 1, pp. 31–36, 2017
- [5] D. D. Bloisi, F. Previtali, A. Pennisi, D. Nardi, and M. Fiorini: “Enhancing Automatic Maritime Surveillance Systems with Visual Information”, IEEE Transactions on Intelligent Transportation Systems, Vol. 18, No. 4, pp. 824–833, 2017
- [6] D. K. Prasad, D. Rajan, L. Rachmawati, E. Rajabally, and C. Quek: “Video Processing From Electro-Optical Sensors for Object Detection and Tracking in a Maritime Environment: A Survey”, IEEE Transactions on Intelligent Transportation Systems, Vol. 18, No. 8, pp. 1993–2016, 2017
- [7] A. Sobral, T. Bouwmans, and E. H. Zahzah: “Double-constrained RPCA based on saliency maps for foreground detection in automated maritime surveillance”, AVSS 2015 - 12th IEEE International Conference on Advanced Video and Signal Based Surveillance, 2015
- [8] Fujii, Hiroaki Izuma, and Shigeru Nonami, "Drowning accident monitoring device", Japan Patent JP2001184574A, July 06, 2001.
- [9] Hajime Fujii, Hiroaki Izuma, and Shigeru Nonami, "Drowning accident monitoring device", Japan Patent JP2001184574A, July 06, 2001.
- [10] H. Chou, Y. J. Chen, S. S. Yang, T. Cheng, and Y. Tsai, "Near-drowning behavior detection method based on support vector machine", China Patent CN103413114A, May 17, 2013.
- [11] Eyal Golan and Tamar Avraham, "Methods and systems for drowning detection", United States Patent US20190034712A1, January 19, 2017.
- [12] Robert Francis Bodi, "System, Device, and Method of Detecting Dangerous Situations", United States Patent US20180040223A1, October 17, 2017.
- [13] T. M. Wang, "Wisdom deep learning water rescue system", Taiwan 107118800A, May 31, 2018.
- [14] Y. T. Chan, Z.H. Chu, C. C. Lee, C. H. Chen, and T.W. Ho, “Implementation of deep-learning-based edge computing for maritime vehicle classification”, In: 8th IIAE International Conference on Industrial Application Engineering (ICIAE 2020), the Institute of Industrial Applications Engineers (IIAE), Shimane, Japan.
- [15] Y. T. Chan, T. W. Hou, Y. L. Huang, W. H. Lan, P. C. Wang, and C. T. Lai, “Implementation of deep-learning-based edge computing for preventing drowning”, In: 8th IIAE International Conference on Industrial Application Engineering (ICIAE 2020), the Institute of Industrial Applications Engineers (IIAE), Shimane, Japan.
- [16] A. Krizhevsky, I. Sutskever, and G. E. Hinton: “ImageNet classification with deep convolutional neural networks”, Communications of the ACM, Vol. 60, No. 6, pp. 84–90, 2017
- [17] https://pjreddie.com/darknet/yolo/


Comments