


Hardware components | ||||||
| × | 1 | ||||
| × | 1 | ||||
| × | 1 | ||||
 |
| × | 1 | |||
 |
| × | 1 | |||
_ztBMuBhMHo.jpg?auto=compress%2Cformat&w=48&h=48&fit=fill&bg=ffffff) |
| × | 1 | |||
 |
| × | 1 | |||
Software apps and online services | ||||||
 |
| |||||
I've recently posted a tutorial about this project on YouTube explaining everything you can read on this article. You can watch it right below.
IntroductionIn this lesson, I’ll show you how Arduino can recognize sounds using a simple sound sensor.
By the end, you’ll build a light controller system that lets you turn an LED on and off with either a button or a clap.
This is lesson #11 of our 24-part series called Arduino for Beginners. If you’re new here, welcome! Make sure to follow me so you won’t miss the upcoming lessons.
How It WorksThe analog sound sensor is a tiny but very handy module. At its core, it uses a microphone that detects the intensity of sound.
Sound waves hit a diaphragm inside the microphone. That thin plate vibrates back and forth, creating tiny changes in voltage. Arduino reads those voltage changes as an analog signal.
- The louder the sound, the higher the voltage.
- The quieter the sound, the lower the voltage.
If that feels familiar, it’s because we’ve seen similar behavior in other components:
- Light sensors vary resistance based on brightness.
- Potentiometers vary resistance when you turn them.
- Microphones vary voltage with sound.
Of course, this kind of sensor is quite simple. It can’t recognize words or voices like your smartphone does. But it’s great for detecting noise levels, claps, knocks, or other sharp sounds.
Some sound sensors include a small potentiometer to adjust sensitivity.The one I’m using today doesn’t, which actually makes it simpler to use.
Before we move on, a huge thank you to DFRobot for sponsoring this series.
DFRobot is one of the world’s leading providers of robotics and electronics components.
On their online store, you can find pretty much everything: motors, sensors, displays, jumper wires, and even powerful single-board computers (all with global shipping and great quality).
The sound sensor used in today’s lesson comes from DFRobot, as part of the MindPlus Arduino Coding Kit.
So if you need components for your own projects, I highly recommend checking them out.
Thank you, DFRobot, for supporting this series and helping make STEM education more accessible to everyone.
We’ll build a light controller system that lets us turn an LED on and off using either a push button or a clap. Both controls work interchangeably.
What You’ll Need (from the MindPlus Arduino Coding Kit):
- Arduino UNO.
- I/O expansion shield.
- Red LED.
- Push button.
- Analog sound sensor.
- A few jumper wires.
Assembling is quite simple:
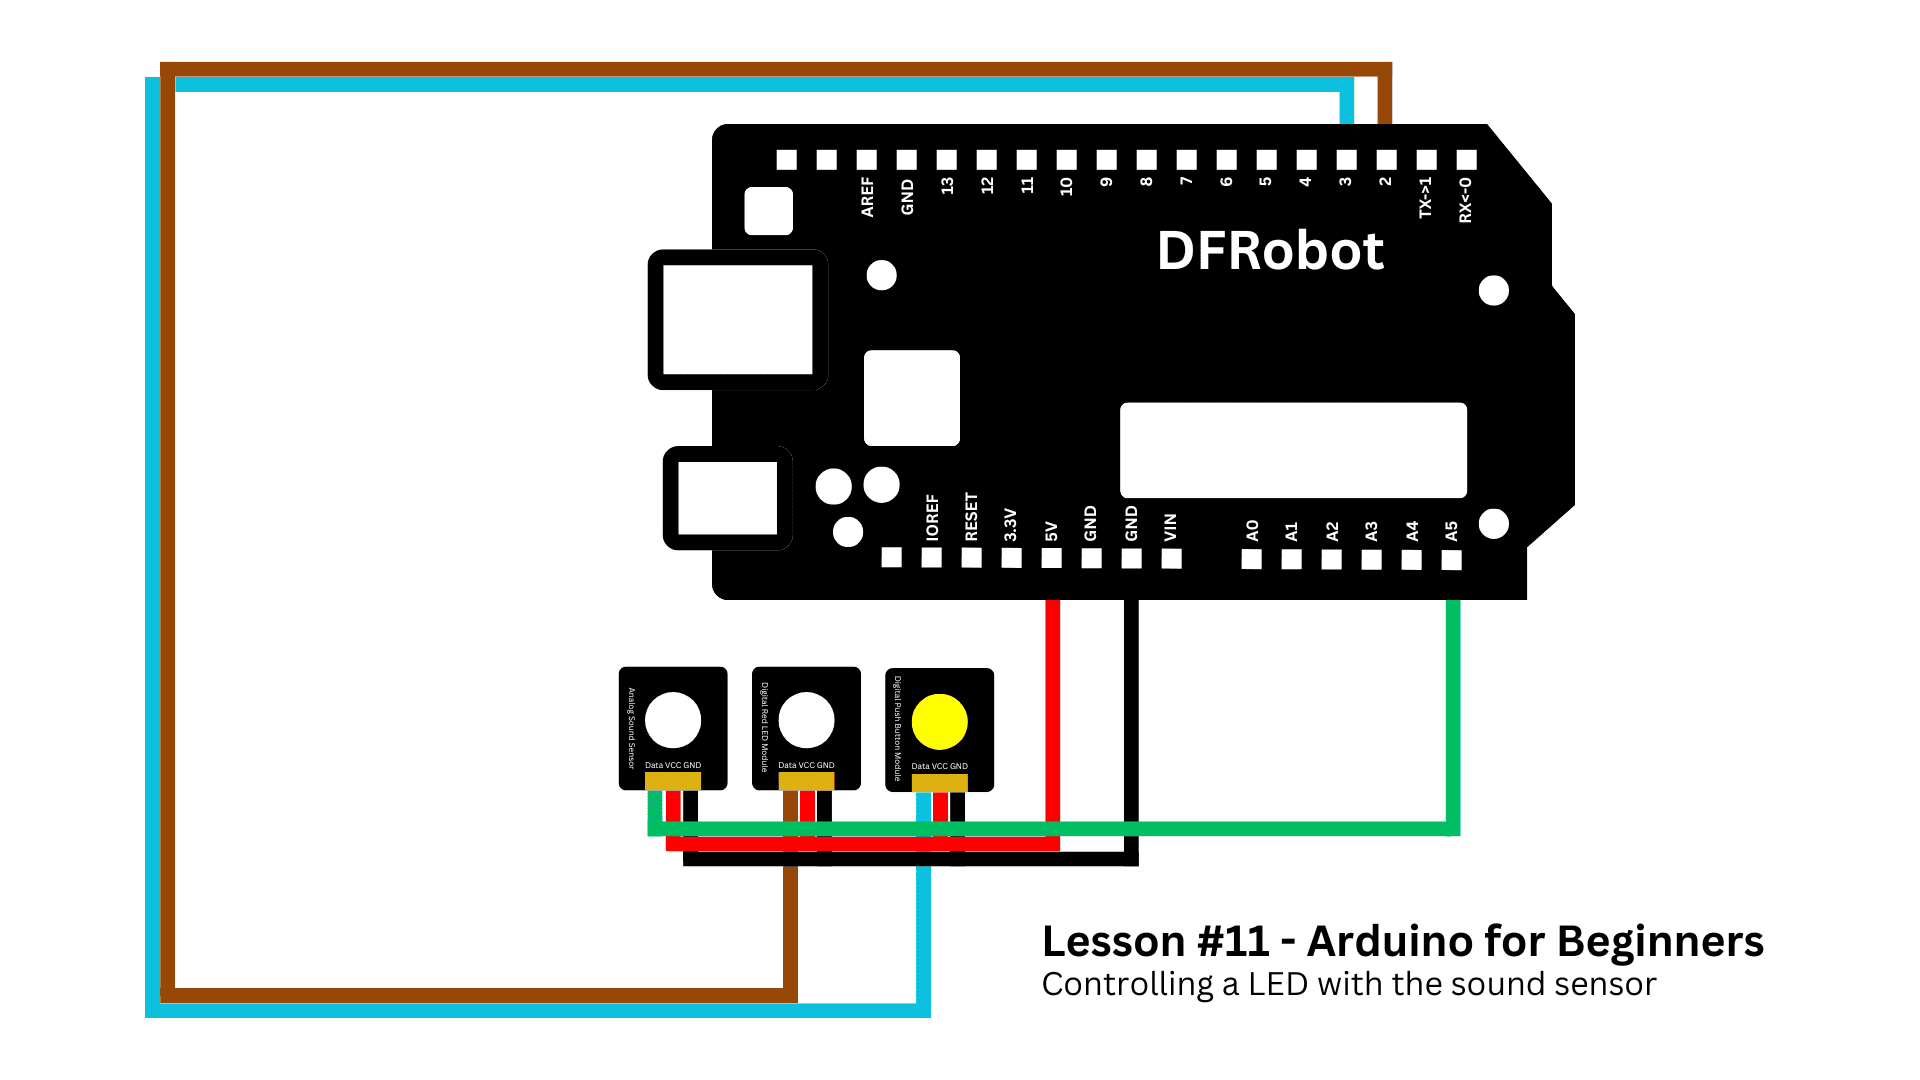
- Attach the expansion shield to your Arduino.
- Connect the LED to port 2.
- Connect the push button to port 3.
- Connect the sound sensor to analog port A5.
That’s it!
If you need extra help, follow the wiring diagram below.
Now that everything is wired, let’s move on to the code.
You’ll find the complete sketch in the GitHub repository for this series.
Copy it into your Arduino IDE, but before uploading, let’s understand what’s going on.
We start by defining the pins: LED on pin 2, button on pin 3, and the sound sensor on A5. We also set up a variable to remember whether the LED is currently on or off.
The button is configured with Arduino’s internal pull-up resistor. That means when the button isn’t pressed, the pin reads HIGH, and when you press it, it goes LOW. We use this change in state to decide when to toggle the LED.
const int ledPin = 2;
const int buttonPin = 3;
const int soundPin = A5;

bool ledState = false;
bool lastButtonState = HIGH;
unsigned long lastClapTime = 0;
const int clapThreshold = 300;
const unsigned long debounceDelay = 200;

void setup() {
  pinMode(ledPin, OUTPUT);
  pinMode(buttonPin, INPUT_PULLUP);

  ledState = false;
  digitalWrite(ledPin, LOW);

  lastButtonState = digitalRead(buttonPin);

  Serial.begin(9600);
}
For the sound sensor, we read an analog value between 0 and 1023. When you clap your hands, the value jumps sharply. We compare that to a threshold. If it’s higher, we treat it as a clap.
To avoid false triggers, there’s a short delay called a debounce, so echoes or background noise won’t keep switching the light rapidly.
void loop() {
  int buttonState = digitalRead(buttonPin);
  if (buttonState == LOW && lastButtonState == HIGH) {
    toggleLED();
  }
  lastButtonState = buttonState;

  int soundValue = analogRead(soundPin);
  if (soundValue > clapThreshold) {
    unsigned long currentTime = millis();
    if (currentTime - lastClapTime > debounceDelay) {
      toggleLED();
      lastClapTime = currentTime;
    }
  }

  Serial.println(soundValue);
}
Both the button and the clap detection call the same function: toggleLED. This function simply flips the state of the LED. If it’s on, turn it off. If it’s off, turn it on.
That way, no matter which input you use, button or clap, the system stays in sync.
void toggleLED() {
  ledState = !ledState;
  digitalWrite(ledPin, ledState ? HIGH : LOW);
  Serial.print("LED is now ");
  Serial.println(ledState ? "ON" : "OFF");
}
Go ahead and test it out. Clap your hands to turn on and off the LED. You can also use the push botton to control the light.
That’s it for today’s lesson!
Thanks for following along, and don’t forget to follow me so you don’t miss the next tutorial.
If you liked this project, check this another one. I think you’ll enjoy it too.


Comments