

Hardware components | ||||||
_baVEVgguW1.jpg?auto=compress%2Cformat&w=48&h=48&fit=fill&bg=ffffff) |
| × | 1 | |||
Software apps and online services | ||||||
 |
| |||||
 |
| |||||
| ||||||
The Arduino 101 is an outstanding platform for developing projects. Two especially appealing features are the onboard Bluetooth Low Energy(BLE) and Inertial Measurement Unit (IMU) with their correspondingly easy to use Arduino IDE libraries.
This protip will show you how to use an Intel Edison as a gateway to publish IMU values in real time to the internet using the PubNub real time data streaming network. In this way you can turn your Arduino 101 project into a true Arduino 101 - IoT project. When you write it up here on Hackster.io and share it with everyone, you'll be living in your own Public IoTaho!
Hopefully this protip will also help you invent your future, especially if you are entering a certain Arduino 101 contest!
Arduino101 - BLE - IntelEdison - WiFi - PubNub - WiFi - EON in your Browser(s)!
Some Assumptions Before We startWhile this is by no means an advanced or super hard project, there are a few things you should be able to do to get this up and running. Embrace the challenge!
- You can get an Arduino sketch uploading and running onto your Arduino 101 using the Arduino IDE.
- You can get the Intel XDK for Iot up and running with your Intel Edison.
- Some very basic Javascript programming is required.
- You should learn about PubNub.
IoT projects are generally composed of several interlocking subunits. Try and break your project into several, independent subunits, test these and then you put them together.
Bluetooth Low Energy(BLE): PeripheralI assume that you will be embedding an Arduino 101 into a "thing" and then using the 101's onboard BLE capability to transmit data. In this case I am streaming IMU data, but it could be any data you want.
I also assume you have nRF Master Control App running on a device. If you do not, I highly recommend getting it and becoming familiar with it. I have found it indispensable for debugging my BLE projects. Some people have even used it as a primary interface to their projects., like shadydave.
BLE can be difficult, so let's make sure we have this part of the project up and running first. If we are successful here, we can connect it with any BLE central we want to use. It doesn't have to be an Intel Edison. I have made no material changes to the Arduino101 sketch for a prior project, IMU to You!, and that project used Evothings on an android tablet! Now that is code reuse!
Go to my project, IMU to You! and grab the Arduino 101 sketch or go to the github repository for this project and get it. Compile and upload it to your board and open the serial window on your Arduino IDE.
Now start up nRF Master Control. Scan for your board. It should show up as "IMU" or a variant of ARDUINO 101-****. Press CONNECT. Select the characteristics and you should now see a stream of IMU data on the serial window and the equivalent bytes for the accelerometer and gyroscope characteristics displayed on nRF master control screen:
You now know that your embedded sketch is working to collect IMU data.
Bluetooth Low Energy: CentralWith the sketch up and running, you are broadcasting data out to the world as fast as the BLE stack can handle it. But until you connect your BLE peripheral up to a BLE central your device is just a lone voice in the wilderness. If a BLE peripheral broadcasts in a forest and there is no BLE central around . . .
Let's setup our Intel Edison as a BLE central and a bit more. First you should get your Intel Edison up and running with the Intel XDK for IoT. The best way to do this is to follow Vincent Wong's project Intel Edison and Intel XDK IoT Edition 102.
Once you have done this, connect to your board over serial and ensure you have a valid wifi connection by issuing this command on the command line interface(cli):
ping www.google.com
This should result in something like the following:
You are now connected to the internet through your Intel Edison, which is important now and will be at later stages of this ProTip. Press CRTL-Z to exit out of the ping command.
If you are not connected at this point, try:
configure_edison --wifi
Complete the configuration process and then retry the ping command from above. If this doesn't, go to this page describing how to setup WiFI on your Edison.
You need WiFi not only to connect to the internet, but also to download the necessary node.js modules to make this project work.
Now we need to get a hold of the Javascript library, noble.js, which will allow us to turn our Intel Edison into a BLE central.
issue the following command:
npm install noble
While we're at, let's get the PubNub node.js sdk and install it as well:
npm install pubnub
Once this is complete, let's complete the following step to allow our Intel Edison to access it's BLE radio:
rfkill unblock bluetooth
Make sure your Arduino 101 is running the BLE sketch from above. Now, run the following command to confirm that BLE is working on your Edison:
bluetoothctl
You should see something like the following:
Your Edison is now ready to be programmed!
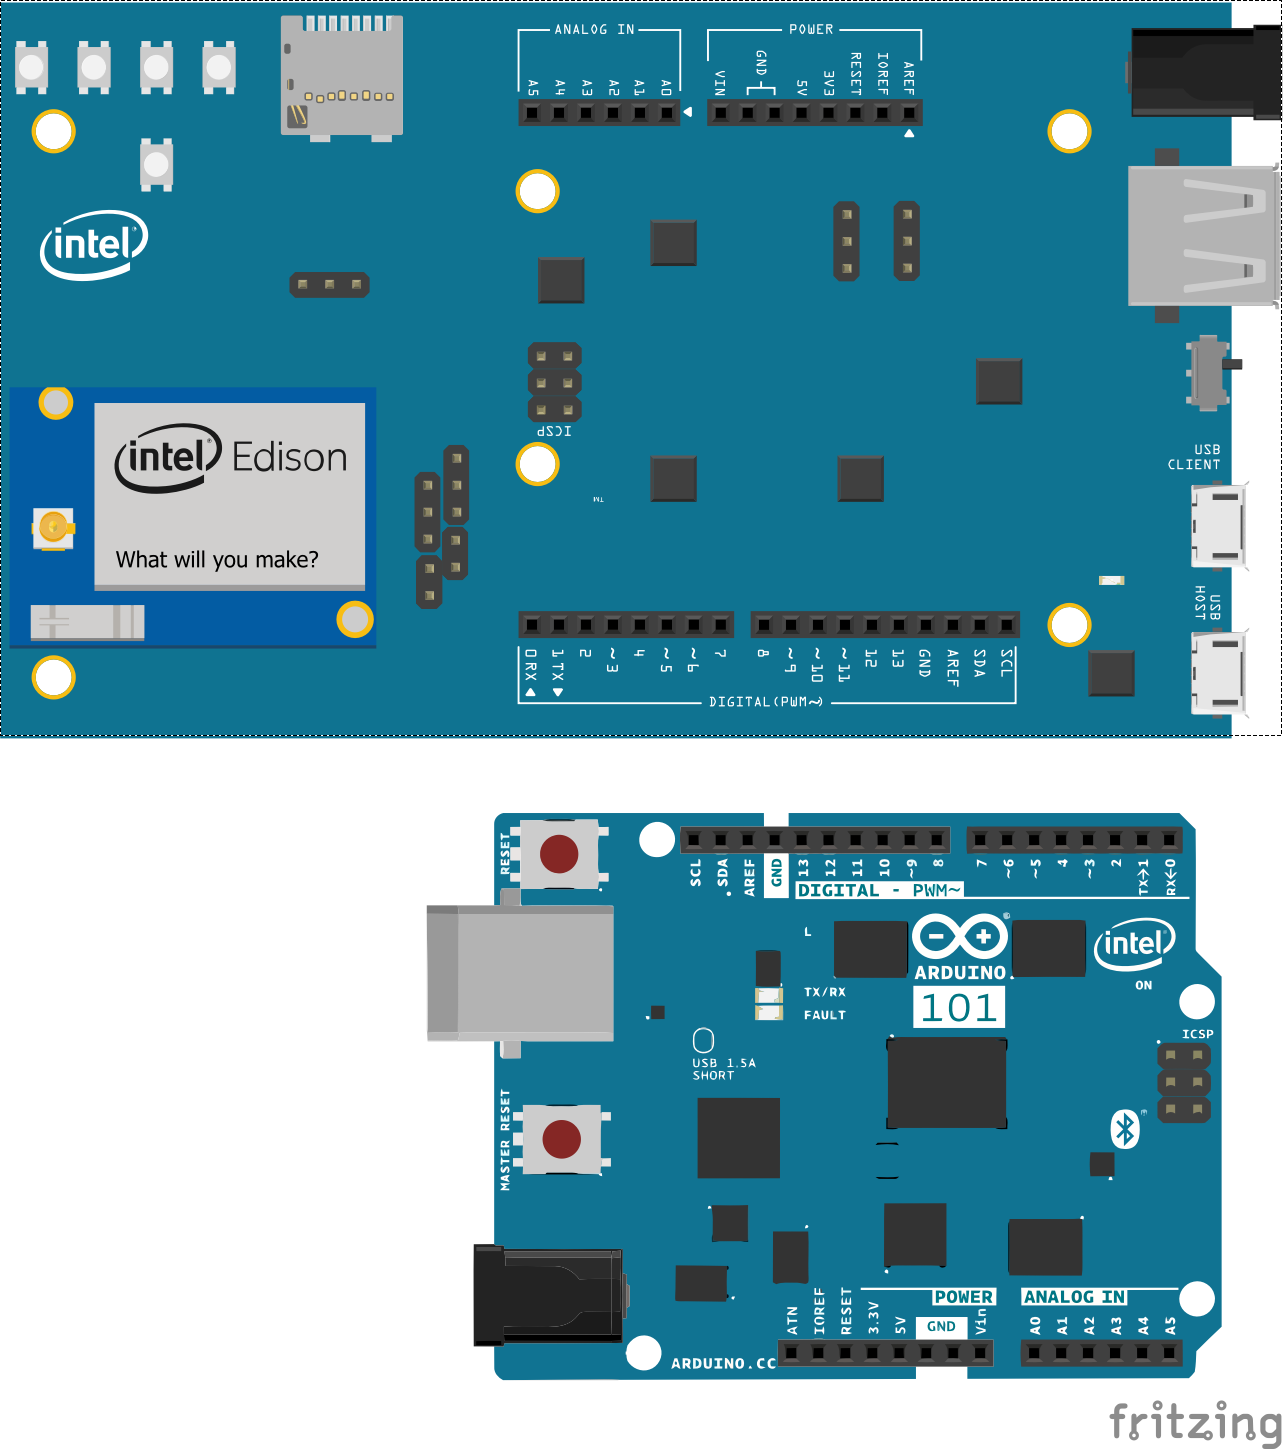
The Intel EdisonThe Intel Edison is a great board to work with once you have got the XDK for IoT up and running and are comfortable with it. It has both BLE and WiFi and with the many examples, libraries and tutorials available you can really build some amazing projects with it.
We will use our Edison is a very useful and powerful way. It will act as our BLE Central device, receiving data from an Arduino 101 acting as a BLE peripheral. We will also use it as an internet gateway, by taking that data and transmitting to the Internet using the WiFi capabilities of the very same board. You could accomplish this by several other means, such as getting a WiFi shield for your Arduino 101. However I think that if you start to imagine what you can do with the power of the Edison, taking this route will open many other doors for you.
Let's begin by disconnecting from the serial and connecting to the board with the Intel XDK IoT tab on the bottom left. This will allow us to code in the XDK editor, compile and upload our programs directly to the Edison. Once this is done, you can also detach your edison from its cables, as long as you have it supplied to a power supply. You can sit back, relax and program from your favorite reclining chair if you wish!
Now select the template program such as BLEScan. from the menu of choices:
Then select the index.js from the menu and gut the code from it and replace it with the following, with the index.js file in the EdisonCode folder in my github repository.
What does this code do? Here are some of the highlights:
These lines simply import our noble.js and pubnub.js libraries. Remember we installed these above in the Serial Terminal tab.
var noble   = require('noble');
var PubNub  = require('pubnub');
Now we'll set up the characteristics of our service. If you use my Arduino 101 sketch, these will work. If you have a different set of uuids, modify here. Make sure to use lower case and no dashes, at least that's what worked for me!
// These should correspond to the peripheral's service and characteristic UUIDs
var LOCAL_NAME = 'imu';
var IMU_SERVICE_UUID = '917649a0d98e11e59eec0002a5d5c51b'; //no dashes!!!!
var ACC_CHAR_UUID =  '917649a1d98e11e59eec0002a5d5c51b';
var GYRO_CHAR_UUID = '917649a2d98e11e59eec0002a5d5c51b';
var BUTTON_CHAR_UUID = '917649a3d98e11e59eec0002a5d5c51b';
When noble.js completes its scan for nearby BLE devices, it will send a 'discover' message. This function handles that message to begin the connect phase. See how it uses the LOCAL_NAME variable from above to connect to this device. I do not know how many BLE peripherals I can connect to at once. Perhaps the subject of a future project. . .
 noble.on('discover', function(peripheral){
	console.log('Found BLE Device: [' + peripheral.id + '] ' + peripheral.advertisement.localName);
	if(peripheral.advertisement.localName == LOCAL_NAME){
		console.log('Found: ' + peripheral.advertisement.localName);
	}
...
After scanning, discovering and connecting to our peripheral we need to discover the services available to us. For debugging, you can uncomment to console.log() statements. Highly recommend before you have everything up and running properly.
peripheral.discoverServices([IMU_SERVICE_UUID], function(error, services) {
       console.log('services: ' + services.length);
       var imuService = services[0];
       console.log('Discovered IMU service');
       imuService.discoverCharacteristics([], function(error, characteristics) {
           characteristics.forEach(function(characteristic) {
               console.log('characteristic UUID: ' + characteristic.uuid);
                characteristic.on('read', function(data) {
                   // console.log('data length: ' + data.length);
                   // console.log('data type: ' + typeof(data));
                   // var ax = new DataView(data).getFloat32(0,true);
                   transformRawImuData(characteristic.uuid,data);
                });
. . .
Now let's get this PubNub thing up and running! Create your pubnub object with your publish and subscribe keys here.
 pubnub = new PubNub({
       publishKey : '',
       subscribeKey : ''
});
The data has been transformed and can now be published using our pubnub object. The channel name is a light weight tag you specify. It could be called anything. I am publishing the accelerometer and gyroscope data on 2 seperate channels with the same publish key. Messages are published in JSON. Below the key eon: in the message allows this message to be automagically (as they say) be plotted by the eon library! You just send the numbers. It takes care of the rest!
 function  publishImu() {
   console.log("pub to pubnub");
   pubnub.publish({
       channel: 'gv-acc',
       message:
       { eon:
           {
               'ax': ax,
               'ay': ay,
               'az': az
           }
       }
   });
   pubnub.publish({
       channel: 'gv-gyro',
       message:
       { eon:
           {
               'gx': gx,
               'gy': gy,
               'gz': gz
           }
       }
   });
}
Now read through the whole index.js file, and try and run it. If you haven't gotten your PubNub account and Publish and entered your publish and subscribe keys, it won't work. However you can comment out those parts and experiment with the BLE parts first. This is a powerful feature of the Intel Edison board, all enabled by the noble.js library we installed previously. This library allows your Edison to act as a BLE central. Another library, bleno.js, will allow you to run your Edison as a BLE peripheral. But that is what our Arduino 101 is for.
Now let's get going with PubNub, which is really the star of this show (protip).
PubNubPubNub is a real time data streaming network. It is awesome and easy to use. Very easy in fact!
Once you have joined PubNub and obtained a set of Publish and Subscribe keys, you are minutes away from being able to publish data streams or in PubNub parlance, channels and subscribe to them. So stop here, join PubNub, take a few tutorials, get your keys and then come back. . .
You should now have some familiarity with PubNub and what it can do and be in possession of your publish and subscribe keys.
Look back to the description of the pubnub components in the description of index.js above. It should all make a lot more sense now.
Start up your Arduino 101, then your Edison. You can now go to the PubNub home page and click on the developer tab. From the menu, select the Debug Console.
Fill in the channel and subscribe key fields. The click the SUBSCRIBE button and scroll down to the bottom of the page. As the data streams across the Edison console, you should also see the data start streaming to PubNub!
You should stop the streaming while you work on the next step. You get a generous 1 million free messages a month, but why use what you don't need?
Graphical Display with PubNub's EONWe will now create a simple HTML page to subscribe to our channel and display it with EON. The HTML page is available on my github repository in the folder entitled EONFrontEnd.
Some highlights of the index.html file. This imports the pubnub eon library for us to use to get subscribe to and graph our data stream.
<script type="text/javascript" src="https://pubnub.github.io/eon/v/eon/1.0.0/eon.js"></script>
This is where we create our pubnub object and subscribe to our data stream. Use your own subcribeKey! How would you know when I was going to publish IMU data anyway?
<script type="text/javascript">
var pubnub = new PubNub({
   subscribeKey : "your key here"
});
Here we use to eon library to chart our data. We let it know what the names of the data coming in and give it some bare minimum formatting. Eon will take of the rest.
The channel name must match your channel name exactly. The bindto statement tells eon where on the html page to place the graph. This corresponds to the acc div in the html above. Feel free to explore with formatting, colors, etc. . .
 eon.chart({
   channels: ["gv-acc"],
   generate: {
       bindto: '#acc',
       data: {
           type:'spline',
           colors: {
               value0:'#ffaaaa',
               value1:'#cc8888',
               value2:'#aa4444',
               value3:'#882222',
               value4:'#660000',
               value5:'ffaaaa'
           },
           names: {
               value0: "ax",
               value1: "ay",
               value2: "az",
           }
       },
       point: {
           show: false
       },
   },
   history:true,
   pubnub: pubnub,
   limit: 100,
});
You do not to run a web server to have this code work. Just save it into a convenient place/folder and click on it to bring it up in a browser!
Save it as index.html or some other name with the .html extension. Now start up your Arduino 101, Intel Edison and bring up index.html in a browser.
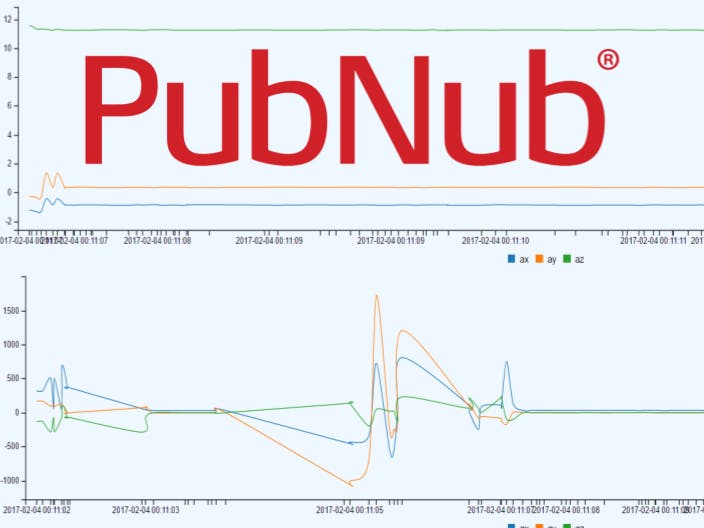
I simply click on the file icon in my windows file browser and it brings up the html page in Chrome for me. You do not need to host this page or run a server, just click on it. If you are actively publishing data on the subscribe key and channel listed, you should see something like this:
Congratulations! You are now live streaming your data from your Arduino 101 to the internet and back! Not super pretty but this is a true IoT project! And I wanted get it up, running and written so those of you wanting to experiment with it or use for the Arduino101 contest could benefit from this.
Graphically displaying the data stream is only one way to tap into the power data streaming with PubNub. Take a look at the blocks available and imagine what you could do now!
Take the time to look into the following resource. Then jump in, experiment and enjoy! https://github.com/pubnub/eon-workshop


Comments