

Hardware components | ||||||
 |
| × | 1 | |||
_baVEVgguW1.jpg?auto=compress%2Cformat&w=48&h=48&fit=fill&bg=ffffff) |
| × | 1 | |||
 |
| × | 1 | |||
 |
| × | 1 | |||
Software apps and online services | ||||||
 |
| |||||
| ||||||
| ||||||
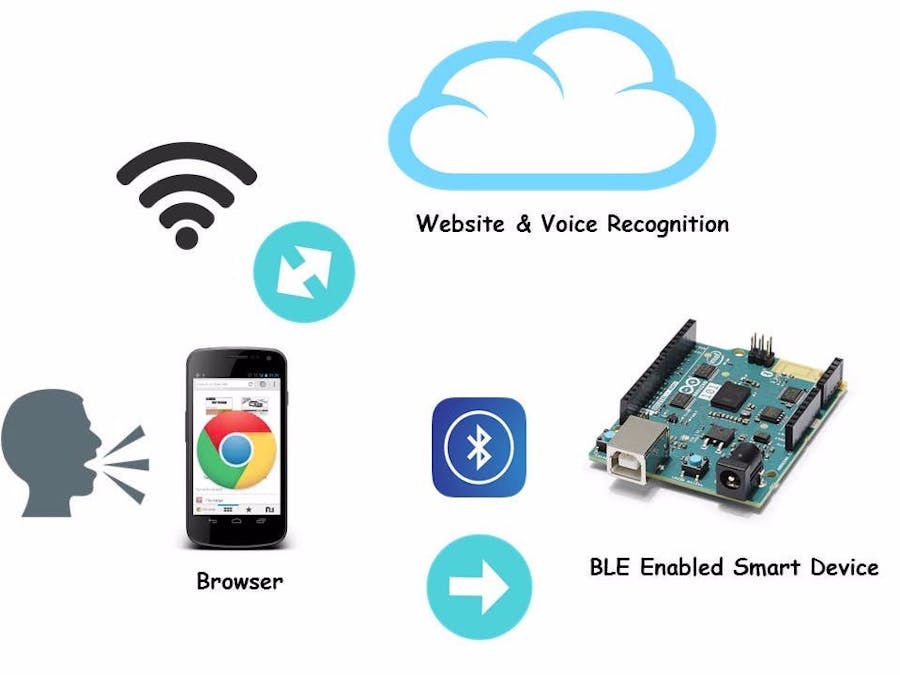
Started experimenting for the Hackster Live workshop 2017 - using Greg V.’s "Lend me your ears" project as our inspiration. This project will show you how to control relays with an Arduino/Genuino 101 using its’ on-board Bluetooth Low Energy (BLE) capability through the Web Bluetooth API, adding voice recognition library with no special hardware needed.
***WARNING - Do NOT attempt to control any high voltage AC or DC devices or expose the wires of high voltage AC or DC device. Do NOT use any device over 12 volts as this could lead to strong electric shock if used improperly!***
**Hackster is not responsible for any damages or injuries sustained while completing this project.**
What you will need for this projectThe original hack requires a Mac with Yosemite or newer operating system, chromebook, or linux. For chromebook instructions see Greg’s project here.
Android Phone with Chrome BrowserThe instructions I'm writing here are for using Mobile Web Bluetooth using Android 6.0 (Marshmallow) Phone or later with Chrome Browser.
- Android phone must be version 6.0 (Marshmallow or above)
- Android Chrome Browser needs to be version version 56 above.
- To check the version, use this URL chrome://version/
- To enable Mobile Web Bluetooth, make sure that this is enabled chrome://flags/#enable-experimental-web-platform-features
- I haven't tested on iPhone with Android. Feel free to try it out and let me know if it works for you.
If you don't have an Android phone with version 6.0, you can try out Ubuntu Linux.
- Create a bootable USB stick on Ubuntu. Read instructions here.
- Boot your laptop using USB drive. Don't install, just try out Ubuntu
- Once it boots, Install Chrome
- Install BlueZ, I followed instructions from Michael Lawton
# Download and install BlueZ 5.43 and libreadline7 packages
wget http://mirrors.kernel.org/ubuntu/pool/main/r/readline/libreadline7_7.0-0ubuntu2_amd64.deb
wget http://ftp.debian.org/debian/pool/main/b/bluez/bluez_5.43-2_amd64.deb
sudo dpkg -i libreadline7_7.0-0ubuntu2_amd64.deb
sudo dpkg -i bluez_5.43-2_amd64.deb
I updated the script to install bluez_5.43-2_amd64.deb
- Restart the BlueZ service
sudo /etc/init.d/bluetooth restart
- Go back to chrome and Enable chrome://flags/#enable-experimental-web-platform-features
- Restart Chrome. Now you're ready.
- Arduino IDE with Arduino/Genuino 101 installed.
Download Arduino IDE here.
Once you have downloaded the Arduino IDE, make sure it has the drivers for the Arduino/Genuino 101 by following these steps:
1. Click Tools → Board → Boards manager.
2. Scroll down the list and find the “Intel Curie Boards” by Intel. If it is not installed, click “install” and follow the prompts making sure to allow the app to make changes on your device.
3. Once installed, go to the Arduino IDE, click Tools → Board → Arduino/Genuino 101 at the bottom of the dropdown menu.
If this project made you interested in learning more about Mobile Web Bluetooth, Arduino 101 or remixing projects on Glitch, please click the "Respect Project" button and follow me.
Instructions:- You can follow the instructions from Katie Kristoff - Hackster Live March 2017 Workshop using Basic LEDs without the relay or follow instructions from “Lend me your ears!”: Web Bluetooth and Voice Recognition by Greg V
- I forked Greg's code on Github. Here's the link
- The sketch is located in the arduino-sketch folder.
- The mobile website is located in the public folder.
- I hosted this mobile website at https://charming-gambler.glitch.me/.
If you just want to test it out without any changes to the Arduino code, here's what you need to do.
- In Arduino IDE, create a new sketch. Copy and paste this sketch to your Arduino IDE. https://raw.githubusercontent.com/rondagdag/relay-click/master/arduino-sketch/relayClick5/relayClick5.ino
- Click Verify and Upload
- Using BLE with voice control
- Click the bluetooth icon and choose the device that matches the local name that you changed in your Arduino code. In this case the default was “relays” so I click “relays” and click pair.
- Once your device has paired you will see a green “paired” under your device name.
- Now you have a choice, you can use the pre-coded commands below:
- RelayOne: relay one, one, lamp, desklamp
- RelayTwo: relay two, two
If you want to make sure that the web bluetooth is hearing you and capturing your words correctly, turn on the development tools on the right hand side of the screen by going to chrome’s menu→ more tools → developer tools. If you want to see if the Arduino 101 is getting your messages, start the serial monitor with 9600 baud.
You should see the commands received from Android phone to the Arduino 101.
Making it your ownYou can customize the website by remixing it and making it your own at: https://glitch.com/edit/#!/charming-gambler
Click on the "charming-gambler" icon → "Remix This". If you want to change the device name, edit the "public/relayClick.js".
Modify this Codeclass RelayClick {
/**
* customize your project here to reflect the uuid of your service and characteristics.
*/
constructor() {
this.deviceName = 'relays';
this.serviceUUID = '917649a0-d98e-11e5-9eec-0002a5d5c51b';
this.characteristic1UUID = '917649a1-d98e-11e5-9eec-0002a5d5c51b';
this.device = null;
this.server = null;
// The cache allows us to hold on to characeristics for access in response to user commands
this._characteristics = new Map();
}
Arduino SketChange the device name, service UUID, characteristic1UUID. Make sure it matches Arduino Sketch. Arduino sketch should have the same info.
/* establish BLE service & characteristics */
BLEPeripheral blePeripheral;
BLEService relayService("917649A0-D98E-11E5-9EEC-0002A5D5C51B");
BLECharacteristic relayCharacteristic("917649A1-D98E-11E5-9EEC-0002A5D5C51B", BLEWrite, 5);
// BLEUnsignedCharCharacteristic relayCharacteristic("917649A1-D98E-11E5-9EEC-0002A5D5C51B", BLERead | BLEWrite);
BLEDescriptor relayDescriptor("2902","relay");
void setup()
{
 // initiate serial communications for debugging
 Serial.begin(9600);
 Serial.println("click relay example");
/**
  *  BLE initilizations
  */
 blePeripheral.setLocalName("relays");
 blePeripheral.setAdvertisedServiceUuid(relayService.uuid());
 blePeripheral.addAttribute(relayService);
 blePeripheral.addAttribute(relayCharacteristic);
 blePeripheral.addAttribute(relayDescriptor);
......
.....
Good luck! If this project made you interested in learning more about Mobile Web Bluetooth, Arduino 101 or remixing projects on Glitch, please click the "Respect Project" button and follow me.
Feel free to ask questions.


Comments