


Hardware components | ||||||
_baVEVgguW1.jpg?auto=compress%2Cformat&w=48&h=48&fit=fill&bg=ffffff) |
| × | 1 | |||
| × | 1 | ||||
| × | 1 | ||||
 |
| × | 1 | |||
When we saw Don Coleman's Arduino 101 Bluetooth MIDI Controller, we knew It was the perfect rainy weekend project for us. The only problem we had was that our Adafruit 12-Key Capacitive Touch Sensor Breakout - MPR121 wasn't working properly. So we thought, why not use some buttons?
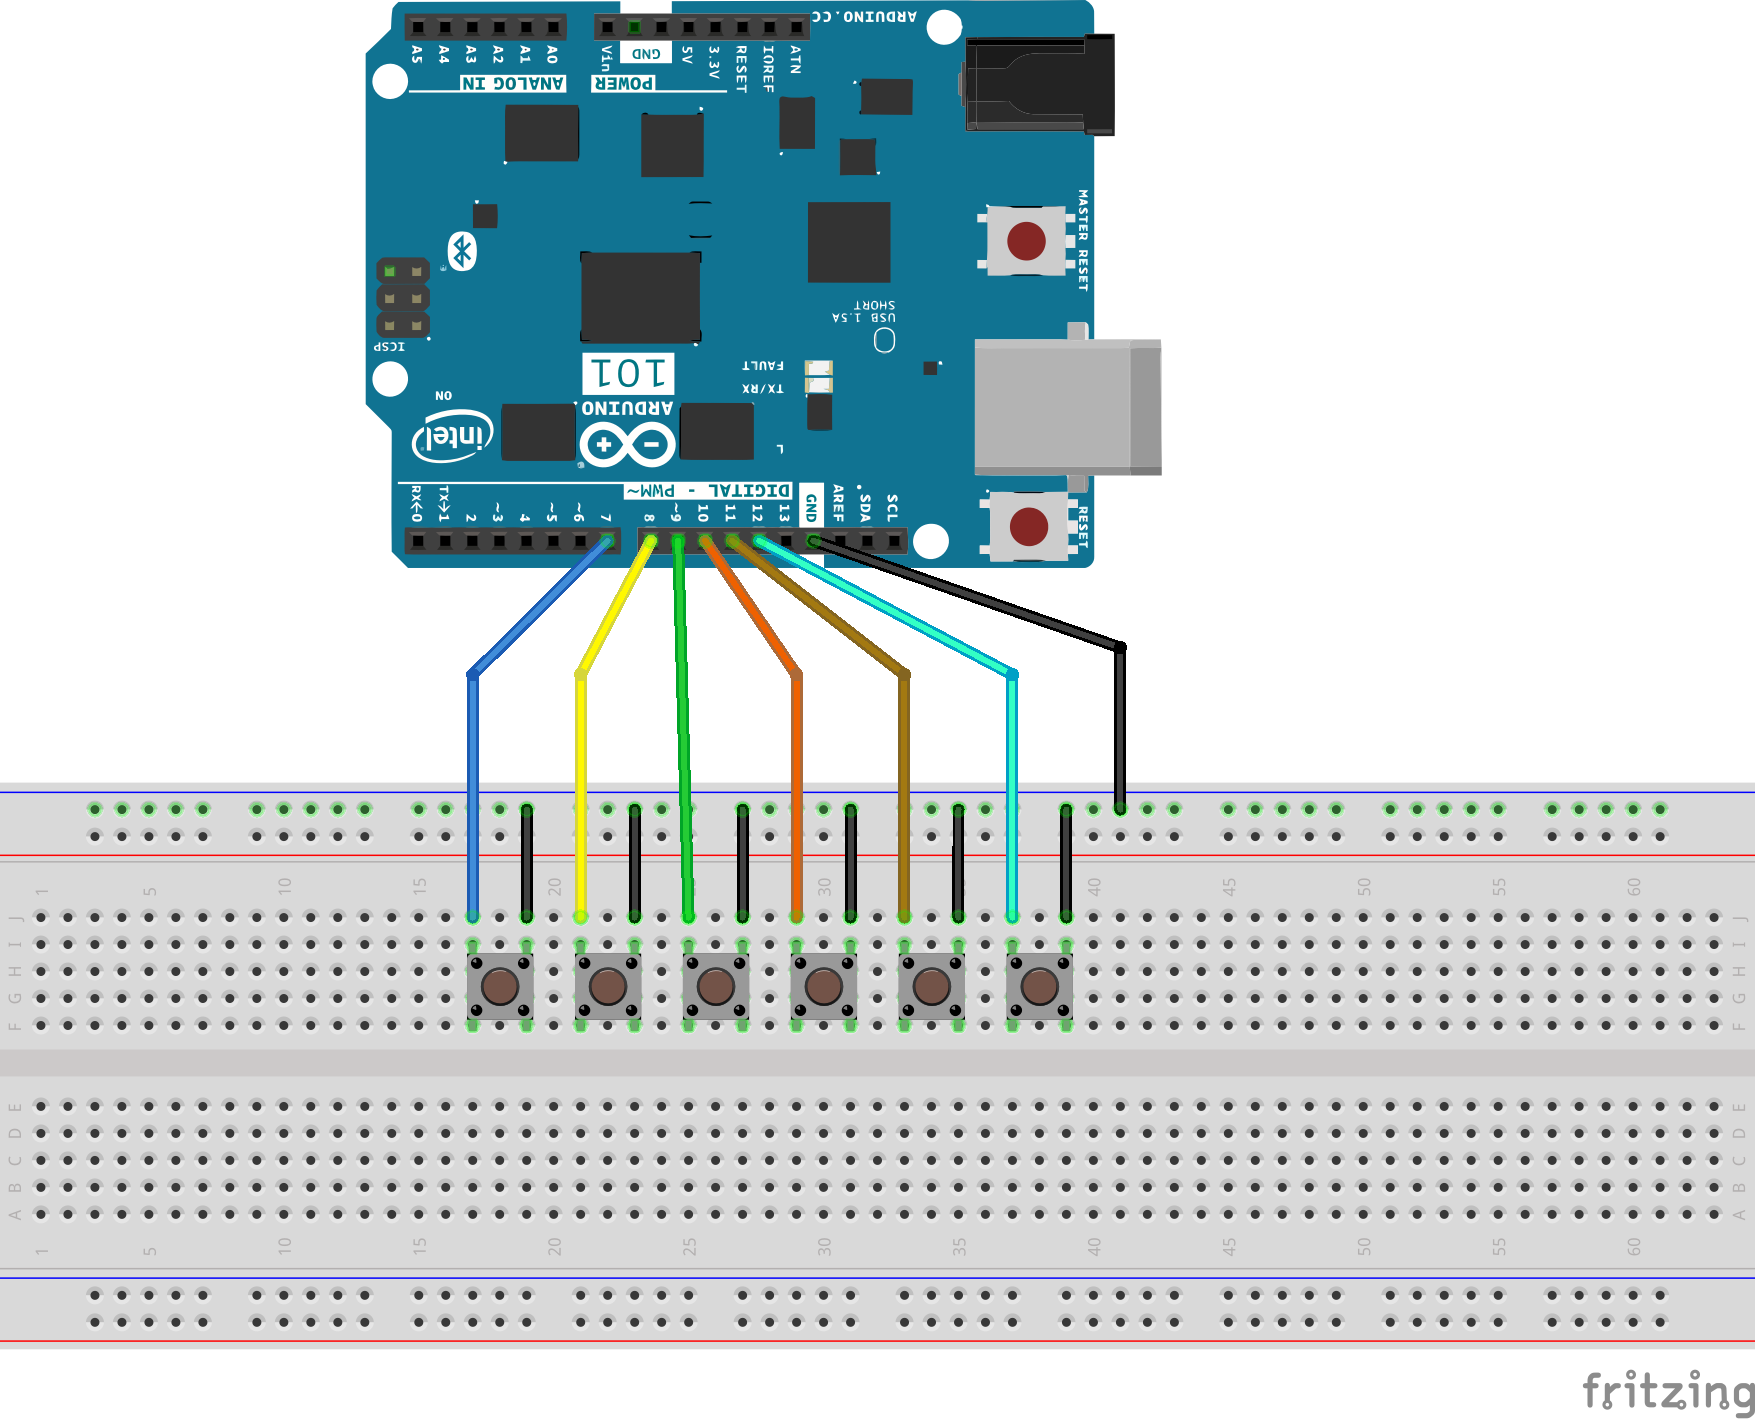
Since our touch sensor board didn't seem to be working properly, we decided to hook some buttons up to the digital pins of the Arduino 101. The Arduino Uno and Arduino 101 have internal pull up resistors and if connected and programmed correctly, you can hook up the switches without needing to use resistors. I learned this from a nice tutorial on Hackster.io by smm2 entitled, You've Been Using a Button Wrong this Whole Time.
You assign the mode of these pin as such:
...
pinMode(button1, INPUT_PULLUP);
pinMode(button2, INPUT_PULLUP);
...
Importantly, when setting up the circuit this way, a closed switch corresponds to the digital pin being LOW and an open switch to the pin being HIGH, which is a bit counterintuitive.
Buttons and DebouncingIt should be simple. Just hook up some buttons to the arduino digital pins. Poll the pins and if one is HIGH/LOW, then the button has been pressed. Check back again, and if the same pin in LOW/HIGH, then the button has been released.
Unfortunately, things aren't so simple. Because of the electromechanical nature buttons and switches, as the two contacts come together there will be unpredictable spikes of voltage created in the short time between switch opening and closure. The microcontroller is fast, these spikes will look like rapid open and close switch states. This means that simply polling the pins may not reflect the true Open/Closed state of the switch.
There are both hardware and software methods of debouncing switches. For this project we used a software method.
One method of software debouncing a switch involves reading the switch state. Waiting a certain short period of time, then rereading the switch state. If after this period of time, the switch is in the same state, then the switch has been pressed. We choose a time delay of 10 ms.
...
void debounce()
 {
  // poll all the digital pins, like the original project we have 6 inputs.
  b1 = digitalRead(button1);
  b2 = digitalRead(button2);
  b3 = digitalRead(button3);
  b4 = digitalRead(button4);
  b5 = digitalRead(button5);
  b6 = digitalRead(button6);
  // NOTE WELL: Because of the way we connected our switches, a LOW signal
  // on hte PIN means the swtich has been pressed!
  // Here we check to see if one of the pins has been pressed(LOW)

  if (!b1 || !b2 || !b3 || !b4 || !b5 || !b6)
  {
   // this is our no delay(), delay!
   currentTime = millis();
   if ((currentTime - previousTime) > pressDelay)
   {
     // if a pin has been pressed and is stilled pressed the length of
     // of value pressDelay, then the switch has really been selected
     // and has been debounced!
     previousTime = currentTime;
     if ( !b1 && !digitalRead(button1)) { currentPressed = 0;  }
     else if (!b2 && !digitalRead(button2)) { currentPressed = 1; }
     else if (!b3 && !digitalRead(button3)) { currentPressed = 2; }
     else if (!b4 && !digitalRead(button4)) { currentPressed = 3; }
     else if (!b5 && !digitalRead(button5)) { currentPressed = 4; }
     else if (!b6 && !digitalRead(button6)) { currentPressed = 5; }
     // set the state of our buttons, it is ok to just let the state
     // machine id that a button has been pressed without, the value
     // of currentPressed can be accessed to see which swtich has been
     // pressed.
     wasButtonPressed = TRUE;
     wasButtonReleased = FALSE;
     previousPressed = currentPressed;
   }
  }
...
We did not use a delay() function. As in our prior projects, we avoid using the delay() function wherever possible because it blocks all microcontroller activity for the period of the delay. We again use the paradigm for simulating multitasking learned from Bill Earl's set of 3 Arduino multi-tasking tutorials on adafruit.
In order to play the Midi buttons correctly, we also need to identify when a button has been released. This would be the case if a button was pressed, initially and then released and also must be debounced.
We poll all the digital pins and they are all HIGH, which is our case represents that all the switches currently are open we then check to see if the delay time has passed and whether the state of the buttons indicates that a button was pressed. If this is the case, a button must have been released and we reset the state variables.
...
else if( b1 && b2 && b3 && b4 && b5 && b6 )
  {
     currentTime = millis();
     if ((currentTime-previousTime) > pressDelay)
     {
       previousTime = currentTime;
       if ( wasButtonPressed )
       {
         wasButtonPressed = FALSE;
         wasButtonReleased = TRUE;
         // Serial.println("button Released");
       }
     }
...
Let's reprise this. If none of the buttons poll closed, then none of them are probably selected. If none of them poll closed, and a certain amount of time has passed then none of them are selected and we are debounced. If none of them are selected and debounced and the current state of the buttons was that a button was pressed, then the state of the buttons must have changed and we reset the state variables.
The Update() function of our MidiButtons class simply calls the debounce() function over and over again at the speed of the loop() function if you will. MidiButtons is essentially a state machine. Since the microcontroller is so much faster than you or I, it appears to instantly respond to our button presses and releases.
Within the loop function we update the state of the buttons with the Update() function. Then we use the MidiButtons getter functions to access the button or "note" that was selected and then if the button was selected or released.
void loop(){
 midiButtons.Update();
 currentNote = midiButtons.getCurrentPressed();
 wasPressed = midiButtons.getWasButtonPressed();
 wasReleased = midiButtons.getWasButtonReleased();
 . . .
After this we use the same logic as in the original project to play or release a note.
...
if ( wasPressed && (currentNote != lastNote))
 {
   playNote(currentNote);
   lastNote = currentNote;
 }
 if (wasReleased && (lastNote == currentNote))
 {
   releaseNote(currentNote);
   lastNote = 255;
 }
...
Why assign lastNote the value of 255 after we detect a button release? This ensures that we can press and release and then press the same button again.
It is seems a bit convoluted, but it all seems to work nicely for us:
Ok, we agree, the button clicks are annoying, but the project was fun anyway!
Conclusion:When we saw the original project, we knew we had to try and replicate it especially since one of us, Phil V., is a real music aficionado. The other one, Greg V., doesn't know a note, from an octave from a hole in his head, but he enjoyed the challenge of debouncing and making a button state machine!


Comments