


Hardware components | ||||||
 |
| × | 1 | |||
_ztBMuBhMHo.jpg?auto=compress%2Cformat&w=48&h=48&fit=fill&bg=ffffff) |
| × | 1 | |||
| × | 1 | ||||
| × | 3 | ||||
| × | 1 | ||||
| × | 1 | ||||
 |
| × | 1 | |||
| × | 1 | ||||
 |
| × | 2 | |||
| × | 3 | ||||
| × | 2 | ||||
 |
| × | 1 | |||
| × | 1 | ||||
 |
| × | 1 | |||
Software apps and online services | ||||||
 |
| |||||
 |
| |||||
| ||||||
| ||||||
 |
| |||||
Hand tools and fabrication machines | ||||||
 |
| |||||
 |
| |||||
 |
| |||||
 |
| |||||
 |
| |||||
 |
| |||||
| ||||||
 |
| |||||
| ||||||
| ||||||
| ||||||
DESCRIPTION
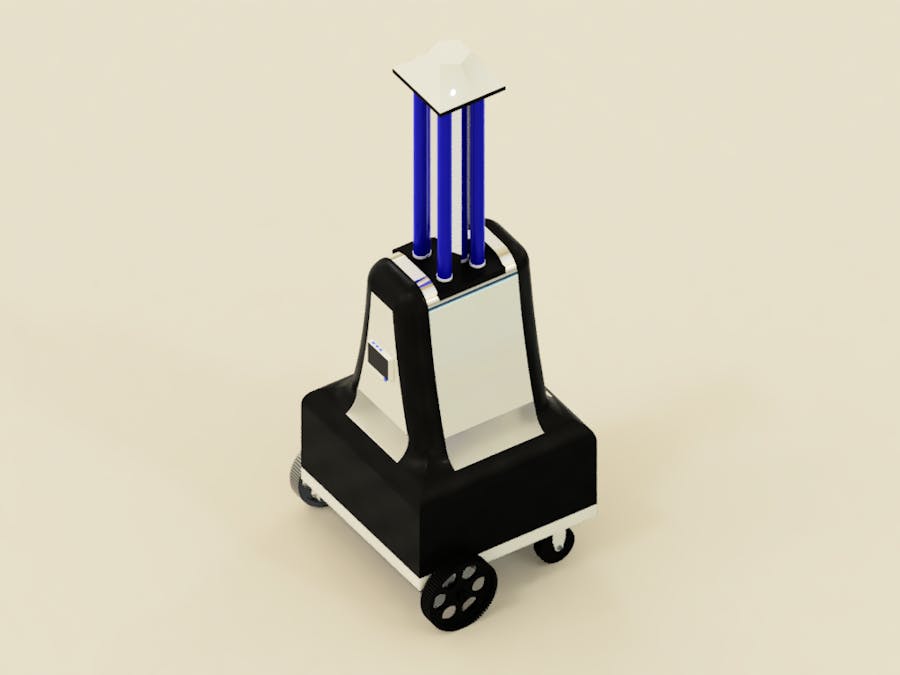
As we face a worldwide healthcare crisis caused by COVID-19, there's a large need for disinfection. This tutorial can be followed by anyone who is new to ROS all the instructions are mentioned so that you too can build an autonomous UV bot. UV-C in many parts of the globe for fighting the COVID-19. Currently, such units are either stationary or moved by humans. We improved upon that concept and built an autonomous, mobile unit that may move around lobbies and hallways to get into rooms for disinfection.
Our aim is to provide a simple tutorial to help people to make an affordable autonomous solution.
DETAILS
Three Lamps mounted on the robot would emit intense UV light at 240 nm wavelength, as per current medical device standards.
Our key innovation is in making this mobile with a state of the art LIDAR based SLAM technology that allows operation without exposing the workers to either the harmful UV light or infected rooms of patients. The mobility allows the disinfection of various corners and narrow alleys. We will be using a mobile app to communicate with the robot and the user can see the real-time status of the robot.
The bottom side can be used for other autonomous applications for surveillance, for delivery, etc.
Block diagramROS (Robot Operation System) is a framework that facilitates the use of a wide variety of "packages" to control a robot. It acts as a middleware. Although ROS is not an operating system. ROS provides low-level device control, implementation of commonly-used functionality, message-passing between processes, and package management also provide packages range all the way from motion control, to path planning, mapping, localization, SLAM, perception, and more. ROS provides a relatively simple interface, and the ability to of course create custom packages.
We are using Raspberry Pi 3 for this project. Raspberry PI 4 and Jetson nano would be a great alternative for this project.
Get the disc imageWe downloaded the Ubuntu 16.04 Xenial with pre-installed ROS from Ubiquity Robotics. The link provided has all the steps to how to install it.
- Download the image from the top of the page.
- Flash it to an SD card (at least 8GB) Class 10 preferable.
- Connect to the WiFi network that starts with
ubiquityrobot. Password isrobotseverywhere. - Go to Terminal, and connect to your Pi using
ssh ubuntu@10.42.0.1. Password isubuntu. - Run
roscoreto make sure that things are working properly. If you get a warning/errors, try stopping ROS and starting it again withkillall -9 roscore.
There are three ways you can control and code your robot.
The easiest way was to connect the monitor and keyboard to raspberry pi to work with code.
Something we would want to be able to do is to access the ROS communication messages from our laptop.
Spin a Linux machine with ROS Kinetic Kame. Either a virtual machine or a real machine. I used a VMWare-Fusion with Ubuntu 16.04 We will refer to that machine as the Observer machine. The robot is the Master.
You can follow this tutorial to set up the robot as amaster and Laptop as an observer machine.
Notes- RVIZ won't work in VNC. I tried and failed. You need to use Virtual Box or Vmware to work with ROS remotely. I will explain the instructions in Step 8.
Follow this website to know how to connect your robot to your wifi.
- On the robot machine,
pifi add YOURNETWOKNAME YOURNETWORKPASSWORD - Restart the Pi,
sudo reboot. Now the Raspberry Pi will connect to your WiFi network on startup. To connect to it, connect your computer to the same network, andssh ubuntu@ubiquityrobot.localwith the passwordubuntu.
Woo! Now both machines have internet and can communicate over SSH.
5. Testing the lidarHow does LiDAR work?The basic principles for traditional LiDAR have been seen in time-of-flight-based distance measurement and triangulation-based measurement.
The ToF concept uses the delay time between the signal emission and its reflection to compute the distance to the target. The time delay is not measured for one particular beam’s round trip.
Basic overview of how ToF works. Image courtesy of Mark Hughes.
Instead, the phase shifts for multiple signals are used to indirectly obtain the ToF and then compute the distance. The triangulation method is used to measure the distance between the source and the obstruction.
Using 3D LiDAR offers richer information about the environment and more accurate and finessed maps in realtime.
We are using the YDLIDAR X4 for this build. The first step is to install the necessary drivers. The driver is a ROS package.
cd catkin_ws/src
git clone https://github.com/EAIBOT/ydlidar.git
cd ../
catkin_make
roscd ydlidar/startup // Make the shell script to an executable
sudo chmod 777 ./*
sudo sh initenv.sh- Go back to your catkin workspace, and run
source devel/setup.bash- Run
catkin_makeTest the lidar with
roslaunch ydlidar lidar_view.launchVisualize the scans in Rviz, by adding the topic /scan.
It may look something like this.
We know that the Raspberry Pi is the most important part of our robot. The Arduino will be controlling the motors.So we require communication between Raspberry Pi and Arduino, we will install rosserial, a ROS module that enables Arduino communication, on both the Raspberry Pi and the Arduino.
- Following the steps from the ROS website, we start with installing the package.
sudo apt-get install ros-kinetic-rosserial-arduino- and then,
sudo apt-get install ros-kinetic-rosserial- If you are using a ROS version different from Kinetic, change the word
kineticto your version.
In the following commands, substitute catkin_ws with the name of your catkin workspace.
git clone https://github.com/ros-drivers/rosserial.git
cd catkin_ws
catkin_make
catkin_make install
In your Arduino IDE, install the rosserial library. Search for rosserial in the Library Manager and install it.
Follow this link to run HelloWorld example,
- On the Raspberry Pi
roscore
In a second Raspberry Pi terminal,
rosrun rosserial_python serial_node.py /dev/ttyACM0. ChangettyACM0with the port of your Arduino. You can check the port by navigating to~/dev/, and observing which files disappear and re-appear when the Arduino is disconnected and connected.In another Raspberry Pi terminal, In a third terminal run
rostopic echo chatterYou will the messages.
7. Installing Hector-SLAMWe can install Hector -SLAM for mapping. We found this video by Tiziano Fiorenzani and the official resources on the ROS website helpful for setting Hector-SLAM up.
Clone the GitHub repository to your catkin workspace. Navigate to the src folder and run
git clone https://github.com/tu-darmstadt-ros-pkg/hector_slam.git.- Clone the GitHub repository to your catkin workspace. Navigate to the
srcfolder and run
catkin_make
source ~/catkin_ws/devel/setup.bash
We need to make a couple of modifications to the Hector SLAM tutorial files in order for them to work with our setup. We first take note of the transformations available to us on the \tf topic, and the reference frames they use.
- Spin the lidar node, with
roslaunch ydlidar_ros lidar.launch- Check the communication on the
/tftopic with
rostopic echo /tf- We will get only one transformation:
---
transforms:
  -
    header:
      seq: 0
      stamp:
        secs: 1578619851
        nsecs: 284012533
      frame_id: "/base_footprint"
    child_frame_id: "/laser_frame"
    transform:
      translation:
        x: 0.2245
        y: 0.0
        z: 0.2
      rotation:
        x: 0.0
        y: 0.0
        z: 0.0
        w: 1.0
---
So we see that we have only two frames. Namely /base_footprint and laser_frame. We will update the file
~/catkin_ws/src/hector_slam/hector_mapping/launch/mapping_default.launchFind this line and change from
<arg name="odom_frame" default="nav"/>
to
<arg name="odom_frame" default="base_footprint"/>.
At almost the very bottom of the file, change from/to:
<node pkg="tf" type="static_transform_publisher" name="map_nav_broadcaster" args="0 0 0 0 0 0 map nav 100"/>
to
<node pkg="tf" type="static_transform_publisher" name="map_nav_broadcaster" args="0 0 0 0 0 0 base_footprint laser_frame 100"/>
Navigate to
~/catkin_ws/src/hector_slam/hector_slam_launch/launch/tutorial.launchChange from
<param name="/use_sim_time" value="true"/>
to
<param name="/use_sim_time" value="false"/>
This should do the trick! Try it out!
- In a first terminal run the lidar with
roslauch ydlidar_ros lidar.launch- In a second terminal run Hector SLAM with
roslaunch hector_slam_launch tutorial.launchYou should be able to see the results in Rviz. Choose the /map topic to visualize the map that was created.
We now want to create a ROS package that would allow ROS communication to move the robot in the world. Again, Tiziano Fiorenzani has a great video explaining the basics of what we are doing here. In a nutshell, we want to make a subscriber node that would run on the Arduino, and listen to the topic /cmd_vel. We would want to begin with sending commands from the keyboard to the robot.
To see what this topic is all about, run
rosrun teleop_twist_keyboard teleop_twist_keyboard.pyIn another terminal, run
rostopic info /cmd_velto see that this topic publishes the structure Run
rosmsg show geometry_msgs/Twist
geometry_msgs/Vector3 linear
  float64 x
  float64 y
  float64 z
geometry_msgs/Vector3 angular
  float64 x
  float64 y
  float64 z
Let’s create the ROS node on our Arduino. We would want to map values in percentages (that we get from /cmd_vel) to the range [0, 255] that our motor controller understands.
We are uploading the code to Arduino and this will allow the robot to be controlled forward, backward, and sideways.
Check out the GitHub repo for full code.
#if (ARDUINO >= 100)
#include <Arduino.h>
#else
#include <WProgram.h>
#endif

#include <ros.h>
#include <geometry_msgs/Twist.h>
// Pin variables for motors.
const int right_back = 5;
const int right_front = 6;
const int left_back = 9;
const int left_front = 10;


ros::NodeHandle  nh;

void MoveFwd() {
  digitalWrite(right_back, HIGH);
  digitalWrite(left_back, HIGH);
  analogWrite(right_front,LOW);
  analogWrite(left_front, LOW);
}

void MoveStop() {
  digitalWrite(right_back, LOW);
  digitalWrite(left_back, LOW);
  analogWrite(right_front,LOW);
  analogWrite(left_front, LOW);
}
void MoveLeft() {
  digitalWrite(right_back, HIGH);
  digitalWrite(left_back, LOW);
  analogWrite(right_front,LOW);
  analogWrite(left_front, HIGH);
}
void MoveRight() {
  digitalWrite(right_back, LOW);
  digitalWrite(left_back, HIGH);
  analogWrite(right_front,HIGH);
  analogWrite(left_front, LOW);
}
void MoveBack() {
  digitalWrite(right_back, LOW);
  digitalWrite(left_back, LOW);
  analogWrite(right_front,HIGH);
  analogWrite(left_front, HIGH);
}

void cmd_vel_cb(const geometry_msgs::Twist & msg) {
  // Read the message. Act accordingly.
  // We only care about the linear x, and the rotational z.
  const float x = msg.linear.x;
  const float z_rotation = msg.angular.z;

  // Decide on the morot state we need, according to command.
  if (x > 0 && z_rotation == 0) {
    MoveFwd();
  }
  else if (x == 0 && z_rotation == 1) {
    MoveRight();
  }
else if (x == 0 && z_rotation < 0) {
    MoveLeft();
  }
else if (x < 0 && z_rotation == 0) {
    MoveBack();
  }
else{
    MoveStop();
  }
}
ros::Subscriber<geometry_msgs::Twist> sub("cmd_vel", cmd_vel_cb);
void setup() {
  pinMode(right_back, OUTPUT);
  pinMode(left_back, OUTPUT);
  pinMode(right_front, OUTPUT);
  pinMode(left_front, OUTPUT);


  nh.initNode();
  nh.subscribe(sub);
}

void loop() {
  nh.spinOnce();
  delay(1);
}
We can control the robot from our laptop now! In separate terminal instances, run the following:
Allow Arduino communication with
rosrun rosserial_python serial_node.py /dev/ttyACM0Control Arduino with the keyboard.
rosrun teleop_twist_keyboard teleop_twist_keyboard.pyCreating a launch file is pretty simple, and can be done following the documentation on ROS.org. In our case, we end up with the following launch file to launch all the necessary nodes for keyboard teleoperation.
<launch>
  <node pkg="rosserial_arduino" type="serial_node.py" name="serial_arduino">
    <param name="port" value="/dev/ttyACM0" />
  </node>

  <node pkg="teleop_twist_keyboard" type="teleop_twist_keyboard.py" name="teleop_twist_keybord">  </node>


</launch>
I am saving it in the name of UVbot_teleop.launch and saving it in a folder named UVbot in the Src folder.
Now you can use the use this code to control the robot using the keyboard
roslaunch UVbot UVbot_teleop.launchIn separate terminals, run:
roslaunch UVbot UVbot_teleop.launch
roslaunch ydlidar_ros lidar.launch
roslaunch hector_slam_launch tutorial.launch
And open Rviz from another Linux machine, if possible or in the rapsberry pi monitor to see it
Now, as you’ll be driving around the space (slowly! We want the map to be built accurately, so no need to give it a hard time doing so.) you’ll see a map starting to be built in real-time, in Rviz. The lighter colors are empty space, and the dark ones are obstacles.
When you think your map is sufficiently good, run the following:
rostopic pub syscommand std_msgs/String "savegeotiff"This will save a.tif and a.tfw files in ~/catkin_ws/src/hector_slam/hector_geotiff/maps directory.
This image shows an example map created.
Now it is autonomous and can drive on its own, and sense its environment. I will be updating this Github repository with code for other applications too.
import numpy as np
import math
import matplotlib.pyplot as plt
import rospy
from rospy.numpy_msg import numpy_msg
from sensor_msgs.msg import LaserScan
from geometry_msgs.msg import Twist
from controller import PID
class WallFollower:
# Import ROS parameters from the "params.yaml" file.
# Access these variables in class functions with self:
# i.e. self.CONSTANT
SCAN_TOPIC = "/scan"
DRIVE_TOPIC = "cmd_vel"
SIDE = -1 # -1 right is and +1 is left
VELOCITY = 1.6
DESIRED_DISTANCE = 0.5
def __init__(self):
# Create a node that
#   Subscribes to the laser scan topic,
#   Publishes to  drive topic - to move the vehicle.
# Initialize subscriber to laser scan.
rospy.Subscriber(self.SCAN_TOPIC, LaserScan, self.LaserCb)
# Initialize a publisher of drive commands.
self.drive_pub = rospy.Publisher(self.DRIVE_TOPIC, Twist, queue_size = 10)
# Variables to keep track of drive commands being sent to robot.
self.seq_id = 0
# Class variables for following.
self.side_angle_window_fwd_ = math.pi*0.1
self.side_angle_window_bwd_ = math.pi - math.pi*0.3
self.point_buffer_x_ = np.array([])
self.point_buffer_y_ = np.array([])
self.num_readings_in_buffer_ = 0
self.num_readings_for_fit_ = 2
self.reject_dist = 0.7
self.steer_cmd = 0
self.vel_cmd = self.VELOCITY
self.pid = PID()
def GetLocalSideWallCoords(self, ranges, angle_min, angle_max, angle_step):
# Slice out the interesting samples from our scan. pi/2 radians from pi/4 to (pi - pi/4) radians for the right side.
positive_start_angle = self.side_angle_window_fwd_
positive_end_angle   = self.side_angle_window_bwd_
if self.SIDE == -1: #"right":
start_angle = -positive_start_angle
end_angle   = -positive_end_angle
elif self.SIDE == 1: #"left":
start_angle = positive_start_angle
end_angle   = positive_end_angle
start_ix_ = int((-angle_min +start_angle)/angle_step)
end_ix_ = int((-angle_min +end_angle)/angle_step)
start_ix = min(start_ix_,end_ix_)
end_ix = max(start_ix_,end_ix_)
side_ranges = ranges[min(start_ix,end_ix):max(start_ix, end_ix)]
x_values = np.array([ranges[i]*math.cos(angle_min+i*angle_step) if i < len(ranges) else  ranges[(i - len(ranges))]*math.cos(angle_min+(i - len(ranges))*angle_step) for i in range(start_ix, end_ix) ])
y_values = np.array([ranges[i]*math.sin(angle_min+i*angle_step) if i < len(ranges) else ranges[i - len(ranges)]*math.sin(angle_min+(i - len(ranges))*angle_step) for i in range(start_ix, end_ix)])
# Check that the values for the points are within 1 meter from each other. Discard any point that is not within one meter form the one before it.
out_x = []
out_y = []
for ix in range(0, len(x_values)):
new_point = (x_values[ix],y_values[ix])
# This conditional handles points with infinite value.
if  side_ranges[ix] < 2.5 and side_ranges[ix] > 0 and abs(new_point[1]) < 7000 and abs(new_point[0]) < 7000 :
out_x.append(new_point[0])
out_y.append(new_point[1])
return np.array(out_x), np.array(out_y)
def LaserCb(self, scan_data):
# This function is called every time we get a laser scan.
# This is the plan:
# * Get scan data.
# * Convert it to x,y coordinates in the local frame of the robot.
# * Find a least squares - best fit line through those points with numpy.
#   Consider using data from multiple scans in one least-squares fit cycle.
#   This is a line equation, with respect to the car at (0,0), with the x axis being the heading.
#   Get vector theta for the line, and theta_0 as the y intersection.
# * Find the distance from the line to the origin with ( theta_T dot [[0],[0]] + theta_0 ) / (norm theta)
# TLDR, We have a vector theta for the line we have found, and a distance to that wall.
# TODO(yorai): Handle erroneous scan values. If one is too big, or too small, use past value.
# Do not do this for too many in a row, maybe just throw scan away if too many corrections.
angle_step = scan_data.angle_increment
angle_min = scan_data.angle_min
angle_max = scan_data.angle_max
ranges = scan_data.ranges
# Get data for side ranges. Add to buffer.
wall_coords_local = self.GetLocalSideWallCoords(ranges, angle_min, angle_max, angle_step)
#######
#Find mean and throw out everything that is 1 meter away from mean distance, no outliers.
# If one differs by more than a meter from the previous one, gets thrown out from both x and y. Distnaces as we go along vector of points.
# but print the things first.
#######
self.point_buffer_x_ = np.append(self.point_buffer_x_, wall_coords_local[0])
self.point_buffer_y_ = np.append(self.point_buffer_y_, wall_coords_local[1])
self.num_readings_in_buffer_ +=1
# If we have enough data, then find line of best fit.
if self.num_readings_in_buffer_ >= self.num_readings_for_fit_:
# Find line of best fit.
# self.point_buffer_x_ = np.array([0, 1, 2, 3])
# self.point_buffer_y_ = np.array([-1, 0.2, 0.9, 2.1])
A = np.vstack([self.point_buffer_x_, np.ones(len(self.point_buffer_x_))]).T
m, c = np.linalg.lstsq(A, self.point_buffer_y_, rcond=0.001)[0]
# Find angle from heading to wall.
# Vector of wall. Call wall direction vector theta.
th = np.array([[m],[1]])
th /= np.linalg.norm(th)
# Scalar to define the (hyper) plane
th_0 = c
# Distance to wall is (th.T dot x_0 + th_0)/(norm(th))
dist_to_wall = abs(c/np.linalg.norm(th))
# Angle between heading and wall.
angle_to_wall = math.atan2(m, 1)
# Clear scan buffers.
self.point_buffer_x_=np.array([])
self.point_buffer_y_=np.array([])
self.num_readings_in_buffer_ = 0
# Simple Proportional controller.
# Feeding the current angle ERROR(with target 0), and the distance ERROR to wall. Desired error to be 0.
print("ANGLE", angle_to_wall, "DIST", dist_to_wall)
steer = self.pid.GetControl(0.0 - angle_to_wall, self.DESIRED_DISTANCE - dist_to_wall, self.SIDE)
# Publish control to /drive topic.
drive_msg = Twist()
# drive_msg.header.seq = self.seq_id
# self.seq_id += 1
# Populate the command itself.
drive_msg.linear.x = self.VELOCITY
drive_msg.angular.z = steer
# drive_msg.drive.steering_angle = steer
# drive_msg.drive.steering_angle_velocity = 0.1
# drive_msg.drive.speed = self.VELOCITY
# drive_msg.drive.acceleration = 1
# drive_msg.drive.acceleration = 0.5
self.drive_pub.publish(drive_msg)
if __name__ == "__main__":
rospy.init_node('wall_follower')
wall_follower = WallFollower()
rospy.spin()
Control.py
#!/usr/bin/env python2
import numpy as np
import math
import matplotlib.pyplot as plt
import time
import rospy
class PID():
def __init__(self):
# Set gains.
self.Kp = 1.0
self.Ki = 0.5
self.Kd = 0.02
self.sample_time = 0.0
self.PTerm = 0.0
self.ITerm = 0.0
self.DTerm = 0.0
self.dist_weight_ = 0.7
self.angle_weight_ = 1.6
self.current_time = time.time()
self.last_time = self.current_time
self.last_error = 0.0
def GetControl(self,angle_error, dist_error, mode = -1):
# Takes in the pose of the robot wrt the wall, and returns a steer angle control.
# Mode is the position of the wall. -1 for right and +1 for left.
# Error will be positive if too far away from wall, and if angled away from wall.
# Error will be negative if too close to wall and if angled towards wall.
error = mode*self.angle_weight_*angle_error + self.dist_weight_*dist_error
self.current_time = time.time()
delta_time = self.current_time - self.last_time
delta_error = error - self.last_error
if (delta_time >= self.sample_time):
self.PTerm = self.Kp * error
self.ITerm += error * delta_time
self.DTerm = 0.0
if delta_time > 0:
self.DTerm = delta_error / delta_time
# Remember last time and last error for next calculation
self.last_time = self.current_time
self.last_error = error
steer_endpoint = math.pi/3
angle_command = self.PTerm + (self.Ki * self.ITerm) + (self.Kd * self.DTerm)
angle_command = np.clip(angle_command, -steer_endpoint, steer_endpoint)
# print("Command", angle_command)
print_lst = ['-' for i in range(20)]
print_lst[int((angle_command+steer_endpoint)/(2*steer_endpoint)*len(print_lst)-1)] = '*'
# print(print_lst)
return -angle_command*mode
We were deeply inspired by this project https://github.com/yoraish/lidar_bot.
NavigationFor navigation, this tutorial was a great help.
Wio terminalWe are using the Wio terminal which has many inbuilt sensors. The Wio Terminal is a SAMD51-based microcontroller with Wireless Connectivity supported by Realtek RTL8720DN that’s compatible with Arduino and MicroPython. It runs at 120MHz (Boost up to 200MHz), 4MB External Flash, and 192KB RAM. It supports both Bluetooth and Wi-Fi providing the backbone for IoT projects. The Wio Terminal itself is equipped with a 2.4” LCD Screen, onboard IMU(LIS3DHTR), Microphone, Buzzer, microSD card slot, Light sensor, and Infrared Emitter(IR 940nm). Really cool features in one single device right. In our case, it acts as a wifi access point and we can connect the raspberry pi and our Virtual machine to a single access point. The inbuilt display will show the time and other messages.
We are using the IMU sensor, inbuilt temperature sensor, and buzzer in the WIO terminal to detect a collision, overheating and it alerts through buzzer as well as our mobile app.
We are adding the UV light sensor to detect and get the feedback if UV light is ON or OFF.
The WIO terminal is also connected to the relay to control the UV lights. The WIO terminal acts as an access point as well as a server. So that we can control the relay from
UV SENSORIt uses a UV photodiode, which can detect the 240-370nm range of light. The signal from the photodiode is a very small level, in the nano-ampere level, hence an opamp to amplify the signal to a more Manageable voltage-level.
Use this basic code to test it
//input this code to test UV sensor
void setup() {
Serial.begin(115200);
pinMode(A8, INPUT);
}
void loop() {
int uvsensor = analogRead(A8);
Serial.print("UV intensity: ");
Serial.println(uvsensor);
delay(50);
}There is a thermistor. There is also a very basic chip inside that does some analog to digital conversion and shows a digital signal with the temperature and humidity. The digital signal is fairly easy to read using wio terminal. Here we are using it as a safety feature. The internal temperature of the robot is being measured here. If it is getting really high the complete system will shut down.
UV lightWe are using 20w unit 2ft Sanyo Japan UVC lamp with a full assembly which provides an area coverage of 70 sqft which is sufficient for our application. You can refer to these articles to find out more regarding the disinfection properties of UVC light.
- https://www.ncbi.nlm.nih.gov/pmc/articles/PMC6801766/
- https://www.who.int/emergencies/diseases/novel-coronavirus-2019/advice-for-public/myth-busters?gclid=EAIaIQobChMIsPPlg4K-6wIVU7eWCh2E7QtREAAYASAAEgK7HfD_BwE#uv
PIR sensors allow you to sense motion, almost always used to detect whether a human has moved in or out of the sensors range. They are small, inexpensive, low-power, easy to use, and don't wear out But it is a little inaccurate in our case we have to use Contact-less Infrared Thermopile Sensor with OpenCV to get more accurate data for human detection. We are working on the Thermopile sensor we will update in this tutorial really fast.
We are running the access point in the Realtek board and sensors are working from the wio terminal.
You have to burn the bootloader to get access to the Realtek board in Wio terminal, follow this link to do it.
This is the code we used.
#include <WiFi.h>
// Current time
unsigned long currentTime = millis();
// Previous time
unsigned long previousTime = 0;
// Define timeout time in milliseconds (example: 2000ms = 2s)
const long timeoutTime = 2000;
String header;
// Auxiliar variables to store the current output state
String output5State = "off";
String output4State = "off";
const int output5 =5;
const int output4 = 4;
char ssid[] = "UV bot";  //Set the AP's SSID
char pass[] = "12345678";     //Set the AP's password
char channel[] = "1";         //Set the AP's channel
int status = WL_IDLE_STATUS;  // the Wifi radio's status
WiFiServer server(80);
void printWifiStatus() {
// print the SSID of the network you're attached to:
// Serial.println();
// Serial.print("SSID: ");
// Serial.println(WiFi.SSID());
// print your WiFi shield's IP address:
IPAddress ip = WiFi.localIP();
//Serial.print("IP Address: ");
// Serial.println(ip);
}
void setup() {
//Initialize serial and wait for port to open:
Serial.begin(115200);
Serial1.begin(115200);
pinMode(output5,OUTPUT);
pinMode(output4,OUTPUT);
while (!Serial) {
; // wait for serial port to connect. Needed for native USB port only
}
// check for the presence of the shield:
if (WiFi.status() == WL_NO_SHIELD) {
//Serial.println("WiFi shield not present");
while (true);
}
String fv = WiFi.firmwareVersion();
if (fv != "1.0.0") {
// Serial.println("Please upgrade the firmware");
}
// attempt to start AP:
while (status != WL_CONNECTED) {
//Serial.print("Attempting to start AP with SSID: ");
//Serial.println(ssid);
status = WiFi.apbegin(ssid, pass, channel);
delay(10000);
}
//AP MODE already started:
// Serial.println("AP mode already started");
//Serial.println();
server.begin();
printWifiStatus();
}
void loop(){
WiFiClient client = server.available();   // Listen for incoming clients
if (client) { // If a new client connects,
Serial.println("New Client."); // print a message out in the serial port
String currentLine = ""; // make a String to hold incoming data from the client
while (client.connected()) { // loop while the client's connected
if (client.available()) { // if there's bytes to read from the client,
char c = client.read(); // read a byte, then
Serial.write(c); // print it out the serial monitor
header += c;
if (c == '\n') { // if the byte is a newline character
// if the current line is blank, you got two newline characters in a row.
// that's the end of the client HTTP request, so send a response:
if (currentLine.length() == 0) {
// HTTP headers always start with a response code (e.g. HTTP/1.1 200 OK)
// and a content-type so the client knows what's coming, then a blank line:
client.println("HTTP/1.1 200 OK");
client.println("Content-type:text/html");
client.println("Connection: close");
client.println();
// turns the GPIOs on and off
if (header.indexOf("GET /5/on") >= 0) {
//Serial.println("GPIO 5 on");
output5State = "on";
digitalWrite(output5, HIGH);
//Serial.print("5");
} else if (header.indexOf("GET /5/off") >= 0) {
// Serial.println("GPIO 5 off");
output5State = "off";
Serial.print("7");
digitalWrite(output5, LOW);
} else if (header.indexOf("GET /4/on") >= 0) {
//Serial.println("GPIO 4 on");
output4State = "on";
digitalWrite(output4, HIGH);
} else if (header.indexOf("GET /4/off") >= 0) {
//Serial.println("GPIO 4 off");
output4State = "off";
digitalWrite(output4, LOW);
}
client.println("<!DOCTYPE html><html>");
client.println("<head><meta name=\"viewport\" content=\"width=device-width, initial-scale=1\">");
client.println("<link rel=\"icon\" href=\"data:,\">");
// CSS to style the on/off buttons
// Feel free to change the background-color and font-size attributes to fit your preferences
client.println("<style>html { font-family: Helvetica; display: inline-block; margin: 0px auto; text-align: center;}");
client.println(".button { background-color: #195B6A; border: none; color: white; padding: 16px 40px;");
client.println("text-decoration: none; font-size: 30px; margin: 2px; cursor: pointer;}");
client.println(".button2 {background-color: #77878A;}</style></head>");
client.println("<h1>UV BoT</h1>");
client.println("<p>UV Light status " + output5State + "</p>");
// If the output5State is off, it displays the ON button
if (output5State=="off") {
client.println("<p><a href=\"/5/on\"><button class=\"button\">ON</button></a></p>");
}
else {
client.println("<p><a href=\"/5/off\"><button class=\"button button2\">OFF</button></a></p>");
}
client.println();
break;
}
else { // if you got a newline, then clear currentLine
currentLine = "";
}
} else if (c != '\r') {  // if you got anything else but a carriage return character,
currentLine += c;      // add it to the end of the currentLine
}
}
}
// Clear the header variable
header = "";
// Close the connection
client.stop();
// Serial.println("Client disconnected.");
// Serial.println("");
}
}
In the wio terminal run this code to get access to the inbuilt sensors, PIR, UV sensor and to control the UV lights by relay.
Wio Terminal working
Communication with Realtek board and Wio terminal board
Use this code to test the communication
void setup() {
RTL8720D.begin(115200);
Serial.begin(115200);
}
void loop() {
if (RTL8720D.available())
{
int inbyte = RTL8720D.read();
Serial.write(inbyte);
}
}The initial plan was to use two NEMA 34 motor with 85KGCM Torque and use two DM860A2 motor drivers. But one of them was not working properly and so we changed our motors and drivers.So in this project, we will be using four wiper motors and two BTS7960 IBT2 motor divers instead. These motors can carry a sufficient load of our robot and control and coding is simple too.
The robot identifies the charging port using path planning and comes and charges once every 5 hours. There are two rods on the robot and there are electrodes in the charging port which aligns properly. There is a magnetic reed switch which gets closed when the robot arrives.
Code
#include <UTFT.h>

// Declare which fonts we will be using
extern uint8_t BigFont[];


UTFT myGLCD(ILI9481,38,39,40,41,42);// ElecFreaks TFT2.2SP Shield


// constants won't change. They're used here to set pin numbers:
const int Reedswitch = 11;     // the number of the reedswitch pin
const int ledPin =  10;
const int relay = 9;
const int statusled = 12;

// variables will change:
int buttonState = 0;         // variable for reading the pushbutton status

void setup() {
   randomSeed(analogRead(0));

// Setup the LCD
  myGLCD.InitLCD();
  myGLCD.setFont(BigFont);
  digitalWrite(statusled, HIGH);
  // initialize the LED pin as an output:

  pinMode(ledPin, OUTPUT);
  pinMode(relay, OUTPUT);
  // initialize the pushbutton pin as an input:
  pinMode(Reedswitch, INPUT);
}

void loop() {


// Clear the screen and draw the frame
  //myGLCD.clrScr();

  // read the state of the reedswitch value:
  buttonState = digitalRead(Reedswitch);

  // check if the reedswitch is closed. If it is, the buttonState is HIGH:
  if (buttonState == HIGH) {
    // turn LED on:
    digitalWrite(ledPin, HIGH);
    digitalWrite(relay, HIGH);
   myGLCD.clrScr();
  myGLCD.setColor(255, 255, 255);
  myGLCD.setBackColor(255, 0, 0);
  myGLCD.print("UVBOT is Charging!", CENTER, 93);

  } else {

    digitalWrite(ledPin, LOW);
    digitalWrite(relay, LOW);
     myGLCD.setColor(255, 255, 255);
  myGLCD.setBackColor(0, 0, 255);
  myGLCD.print("Charging circuit is ON!", CENTER, 93);
  delay(20);
  }
}
Blockdiagram
Components
- ArduinoMega: It acts as the controller for the charging circuit.
- Relay:To safely switch on the circuit if the robot arrives and protects others from accidentally touching it.
- Reed switch: It is a magnetic switch it will be closed when magnets get in contact.
- Status LED: To see the status.
- Touch Screen It is used to show the status on the screen. We are using a 3.5-inch touch screen shield for Arduino Mega.
The electrodes on robot will align with the electrodes in the charging station.
We have used Aluminum for fabrication for the case since it is lighter.
Top Part
Holds a mirror to reflect light and holds the UV light.
Bottom Part
It holds the Motor, Battery, and Inverter.
Middle part
The middle part holds the Wio terminal and the safety circuits.
Charging circuit Fabrication
Motors
Motor wheels were cut using Lathe and were connected to the motors and have a diameter of 12 cm.
Base
- Switch on the Robot. It connects to the wifi of the WIO terminal.
- Control the Robot through and Map the room.
- Save the MAP.
- Switch it to Autonomous mode.
- You can switch on the UV light with the app.
- You can see the status of the UV robot in the app.
We have used a UV application to switch on and of the LED and to show the other status like UV bot is down or UV bot is charging. You can download the app from here.
UVBot WorkingBOM-Bill of materials- Robot weight: 36 pounds
- Robot Cost: 2300 USD
- Disinfection area: 70 sqr meters
- Running time with a single charging cycle. :5 Hours
- Height of the robot: 150cm
- Width of the robot: 52cm
- Omnidirectional wheel
- Better processor
- Better motors with feedback
- Better sensors for human detection.
- Use PCBs
- Proper weight distribution


_t9PF3orMPd.png?auto=compress%2Cformat&w=40&h=40&fit=fillmax&bg=fff&dpr=2)


Comments