

Hardware components | ||||||
| × | 1 | ||||
Software apps and online services | ||||||
| ||||||
| ||||||
| ||||||
 |
| |||||
 |
| |||||
Hi everyone, my name is Ivan Fardin and I'm a student of the MSc in Engineering in Computer Science at Sapienza University of Rome and this project has been developed as part of the Internet of Things 19-20 course.
In this article, I'll show you how to replace the MQTT protocol and the short-range wireless medium of the previous version with LoRaWAN™ and The Things Network developing a new RIOT-OS application that runs on the B-L072Z-LRWAN1 LoRa kit.
Since I haven't one, I used IoT-LAB to execute the RIOT-OS application on real devices.
The guide has been written using Ubuntu, so all terminal commands are intended for its users.
DemoOverviewThe project consists of:
- a RIOT-OS program that represents a virtual environmental station that generates periodically a set of random values for 5 different sensors: temperature, humidity, wind direction, wind intensity and rain height
- a The Things Network MQTT broker
- an MQTT transparent bridge
All the code is available in the GitHub repository in the Assignment3 folder.
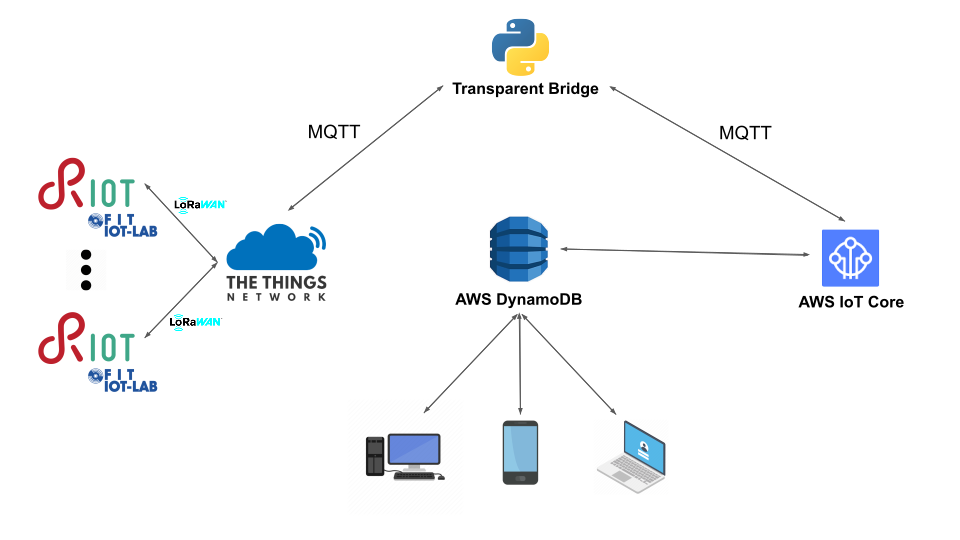
ArchitectureLet's start to analyze each component.
The devices are represented by the different processes of the RIOT-OS program that are running on B-L072Z-LRWAN1 LoRa boards of IoT-Lab.
IoT-LAB provides a very large scale infrastructure suitable for testing small wireless sensor devices and heterogeneous communicating objects.
Multiple instances of the RIOT-OS application can be started since each virtual environmental station uses a unique ID to publish its collection of values via LoRaWAN™ to TheThingsNetwork and is connected with exactly one different TheThingsNetwork device.
TheThingsNetwork is a global community of more than 80000 active members from over 100 countries around the world.
Together with the community, they are building a decentralized data network based on the technology called LoRaWAN™ which is perfect for the Internet of Things as it is low energy, long-range and low bandwidth.
TheThingsNetwork devices receive the messages from the stations and forward them to the MQTT transparent bridge running on the local machine according to the publish-subscribe pattern.
The bridge handles the communication between the devices and the AWS cloud subscribing to TheThingsNetwork MQTT broker and sending the stations' messages via MQTT to the AWS IoT message broker.
IoT-LabFirstly you need to sign up to FIT IoT-LAB, if not already registered, and configure the SSH credentials as explained in this guide. In the meanwhile take note of your ssh login on your profile page.
The Things NetworkLikewise, you need to sign up to TheThingsNetwork, if not already registered, and create an application from the console
Once you have done it, you will be redirected to the Overview tab. Here take note of the application ID and access key.
Then, go to the Payload Formats tab and set the payload decoder function as follows to convert hex to a Unicode string
function Decoder(bytes, port) {
  // Decode an uplink message from a buffer
  // (array) of bytes to an object of fields.
  var decoded = "";
  for(var byte in bytes)
    decoded += String.fromCharCode(bytes[byte]);
  return {"string": decoded};
}
Hence register some devices from the Devices tab by clicking on register device
and then auto-generating a device EUI by clicking on the crossed-over arrows icon.
Eventually, take note of the application EUI, device EUI and application key in your device page, soon they will be very important.
If you have already read my previous post, you are a good guy, so you don't need to clone the RIOT-OS GitHub repository which contains the modules needed to run the application.
Then pull or clone my GitHub repository to fetch the code of the RIOT-OS program.
Once you have downloaded it, open the Makefile in Assignment3/LoRa folder and change the path to the RIOT-OS directory with yours.
RIOTBASE ?= $(CURDIR)/<your-path-to-RIOT-dir>Then, in the current folder, build the station program
$ make clean alland copy the binary file in your IoT-LAB Saclay site home.
$ scp bin/b-l072z-lrwan1/riot_lora.elf <your-login>@saclay.iot-lab.info:riot_lora.elfNow you have to perform some step from the IoT-LAB LoRa tutorial in order to flash the application on their nodes, so connect to the Saclay site host
$ ssh <your-login>@saclay.iot-lab.infoand from the SSH frontend start an experiment with LoRas.
$ iotlab-auth -u <your-login>
$ iotlab-experiment submit -n <experiment-name> -d <time-in-minutes> -l <number-of-devices>,archi=st-lrwan1:sx1276+site=saclay
Then, wait a moment until the experiment is launched (the state is Running) and get the nodes list replacing <exp_id> with the experiment ID returned by the last command.
$ iotlab-experiment get -i <exp_id> -s
$ iotlab-experiment get -i <exp_id> -r
Since RIOT-OS doesn’t support the arm gcc version installed by default on the SSH frontend, e.g. 4.9, we provide arm gcc 7.3
$ export PATH=/opt/gcc-arm-none-eabi-7-2018-q2-update/bin:$PATHand then verify that you have the right gcc version.
$ arm-none-eabi-gcc --versionUse the CLI-Tools to flash the ST LoRa nodes with the LoRaWAN firmware that you have copied previously, repeating for a <number-of-devices> times and replacing <your-device-number> each time with one returned when you got the nodes list
$ iotlab-node --update riot_lora.elf -l saclay,st-lrwan1,<your-device-number>Now you can access the RIOT-OS shell running on your nodes using netcat on serial 20000.
$ nc st-lrwan1-<your-device-number> 20000To run multiple instances of the program you may need to run them in different terminals to better see the data generation, so I suggest you open a <number-of-devices> shells.
$ ssh <your-login>@saclay.iot-lab.info
$ nc st-lrwan1-<your-device-number> 20000
Then, you have to perform for all the LoRa nodes the set up with The Things Network replacing <your-device-eui>, <your-app-eui> and <your-app-key> with a <number-of-devices> different device EUIs, app EUIs e app keys taken from the devices registered in your The Things Network application.
> loramac set deveui <your-device-eui>
> loramac set appeui <your-app-eui>
> loramac set appkey <your-app-key>
> loramac set dr 5
> loramac join otaa
In the end, start the collection and publication of values from sensors.
> startDigit stop to properly stop it and Ctrl+c to close netcat.
To implement this RIOT-OS program, I started with the semtech-loramac test available in the forked RIOT-OS repository of IoT-LAB and I copied it to the main.c file in Assignment3/LoRa folder. Then I wrote the previous start command with which I create a new thread to periodically generate and transmit station values
static int cmd_start(int argc, char **argv) {
    // Trick to invoke the cmd, it never will be called with argc < 1
    if (argc < 1) {
        printf("Usage: %s\n", argv[0]);
        return 1;
    }

    // Start the station thread
    thread_create(station_thread_stack, sizeof(station_thread_stack), THREAD_PRIORITY_MAIN - 1,
                  THREAD_CREATE_STACKTEST, station_thread, NULL, "station");

    puts("Successfully started station");
    return 0;
}
and the stop one to end the transmission.
static int cmd_stop(int argc, char **argv) {
    // Trick to invoke the cmd, it never will be called with argc < 1
    if (argc < 1) {
        printf("Usage: %s\n", argv[0]);
        return 1;
    }

    if (!running)
      puts("No station to stop");

    else {
      running = 0;
      puts("Station stopped. Press Ctrl+c to close netcat");
    }
    return 0;
}

static const shell_command_t shell_commands[] = {
    { "start", "start a station", cmd_start },
    { "stop", "stop a station", cmd_stop },
    { NULL, NULL, NULL }
};
For further details open the file in my GitHub repository.
MQTT transparent bridgeAt the end you have to set up the folder from which the bridge read the credentials, so create an Assignment3/keys folder and in it a TTNkeys.txt file with the following format
TTN per VirtualEnvironmentStationsEmulator
appID,<your-app-ID>
accessKey,<your-access-key>
certFile,<your-CA-file>
The CA certificate is available in the API Reference on The Things Network site.
Then, move to Assignment3/MQTT_Transparent_bridge folder, open the MQTTClientTTN.py file and edit the path variable to the Assignment3/keys folder if necessary
$ path = "<your-path-to-keys-folder"In the end, open a new terminal window and start the bridge that will forward values to the AWS IoT broker
$ python MQTTClientTTN.pyUse Ctrl+c to properly close it.
If you set all correctly, you can see that messages sent from the stations in their terminal windows are received by the MQTT broker in its window (at the bottom-right in the picture).
The implementation is quite simple and similar to the myMQTTSNclient.py of the previous assignment.
Firstly, as usual, I installed the Python SDK for TTN package
$ pip install ttnand then I imported it
import ttnIn this class, you can see how I initialized the TTN client and the reuse of the keys.txt file as in the previous article
handler = ttn.HandlerClient(self.app_id, self.access_key, cert_path=path+self.cert_file)
self.mqtt_client = handler.data()
self.mqtt_client.set_uplink_callback(self.uplink_callback)
self.mqtt_client.connect()
To send messages to the AWS IoT broker I used the MQTTClient class from a callback as in the previous article.
Last but not least, I had to add the current date time to the JSON from the bridge because LoRa nodes don't get it properly.
That's all, now you have three ways to publish data and interact with them on the website.
Enjoy it and if you appreciate my work let me know with a like or a comment. Thank you!


Comments