

Software apps and online services | ||||||
 |
| |||||
| ||||||
Hi everyone, my name is Ivan Fardin and I'm a student of the MSc in Engineering in Computer Science at Sapienza University of Rome and this project has been developed as part of the Internet of Things 19-20 course.
In this article I'll show you how to replace the virtual environmental stations developed using Java in the previous version with new ones built using the RIOT-OS and MQTT-SN (MQTT for Sensor Networks) protocol.
The guide has been written using Ubuntu, so all terminal commands are intended for its users.
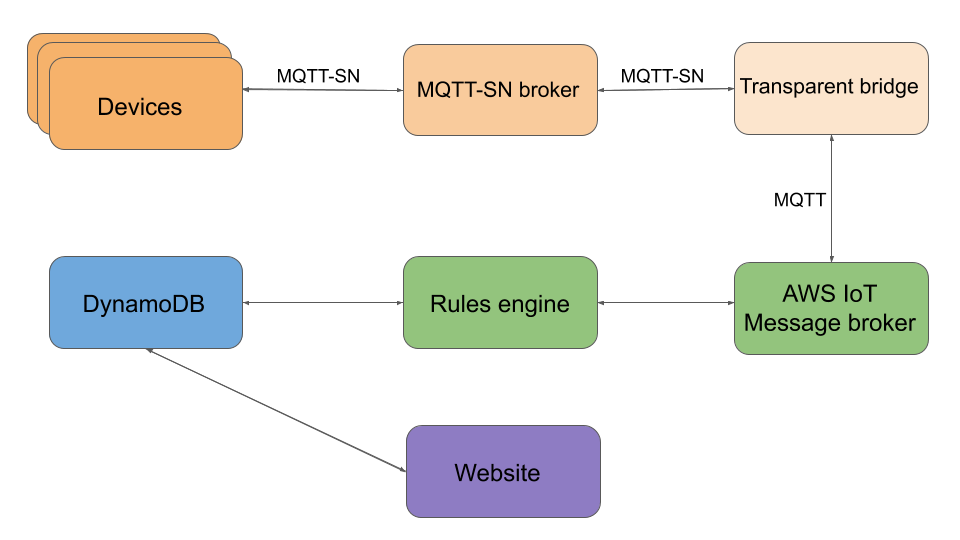
DemoOverviewThe project consists of:
- a Riot program that represents a virtual environmental station that generates periodically a set of random values for 5 different sensors: temperature, humidity, wind direction, wind intensity and rain height
- an MQTT-SN broker
- an MQTT-SN/MQTT transparent bridge
All the code is available in the GitHub repository in the Assignment2 folder.
ArchitectureLet's start to analyze each component.
RIOT-OS is a free, open-sourceoperating system for the Internet of Things that supports most low-power IoT devices and microcontroller architectures.
The devices are represented by the different processes of the Riot program that are running on your local machine through the Riot native emulator.
Indeed to simulate a real IoT system, multiple instances of the Riot program can be started since each virtual environmental station uses a unique ID to publish its collection of values on an MQTT-SN channel.
MQTT for Sensor Networks is aimed at embedded devices on non-TCP/IP networks, whereas MQTT itself explicitly expects a TCP/IP stack.
The MQTT-SN broker receives the messages from the stations and forwards them to the MQTT-SN/MQTT transparent bridge according to the publish-subscribe pattern.
The bridge handles the communication between the devices and the AWS cloud subscribing to the MQTT-SN broker and sending the stations' messages via MQTT to the AWS IoT Message broker.
MQTT-SN brokerFirstly you have to clone the Mosquitto Real Simple Message Broker (RSMB) GitHub repository.
Then, you need to set up it, so open a terminal, go into the source folder and build the RSMB
$ cd mosquitto.rsmb/rsmb/src
$ make
Hence, create a config file called config.conf
$ nano config.confand write the following:
# add some debug output
trace_output protocol
# listen for MQTT-SN traffic on UDP port 1885
listener 1885 INADDR_ANY mqtts
ipv6 true
# listen to MQTT connections on tcp port 1886
listener 1886 INADDR_ANY
ipv6 true
In this way you run the RSMB as MQTT and MQTT-SN capable broker, using port 1885 for MQTT-SN and 1886 for MQTT and enabling IPv6.
Eventually, start the broker
$ ./broker_mqtts config.confOnce the broker is started, clone the RIOT-OS GitHub repository that contains the modules needed to run the next program.
Since you will run the project under native, you must configure some global addresses, as the RSMB doesn't seem to be able to handle link-local addresses.
So, open another terminal and setup tap and tapbr devices using RIOT's tapsetup script
$ sudo ./RIOTDIR/dist/tools/tapsetup/tapsetupand assign a site-global prefix to the tapbr0 interface
$ sudo ip a a fec0:affe::1/64 dev tapbr0Now you are ready to clone my GitHub repository to fetch the code of the Riot program.
Once you have downloaded it, open the Makefile in Assignment2/emcute_MQTTSN folder and change the path to the RIOT directory with yours
RIOTBASE ?= $(CURDIR)/<your-path-to-RIOT-dir>Then, in the current folder, build the station program
$ make all term PORT=tap0 EMCUTE_ID=station1Therefore assign a site-global address with the same prefix within the RIOT native instance
> ifconfig 5 add fec0:affe::99and start the collection and publication of values from the station by connecting with the RSMB
> start fec0:affe::1 1885Use Ctrl+c to properly stop it.
If you set up it correctly, you can see that messages sent from the station, in one terminal window, are received by the MQTT-SN broker in its window.
To run multiple instances of the program you need to build it in different terminals with different PORTs and EMCUTE_IDs
$ make all term PORT=<tapX> EMCUTE_ID=<put-whatever-id>and assign different site-global addresses with the same prefix within the RIOT native instance
> ifconfig 5 add fec0:affe::<XX>To know which tap interfaces are available use the following command in a shell
$ ifconfig | grep tapTo implement this RIOT program, I started with the emcute example available in the Riot repository and I copied it to the main.c file. Then I wrote the previous start command with which I create a new thread to periodically generate and transmit station values.
static int cmd_start(int argc, char **argv) {
    if (argc < 3) {
        printf("usage: %s <ipv6 addr> <port>\n", argv[0]);
        return 1;
    }

    // Start the connection with the MQTT broker
    char* con_param[3] = {"con", argv[1], argv[2]};
    //char* con_param[3] = {"con", "fec0:affe::1", "1885"};
    int res = cmd_con(3, con_param);
    if(res)
      return 1;

    connected = 1;

    // Start the station thread
    thread_create(station_thread_stack, sizeof(stack), THREAD_PRIORITY_MAIN - 1,
                  THREAD_CREATE_STACKTEST, station_thread, NULL, "station");

    puts("Successfully started station");
    return 0;
}

...

static const shell_command_t shell_commands[] = {
    { "start", "start a station", cmd_start },
    ...
};To conclude you have to set up the folder from which the bridge read the credentials, so open the key.txt file in Assignment1/keys folder created in the previous article and add the following line
rootCAFile,<your-root-CA-file>Then, go to Assignment2/MQTT-SN_MQTT_Transparent_bridge folder, open the MQTTClient.py file and edit the path variable to the Assignment1/keys folder if necessary
$ path = "<your-path-to-keys-folder"In the end, open a third terminal window and start the bridge that will forward values to the AWS IoT broker
$ python myMQTTSNclient.pyUse Ctrl+c to properly stop it.
Since I switched from Java to Python, let's see how the communication between the client and the AWS service is performed.
Firstly, as usual, I imported the aws-iot-device-sdk-python package into a newly created class called MQTTclient
from AWSIoTPythonSDK.MQTTLib import AWSIoTMQTTClientThen, you can see how I initialized the client and the reuse of the keys.txt file as in the previous article with the addition of the root CA file
# For TLS mutual authentication
self.myMQTTClient.configureEndpoint(values["clientEndpoint"], 8883)
self.myMQTTClient.configureCredentials(path+values["rootCAFile"], path+values["privateKeyFile"], path+values["certificateFile"])
self.myMQTTClient.configureOfflinePublishQueueing(-1) # Infinite offline Publish queueing
self.myMQTTClient.configureDrainingFrequency(2) # Draining: 2 Hz
self.myMQTTClient.configureConnectDisconnectTimeout(10) # 10 sec
self.myMQTTClient.configureMQTTOperationTimeout(5) # 5 sec
The connection of the client to the server is trivial
self.myMQTTClient.connect()as well as the publishing and subscribing.
self.myMQTTClient.publish(topic, payload, 0)

self.myMQTTClient.subscribe(topic, 1, customCallback)
As you have seen the code is simpler than using Java.
For further explanations, refer to the guide of aws-iot-device-sdk-python.
So, in the myMQTTSNclient.py file, I edited the Python client available in the RSMB repository in order to listen to the messages of the stations and handle them with a callback that sends them to the AWS broker through the MQTTClient class
aclient = Client("linh", port=1885)
aclient.registerCallback(Callback())
aclient.connect()

rc, topic1 = aclient.subscribe(<topic>)

# Loop to receive messages and intercept Ctrl+c to disconnect in a correct way
try:
    while True:
        pass
except KeyboardInterrupt:
    print("\nClosing the transparent bridge...")
    aclient.disconnect()
    sys.exit()
That's all, now you have two ways to publish data and retrieve them from the website. So enjoy it and if you appreciate my work let me know with a like or a comment. Thank you!
Visit my LinkedIn profile for more details about me.


Comments