

Software apps and online services | ||||||
 |
| |||||
 |
| |||||
| ||||||
 |
| |||||
 |
| |||||
Hi everyone, my name is Ivan Fardin and I'm a student of the MSc in Engineering in Computer Science at Sapienza University of Rome and this project has been developed as part of the Internet of Things 19-20 course.
In this article I'll show you how to setup an IoT MQTT cloud based system, including sensors, a database and a website using Amazon Web Services (AWS).
DemoThe project consists of:
- a Java program that represents a virtual environmental station that generates periodically a set of random values for 5 different sensors: temperature, humidity, wind direction, wind intensity and rain height
- an IoT MQTT cloud-based backend system implemented using AWS IoT.
- a website that provides the following functionalities:
- • display the latest values received from all the sensors of a specified environmental station;
- • display the values received during the last hour from all environmental stations of a specified sensor
All the code is available in the GitHub repository.
ArchitectureAs already mentioned, the project consists of three components:
- devices
- backend
- website
let's start to analyze each of them.
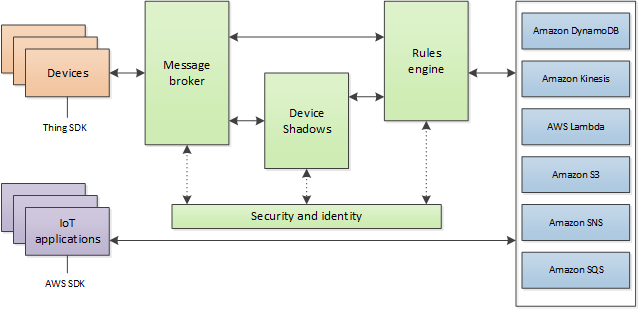
The backend is implemented using AWS IoT which provides secure, bi-directional communication (protected through the use of X.509 certificates) between Internet-connected devices such as sensors, actuators, embedded micro-controllers, or smart appliances and the AWS Cloud.
The devices are represented by the the different processes of the Java program that are running on your local machine. Indeed to simulate a real IoT system, multiple instances of the Java program can be started since each virtual environmental station uses a unique ID to publish its collection of values on an MQTT channel.
The communication between the devices and the AWS cloud is handled by the AWS IoT message broker according to the publish–subscribe pattern.
The AWS IoT message broker provides a secure mechanism for devices and AWS IoT applications to publish and receive messages from each other.
You can use either the MQTT protocol directly (as I will show you later) or MQTT over WebSocket to publish and subscribe.
The AWS IoT message broker connects AWS IoT clients by sending messages from publishing clients to subscribing clients. Clients send data by publishing a message on a topic and receive messages by subscribing to a topic. When the message broker receives a message from a publishing client, it forwards the message to all clients that have subscribed to that topic.
Moreover, AWS IoT offers the possibility to create rules that define one or more actions to perform based on the data in a MQTT message, so I implemented a persistent layer by creating a rule in which the message broker will insert all the incoming messages from the stations to a specified AWS DynamoDB table.
Eventually, the website will connect to the AWS DynamoDB service to retrieve and display devices data according to functionalities written before.
AWS ConfigurationFirstly you need to create an AWS account if you not have one. As a student I've an AWS educate one that offers at no-cost a limited access to cloud resources.
If like me you have an AWS educate account ensure that the selected region is us-east-1 (North Virginia), the only one available for this type of account, otherwise the backend will not work.
Once you signed up or logged in, move on to the next section.
DynamoDB
In this section I'll show you how to create an AWS DynamoDB table.
In the AWS console find the DynamoDB service and click on it. Then click on Create table and fill out the form as follow, then press Create.
For consistency with the code in the website section blocks I will use Id and dateTime but of course you can put whatever attribute as partition and sort key, as well as decide to not use a sort key.
When the table is created, you can get the associated ARN (Amazon Resource Name) scrolling the Overview tab.
By clicking on the Items tab you can see which elements are present in the table.
Nothing could be simpler, your DB is ready.
Cognito
In this section I'll explain to you how to create an AWS Cognito Identity Poll that grant users access to the DynamoDB service.
In the AWS console search and select the Cognito service.
In its homepage press the Create Identity Poll button and fill out the form as follow, then click on Create Pool and next on Allow.
Hence, click on the Sample code tab to view your pool ID.
Now move to the IAM service page and click on Roles
Here search the new unauth Cognito role just created and click on it.
Then press the Attach policies button
and search for DynamoDBFullAccess, select it and press the Attach policy button.
You are done, your Cognito identity poll is ready to be used to access your DynamoDB.
IoT Core
In this section I'll show you how to create a thing object using AWS IoT Core.
In the AWS console find the IoT Core service and click on it.
Here you have to connect your device to the platform, so go to Onboard and click on Get started in Onboard a device.
Then select how you are connecting to AWS IoT, in this case I use the Linux platform and the Java programming language and press Next.
Insert the name of your thing and go ahead
Then download the certificate and the private and public keys and go to the next step.
Here will you display a tutorial to configure and test your device, hence press Done. Your things has been created :)
After, take note of your region and account ID from the Amazon Resource Name (ARN) that uniquely identifies your thing.
ARNs have the following general formats:
- arn:partition:service:region:account-id:resource-id
- arn:partition:service:region:account-id:resource-type/resource-id
- arn:partition:service:region:account-id:resource-type:resource-id
So, from the IoT Core initial page go to Things, choose the new created one and click on it.
Then, from the IoT Core initial page click on Settings and take note of your custom endpoint that allows you to connect to AWS IoT via REST API (it will be very useful later).
Now you need to edit the policy that was generated when you created your thing in order to allow your client to connect and communicate with the broker via MQTT.
Hence, from the IoT Core initial page go to Secure and then to Policies and click on the policy associated with your thing
Here click on Edit policy document and use this JSON replacing the region and account ID fields with the ones that you've taken before.
{
  "Version": "2012-10-17",
  "Statement": [
    {
      "Effect": "Allow",
      "Action": [
         "iot:Publish",
         "iot:Receive"
      ],
      "Resource": [
         "arn:aws:iot:<your-region>:<your-account-id>:topic/<your-topic>",
         "arn:aws:iot:<your-region>:<your-account-id>:topic/sdk/test/java",
         "arn:aws:iot:<your-region>:<your-account-id>:topic/sdk/test/Python",
         "arn:aws:iot:<your-region>:<your-account-id>:topic/topic_1",
         "arn:aws:iot:<your-region>:<your-account-id>:topic/topic_2"
      ]
    },
    {
      "Effect": "Allow",
       "Action": [
         "iot:Subscribe"
       ],
       "Resource": [
          "arn:aws:iot:<your-region>:<your-account-id>:topicfilter/sdk/test/java",
          "arn:aws:iot:<your-region>:<your-account-id>:topicfilter/sdk/test/Python",
          "arn:aws:iot:<your-region>:<your-account-id>:topicfilter/topic_1",
          "arn:aws:iot:<your-region>:<your-account-id>:topicfilter/topic_2"
       ]
    },
    {
       "Effect": "Allow",
       "Action": [
         "iot:Connect"
       ],
       "Resource": [
         "arn:aws:iot:<your-region>:<your-account-id>:client/${iot:ClientId}",
         "arn:aws:iot:<your-region>:<your-account-id>:client/sdk-java",
         "arn:aws:iot:<your-region>:<your-account-id>:client/basicPubSub",
         "arn:aws:iot:<your-region>:<your-account-id>:client/sdk-nodejs-*"
      ]
    }
  ]
}
Where:
- the ${iot:ClientId} variable represents the client ID used to connect to the AWS IoT Core message broker
- * is a wildcard for topic names equivalent to # wildcard in MQTT protocol
For more info about IoT policies see the relative documentation.
Now you have to add a rule to the broker to insert all the incoming messages of a specified topic in your DynamoDB table. Take note of the topic, you will use it later.
In order to do that go to Act and press the Create a rule button. Then fill out the form as follows
Scroll the page and press the first Add action button to set an action for the rule
and select Insert a message into a DynamoDB table.
Then click on Configure action at the bottom of the page and fill out the next form as follows
I used the sintax ${<name>} to extract the value of a specified field of the JSON message sent via MQTT to the broker and write it as attribute value of the DynamoDB keys.
WARNING: If you defines different DynamoDB keys use them instead of Id and dateTime.
Finally click Add action and then Create rule to conclude: your backend is finally ready.
Once you have setup your cloud-based backend, it's time to produce data to populate the AWS DynamoDB table.
To achieve this, clone the GitHub repository and open the Assignment1 folder. Here you can find the VirtualEnvironmentStationsEmulator folder where the Java project is stored.
Before starting to collect data you need to setup the program, so create a folder called keys where to put the certificate and keys of the thing previously downloaded from AWS IoT.
Then, to avoid generating a KeyStore object each time the program is launched, create it now importing the X.509 certificate and the private key into the.keystore file like so:
$ openssl pkcs12 -export -in <certificate-file> -inkey <private-key-file> -out p12.keystore -name alias
(type in the export password)

$ keytool -importkeystore -srckeystore p12.keystore -srcstoretype PKCS12 -srcstorepass <export-password> -alias alias -deststorepass <keystore-password> -destkeypass <key-password> -destkeystore <your-keystore-file>
Moreover, in the same folder create a csv-like file called key.txt with the following format:
AWS for <your-app-name>
filename,<your-keystore-file>
keyStorePass,<keystore-password>
keyPass,<key-password>
certificateFile,<your-thing-certificate-file>
privateKeyFile,<your-thing-private-key-file>
clientEndpoint,<your-client-endpoint>
Eventually, open the VirtualEnvironmentStationsEmulator folder with your favorite IDE and then the VirtualEnvironmentStation.java file.
So, edit the following line replacing my topic with the one you used in your AWS IoT Rule.
mqttClient.publish("<your-topic>", json.toString(), false);Now you are ready to collect data, so let's see how the communication between the client and the service is performed.
Open the pom.xml file, here I installed the aws-iot-device-sdk-java using Maven in order to use AWS IoT SDK for Java.
<dependencies>
 <dependency>
  <groupId>com.amazonaws</groupId>
  <artifactId>aws-iot-device-sdk-java</artifactId>
  <version>1.3.6</version>
 </dependency>
</dependencies>
Then move to the MQTTClient.java file. In this class, you can see how I initialized the client and you can now understand why you had to create the key.txt file: we must never expose our credentials when we publish code.
// MQTT over TLS 1.2 (loading key store directly from a file)
String path = "../keys/";
Map<String, String> values = Util.readFromCSVFile(path + "key.txt");

String clientEndpoint = values.get("clientEndpoint");
String keyStoreFile = values.get("filename");
String keyStorePassword = values.get("keyStorePass");
String keyPassword = values.get("keyPass");

KeyStore keyStore = null;
try {
  keyStore = KeyStore.getInstance(KeyStore.getDefaultType());
  keyStore.load(new FileInputStream(path + keyStoreFile), keyStorePassword.toCharArray());
} catch (Exception e) {
    System.out.println("An error occurred while initializing the MQTT client!");
    e.printStackTrace();
    System.exit(1);
}

client = new AWSIotMqttClient(clientEndpoint, clientId, keyStore, keyPassword);
Then the connection of the client to the server is trivial.
// optional parameters can be set before connect()
try {
  client.connect();
} catch (Exception e) {
    System.out.println("An error occurred while connecting the MQTT client!");
    e.printStackTrace();
    System.exit(1);
}
To implement the publish-subscribe pattern I had to create two very simple classes PublishListener and TopicListener and then wrote this two functions in the MQTTClient class
// To publish a message to a topic using a blocking/non-blocking API
public void publish(String topic, String payload, boolean block) {
  //String topic = "my/own/topic";
  //String payload = "any payload";
  AWSIotQos qos = AWSIotQos.QOS0;
  long timeout = 3000;   // milliseconds

  try {
    if (block)
      client.publish(topic, qos, payload);
    else {
      PublishListener message = new PublishListener(topic, qos, payload);
      client.publish(message, timeout);
    }
  } catch (Exception e) {
      System.out.println("An error occurred while publishing a message with the MQTT client!");
      e.printStackTrace();
    }
}


// To subscribe to a topic
public void subscribe(String topicName) {
  //String topicName = "my/own/topic";
  AWSIotQos qos = AWSIotQos.QOS0;
  TopicListener topic = new TopicListener(topicName, qos);

  try {
    client.subscribe(topic);
  } catch (Exception e) {
      System.out.println("An error occurred while subscribing to a topic with the MQTT client!");
      e.printStackTrace();
  }
}
For further explanations, refer to the guide of aws-iot-device-sdk-java.
In the end, choose your favorite way to start the program between:
- GUImain (recommended: more control on sending MQTT messages. Start, pause, resume and stop it by using a simple GUI)
- Main (terminal based (no control on sending MQTT messages. Start it and it will work until you'll stop it)
and launch many instances of them to emulate a real IoT system.
WebsiteThe website is the way to properly present devices data according to these functionalities:
- display the latest values received from all the sensors of a specified environmental station
- display the values received during the last hour from all environmental stations of a specified sensor
When you are in the homepage click the Get started button to be redirected to the dashboard. Here you will find a table where are inserted all the environment stations that have communicated with the cloud-based backend.
In the status column you can see if the corresponding station is currently sending data (Online) or not (Offline).
You can perform the first functionality by clicking one row of the table, then a chart is displayed and automatically updated if the station is Online.
To close the graph re-click the same row.
To achieve the second functionality press one of the button immediately below the table, then for each station that has sent messages in the past hour about the specified sensor a chart is showed, so they can be none or many.
Let's see how to implement the communication between the website and the AWS DynamoDB.
Firstly you have to setup a connection with the AWS backend to retrieve data from your AWS DynamoDB table, so import the AWS SDK library for Javascript
<script src="https://sdk.amazonaws.com/js/aws-sdk-2.7.16.min.js"></script>and add your region and identity pool ID for AWS Cognito.
// Initialize Amazon Cognito credentials provider
AWS.config.region = '<your-region>';
AWS.config.credentials = new AWS.CognitoIdentityCredentials({
  IdentityPoolId: '<your-identity-pool-id>',
});//*/

var docClient = new AWS.DynamoDB.DocumentClient();
Now you are ready to query your database and since DynamoDB is a NoSQL one we have to use the following sintax
var params = {
  TableName : "<your-table-name>",
  ProjectionExpression: "<your-attribute1-to-project>, ..., <your-attributeN-to-project>",
  KeyConditionExpression: "<expression-on-key-attributes>",
  FilterExpression: "<expression-on-key-attributes>",
  ExpressionAttributeNames:{
    "<attribute1-substitution>": "<attribute1>",
    ...,
    "<attributeM-substitution>": "<attributeM>"
  },
  ExpressionAttributeValues: {
    "<attribute1-value-substitution>": "<attribute1>",
    ...,
    "<attributeL-value-substitution>": "<attributeL>"
  }
};
where:
- KeyConditionExpression specifies the search criteria: a string that determines the items to be read from the table or index. You must specify the partition key name and value as an equality condition
- FilterExpression determines which items within the query results should be returned to you
- ExpressionAttributeNames provides name substitution. This is used because some words are reserved in Amazon DynamoDB
- ExpressionAttributeValues provides value substitution. This is used because you can't use literals in any expression, including KeyConditionExpression
- N >= M and N >= L
For more details consult the AWS DynamoDB Documentation.
Hence to satisfy the first functionality, the query is the following
var params = {
  TableName : "<your-table-name>",
  ProjectionExpression: "Id, #dt, Payload",
  KeyConditionExpression: "Id = :stationId",
  ExpressionAttributeNames:{
    "#dt": "dateTime"
  },
  ExpressionAttributeValues: {
    ":stationId": stationId
  }
};

docClient.query(params, function(err, data) {
  if (err) {
    // Error
  } else {
    // Success, do stuff
  }
});
while for the second one I use a scan because my condition is not on the partition key
var params = {
  TableName : "<your-table-name>",
  ProjectionExpression: "Id, #dt, Payload",
  ExpressionAttributeNames:{
    "#dt": "dateTime"
  },
  FilterExpression: "#dt between :start_h and :end_h",
  ExpressionAttributeValues: {
    ":start_h": dateTimeCurrent,
    ":end_h": dateTimeOneHourAgo,
  }
};

docClient.scan(params, onScan);

function onScan(err, data) {
  if (err) {
    // Error
  } else {
    // Success
    data.Items.forEach(function(element) {
      // Do stuff
    });

    // Continue scanning if we have more data (per scan 1MB limitation)
    if (typeof data.LastEvaluatedKey != "undefined") {
    params.ExclusiveStartKey = data.LastEvaluatedKey;
    docClient.scan(params, onScan);
  }
}
Warning: as partition key I used Id while as sort key dateTime, they must be consistent with those you defined in your DynamoDB table. So, if you used different ones, replace my keys with yours in the code.
If you are interested to all website code, see the docs folder in the GitHub repository.
That's all, enjoy it and if you appreciate my work let me know with a like or a comment. Thank you!
Visit my LinkedIn profile for more details about me.


Comments