


Hardware components | ||||||
 |
| × | 1 | |||
| × | 1 | ||||
| × | 1 | ||||
 |
| × | 1 | |||
| × | 1 | ||||
| × | 1 | ||||
| × | 1 | ||||
 |
| × | 1 | |||
| × | 1 | ||||
| × | 1 | ||||
Software apps and online services | ||||||
| ||||||
The Coffee Conundrum
I am a coffee connoisseur and visit the cafeteria coffee kiosk twice a day, so naturally, I really appreciate the reward system that the cafeteria offers. The only problem was that I kept losing my reward cards (ugh!). I asked around and learned that others shared a similar experience. At the same time, our company launched an internal competition to showcase the power of Zynq UltraScale+ MPSoC — so I used this opportunity to utilize the Xilinx ecosystem to come up with a solution.
The Solution
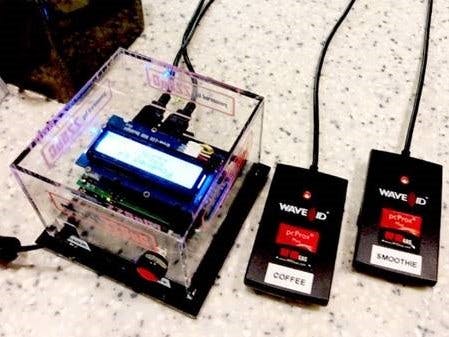
The Ultra96 board came with a pre-built PetaLinux image, so adding plug-n-play USB devices was fairly straight-forward. I thought of using a USB badge scanner to keep track of the coffee purchases and found a $100 badge scanner on eBay that worked with our company badges. The badge scanner acts as a HID (Human Interface Device), and the scanned value can be read as keystrokes. Since the cafeteria offers a reward for both coffee and smoothie purchases, I configured two card readers – this was mainly done to make it user-friendly for the cafeteria staff.
The entire project was done with 250 lines of Python code that executed on the pre-built PetaLinux image. The code maintains a SQlite database. It reads the scanner input and then queries the database. If the badge value doesn’t exist, then it creates an entry and sets the count to 1. If the entry already exists, it updates the count. The count value is displayed on the attached LCD. It alerts the users if they have reached the magic number for a free drink.
Reading and storing badge IDs is a major concern for the global security team. This was addressed by salting and then hashing the values. Another concern was hardware failure; in case of such failure, the database could be lost, and we could have many unhappy users. I added daily, weekly, and monthly cron jobs to back up the database onto the office Ultra96 server. This way, we can recover from a catastrophic failure. The following flow diagram shows the various blocks within the main Python function and the cron jobs that back up the database. (Note: Because implementing back-ups is specific to your network, that part is not covered in the project instructions.)
Physical Design
I was also mindful of the rough usage of this board once it was deployed, I wanted to ensure that the final product was:
- Aesthetically pleasing
- Rugged: Can withstand heavy use, Water/dust proof (to some degree)
- Thermally proficient: The design should allow for sufficient airflow to allow cooling of the board & LCD for long-term system stability
- Accessible: Unobstructed view of LCD. Allow easy access to USB & power connectors. In case of any issues, they can be disconnected/connected. Add external power ON / OFF button. Eliminates the need to physically touch the board or mezzanine
- Showcased the Ultra96 board & kit
Based on the above I worked with a machine shop to come up with a design that met the above criteria. See the project cover photo.
I am happy to say that, as of when this was written, we have 500 unique coffee users & 100 unique smoothie users of this application. The ease of design is a testament to the power of PetaLinux and its pre-built functions and libraries.
WiFi Network and Security Considerations
At our office, there is a separate WiFi network for development boards. This is to ensure that any security vulnerabilities in a semi-developed/in-progress/experimental project can't be used to hack into the production network. So, my system is using that WiFi network to perform its backups.
If security is a concern on your network, when you are developing and testing your projects, you might consider setting up a separate network to isolate your experimental projects from your other computers.
Step 1: Badge Reader Configuration1. Download and install the pcProxConfig utility. Documentation page. Manual for the PCProxPlus.
2. Plug in the badge reader into the USB port of your computer.
3. Open the pcProxConfig utility. You should see it appear in the “Device list”.
4. In order to test out your badge reader with the configuration that you set, check the “Auto GetID” checkbox.
5. Follow the “Card Analyzer” process in chapter 3 of the pcProxPlus manual, up to and including the section “AutoConfig” to learn the configurations for each badge type that you plan to accept. At the end of “Auto Config”, make sure you write the configurations to the badge reader.
Note that the following screenshots will have some fields blacked-out, for privacy/security purposes.
6. Next, configure the output of the badge reader so that the data is usable by the hashrfid.py application included in this project.
In the Format > Data format tab, set fields as shown in this screenshot:
Then, in the Format > Delimiters tab, set fields as shown in this screenshot:
Click on “Write Active” to write the settings you just updated (i.e. the “active configuration”) to the card reader.
7. If you have a second badge reader(e.g. for the smoothie lovers at your café), repeat the badge reader configuration steps above. Then, so that we can distinguish a smoothie input from a coffee input, we put a leading “1”on the data for smoothies: Go to Format > Delimiters and set fields as shown in this screenshot (i.e. Change the pre-data delimiter to be 1 instead of 0):
And then click on the “Write Active” button to write the configuration to the smoothies badge reader.
Click inside the green rectangle in “Output test area”. If you scan your badge (don’t forget to make sure Auto GetID is checked), you should see that the ID will start with a 1 from the smoothie badge reader and with a 0 from the coffee badge reader. (Screenshot omitted for security/privacy)
Step 2: Board Setup1. Very important! Make sure the power supply is NOT plugged into the Ultra96 board.
2. Insert the micro SD card with the Ultra96 default image (This has the PetaLinux boot image, NOT the Ultra96 PYNQ image). Make sure it is fully inserted.
If you have accidentally overwritten the micro SD card that came with your Ultra96, follow the instructions to make a new micro SD card with the Ultra96 default image at this page.
Carefully attach the 96Boards Sensors mezzanine card to the Ultra96.
4. Plug in the Grove-LCD RGB Backlight into the I2C0 port on the 96Boards Sensors mezzanine.
5. Plug the micro USB cable into the 96Boards Sensors mezzanine and connect it to your computer. Plug in the power cable to the Ultra96, but leave the board turned off for now.
- Let Windows find the driver for this device. It should get detected, even though the board is off.
- If Windows couldn't find the driver, install it manually: http://www.ftdichip.com/Drivers/VCP.htm
- After that, you can follow the instructions here for connecting a Terminal Emulator on your machine to talk to the board through the UART (PuTTY was used to take the screenshots below, but you can choose your favorite)
- Power on the board using the"PWR" switch S1 on the 96Boards Sensors Mezzanine and you will now see the boot messages appearing on your Terminal Emulator.
1. From a laptop or other device, connect to the Ultra96 WiFi network called Ultra96_xxxxxxxxxxxx according to the instructions under “Option 1” at https://www.96boards.org/documentation/consumer/ultra96/ultra96-v1/getting-started/
2. Load http://192.168.2.1
3. Scroll down the page and select the link “WiFi setup"
4. Click on the “Refresh Connections” button. It will take about 30 seconds for the list of networks to get refreshed.
5. Then look for your WiFi network in the “Network Name” drop-down and enter your network’s password.
6. Once connected, you will get a message that the WiFi network was successfully added.
7. Test that the connection is working by going back to the terminal emulator and entering the command "wget https://www.kernel.org/index.html"(without the quotes). Check that “index.html” now appears in your current directory.
Step 4: Software Setup1. In order to run the Python application for this project, you will need the evdev package. Now that you have your WiFi setup & working, go to the terminal emulator and type the command below:
2. Next, you will need to put the application files onto the Ultra96. From your computer, copy hashrfid.py, ultra96-coffee-smoothie-setup.sh, and coffee_smoothie.sh to a USB stick. The following steps assume that you copy the files to the top level directory on the USB stick. If you put it in a subfolder, make sure to update the paths you use accordingly.
3. Then, plug that USB stick into the Ultra96 USB port. On the terminal emulator, look for messages that get printed when the USB stick is detected by Linux. In the example below, it was assigned “sda1”:
4. Mount the drive and copy the files to the locations shown below on the Ultra96 (here, /dev/sda1 is used because sda1 was identified in the previous step):
5. Wait about 10 seconds after unmounting. Remove the USB stick from the Ultra96.
6. Next, we will need to know what event gets associated with each badge reader. Before plugging in the badge readers, check /dev/input:
7. Plug in the coffee badge reader, and you will see messages about the new USB device getting detected. Then check /dev/input again, to see what event the coffee badge reader gets associated with. In this case shown below, it gets associated with event1 (The old entries have date “Jan 1 1970”. The new entry for the badge reader should have the current date).
8. Plug in the smoothie badge reader and do the same. In this case shown below, it gets associated with event2.
9. Open /usr/share/coffee_smoothie/hashrfid.py and search for “*EVENTS*” (“vi” is already installed on the Ultra96 image for use as a text editor). Update hashrfid.py to use the events noted above, if different from what is already given. For the case shown in the screenshots, no modifications are necessary because the script already uses event1 and event2.
10. This example is set up for 2 badge readers. If you only have 1 badge reader, then search for all the comments containing “*1BR*” and follow those instructions to comment out the relevant lines. Otherwise you will get errors about a missing device.
11. Now, test that the badge readers work with the application by going to /usr/share/coffee_smoothie and calling “python hashrfid.py”.
You will see the LCD RGB Backlight light up with the message “LET’S GO!!!”
Tap a badge to the coffee badge reader and see the count increase. Repeat 10 more times, waiting a couple seconds between taps (until the badge reader’s LED turns back to red), to see the count increase on the LCD. On the 11th tap, you will see a message that a free coffee was earned. On the 12th tap, you will see the count start over.
Do the same for the smoothie badge reader, but on the 6th tap, you will see a message for a free smoothie and on the 7th tap the count starts over.
12. Hit Ctrl-C to terminate the hashrfid.py script.
13. Next, make “python hashrfid.py” start up automatically on boot:Make sure ultra96-coffee-smoothie-setup.sh and coffee_smoothie.sh are executable. Then, go to /etc/rcS.d and create a soft link from S99ultra96-coffee-smoothie-setup.sh to/etc/init.d/ultra96-coffee-smoothie-setup.sh
14. Do “shutdown -h now” to power off the board completely.
15. Power the board back up using the PWR button S1. When it boots, the coffee loyalty application should run automatically, and you should see “LET’S GO!” appear on the LCD display.
Step 5: Back-upsIf you implement this coffee system at your office, it is a good idea to do nightly back-ups of the database. You can use the WiFi connectivity of the Ultra96 to do this. Because the details of setting up the back-ups is specific to your network, back-up setup is out of the scope of this document.


Comments