IntroductionThe Waternator 293 is a simple device that regulates liquid level in a container. Using an Arduino 101, sensors, reservoir, pump, and a mobile app you can take the guess work out of knowing if the water level is low. Once set up, tuck reservoir container away and let the system do all the work. With the supplied app you can set minimum and maximum liquid levels, get push notification alerts, and you can see if the main reservoir needs refilling.
Applications include, but are not limited to:
Circuit AssemblyFirst thing to assemble is Adafruit's protoshield. They have an excellent assembly guide here. I used the non-stacking headers for assembly, which made testing and diagnostics a little harder, but saved space. You can do either.
Next, let's get our components onto the protoshield. I would recommend laying out your components first and then cut and bend wire to make all the connections. This allows you to find the best placement and routing before you solder anything.
I highly recommend using both sides of the board to run wires and mount components. You can also use the long leads of capacitors and resistors to make connections instead of cutting them off. For items with short leads like the buzzer and pin blocks, it’s easiest to connect to them by soldering the wire directly to the lead as shown in fig. 1.
fig. 1 - It's easiest to solder wires directly to the leads of the terminal blocks and buzzer.
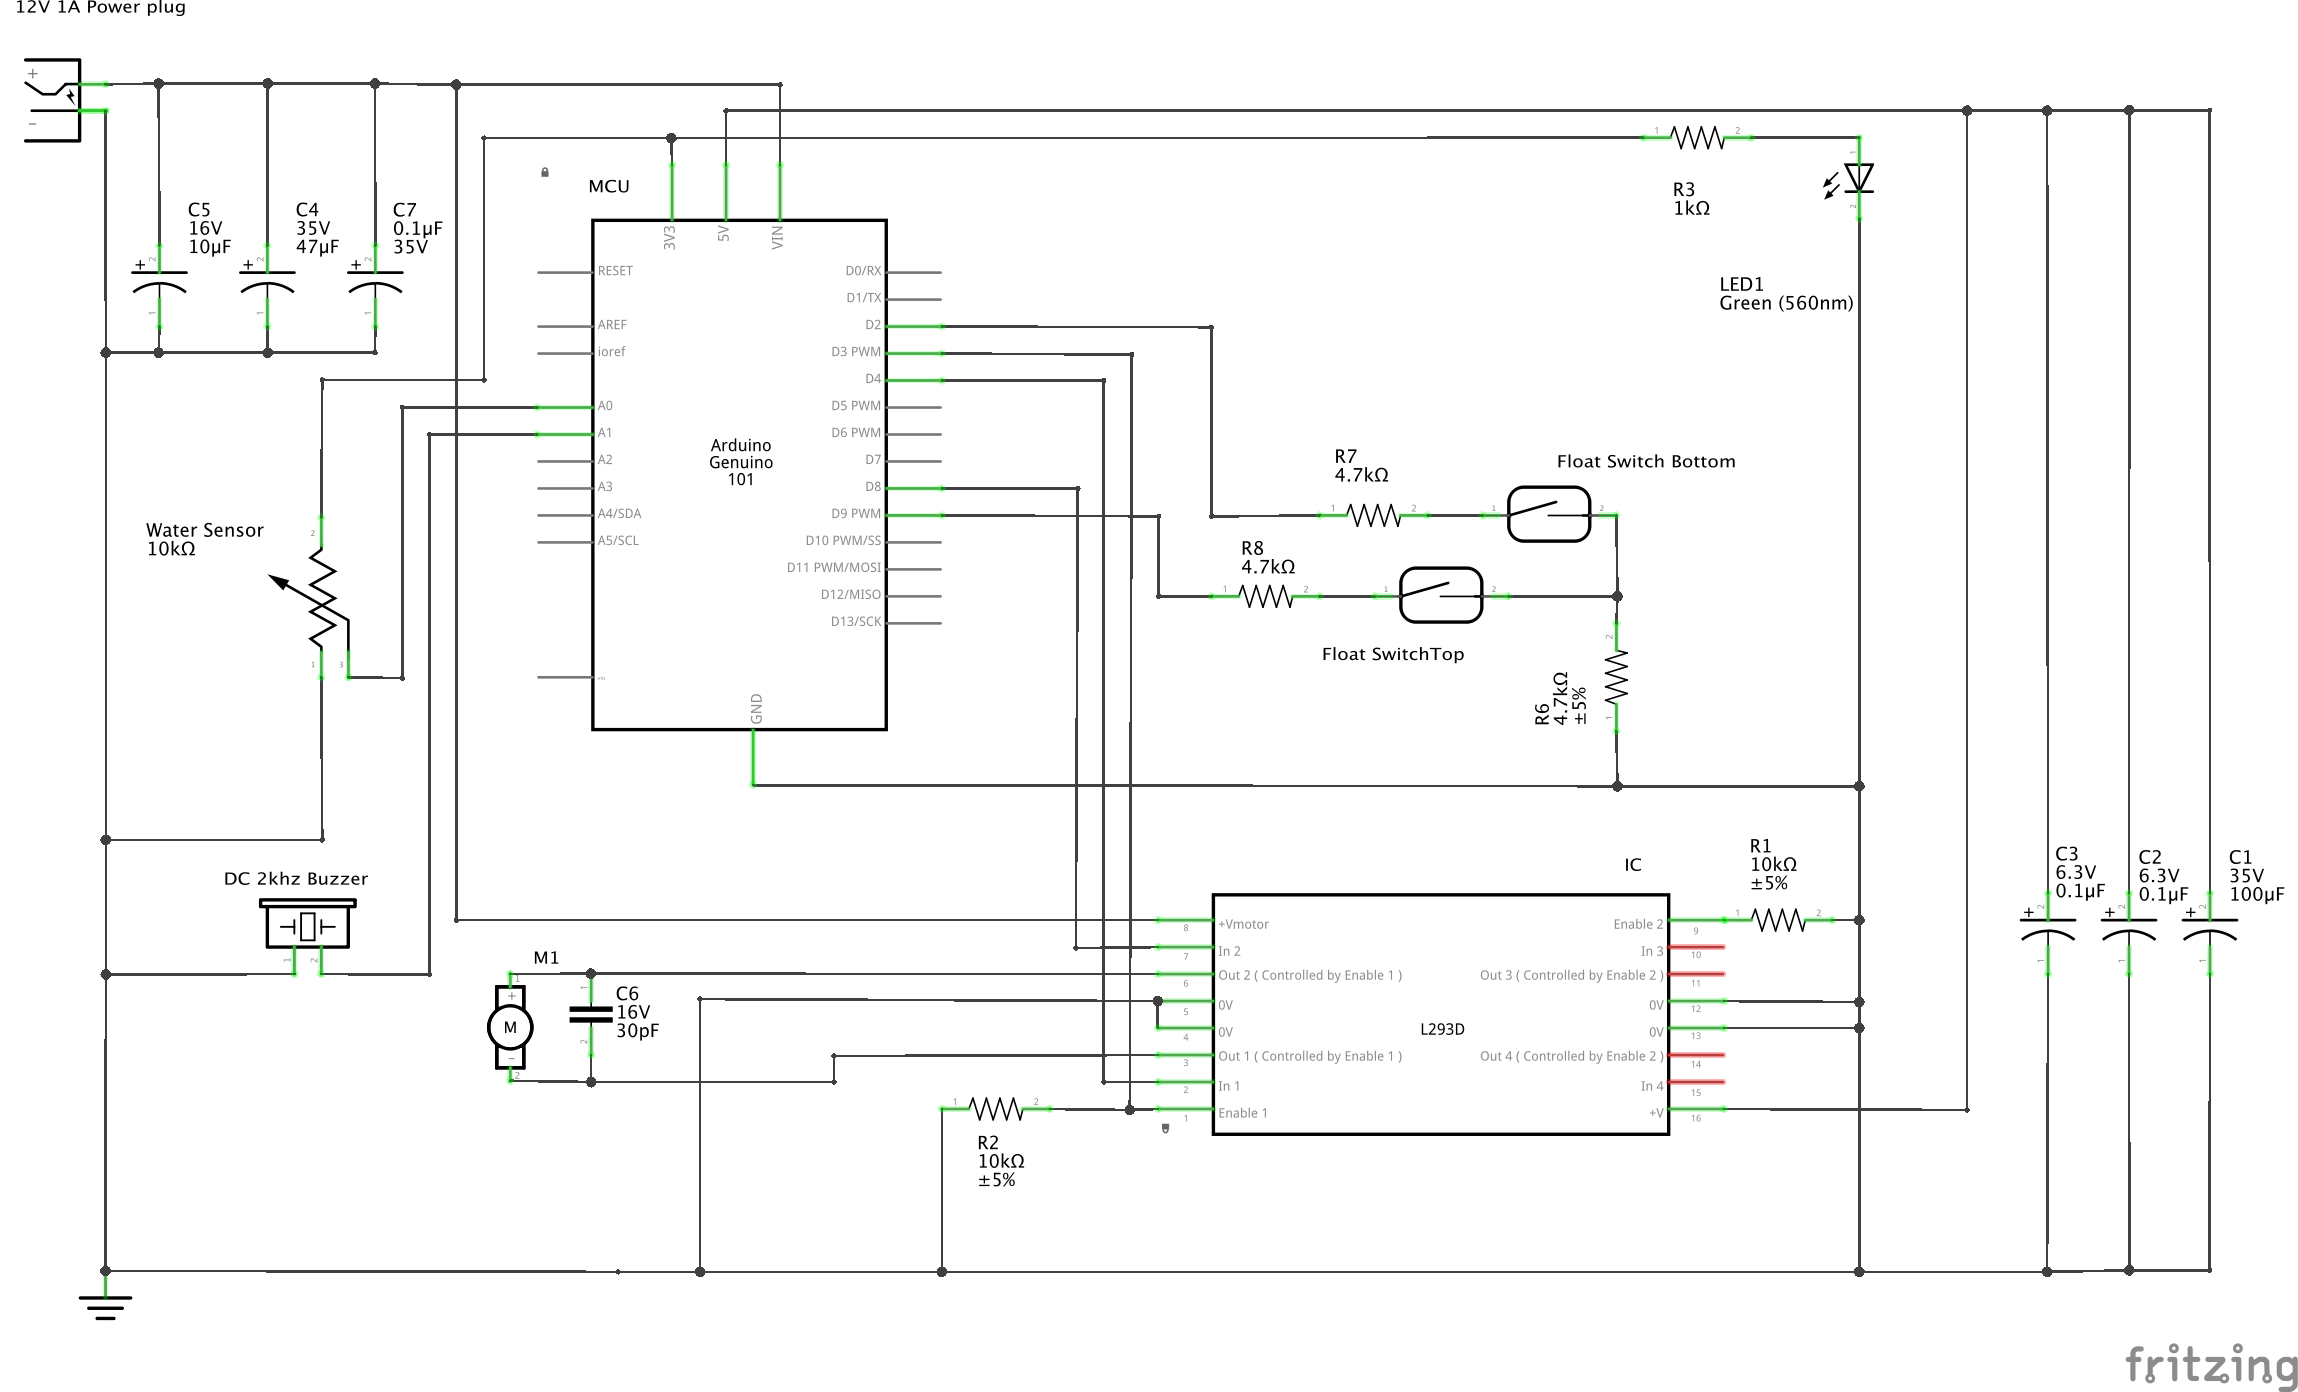
Here are the pins I used for each of my connections, I highly recommend you use these pins (You are welcome to modify my IO pin usage; you will have to modify the code and avoid using pins used by the WiFi 101 shield.) See the circuit schematic for complete wiring information.
- L293 IC pin 1 -> Digital 3
- L293 IC pin 2 -> Digital 4
- L293 IC pin 7 -> Digital 8
- Lower horizontal float sensor -> Digital 9
- High vertical float Sensor -> Digital 2
- Buzzer pin -> Digital 15 (same as Analog 1)
Once you are satisfied with your wire and component layout, take some photos for your own reference. Remove everything and, starting with the components, start soldering everything onto the board.
Finally, for this soldering process, here are some tips on the various components:
- IC-L293D - It is hard to re-solder an IC or IC socket. I accidentally mounted my IC socket backwards. You can always just put the IC in "the wrong way" but it is confusing. Make sure you know which direction you are mounting the IC socket.
- Terminal Headers - These little things twist in the perf-board a bit, or get tilted, or not seated against the board all the way when soldering. I would recommend just getting one leg soldered without worrying about getting the header perfectly positioned. Once it is attached you can reheat the solder on the one pin and get it positioned exactly as you would like.
- Wires - My hands tend to shake when I solder. I have to be extra carful when I start getting lots of stuff on the board to not accidentally melt the jacket on a nearby wire. Basically, be careful.
- eTape Wiring - The eTape wiring harness is wired backwards. The red wire is ground, the black wire is V+, and the white wire is (correctly) the output to the analog input. I "fixed" this by soldering the terminal pins backwards for ground and V+. This way I did not have to switch the wires on the sensor when I attached it to the terminal block. Do what makes sense to you.
That is it! Hopefully you have a complete protoshield with all the components correctly wired. Here are photos of what my protoshield looks like with everything wired up. I did not have all the stacking headers so that aspect is missing in these photos, I instead directly soldered the motor and power supply leads. Once you stack it onto the Arduino 101 and WiFi 101 shields you will be ready to go.
1 / 2 • fig. 2 - Our final layout on the top side of the protoshield.
Your eTape sensor needs calibration. Everything I found online gives the right process for calibration, but used the numbers in an equation solving for volume, not for height of water like the eTape is used for in our situation. In the Github for this project there is a calibration sketch for the eTape that will send the resistance read and the calculated depth to the serial monitor. In that sketch are instructions on how to calibrate the device. Follow them and update the variables in code to the correct value, then reload the sketch with the modified variables and you should now have an accurate depth measurement. The three variables to update are:
Once you have your 3 calibration numbers you can save these to use later in the final sketch.
Note: The first 2.54 cm (1 in.) is unresponsive on the eTape. You can see this in the spec sheet. Ignoring this issue means inaccuracy in measurements because the slope of the line is incorrect. I fixed this issue in the math and by always displaying the calculated water level. What this means in reality is even if your destination container is empty the app will say there is ~2.54cm of water. Just know it will never read below ~2.54cm. If anyone thinks of a clever way to get around this issue, please submit a ticket on the Github project.
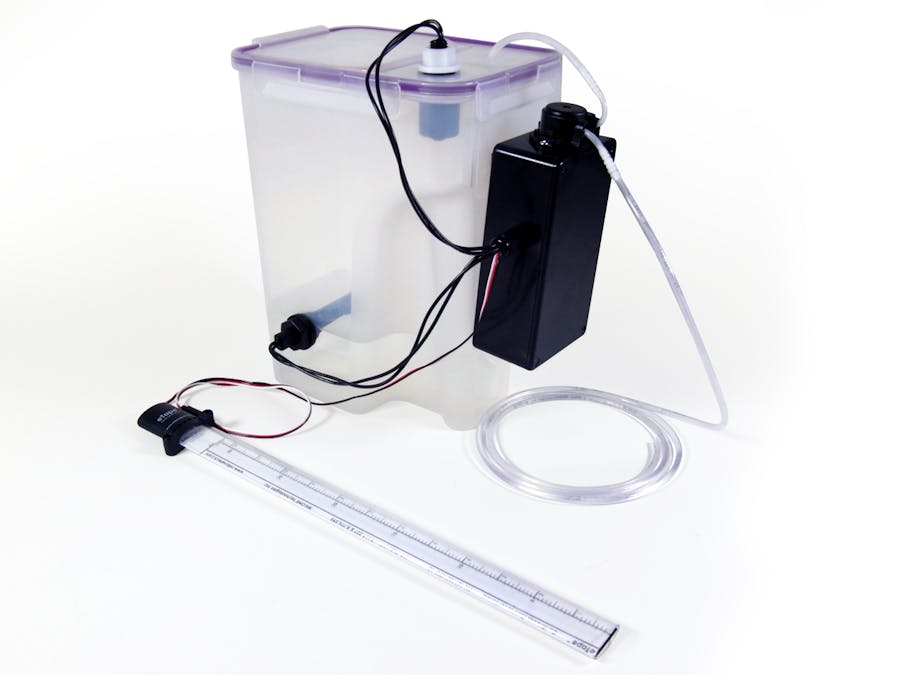
Project AssemblyNow that we have a circuit assembled and the needed calibration information, we can move to assembling all the parts together. We have a project enclosure for the electronics and we have the source container to hold liquid. We chose a "Snapware" container for our source container. Depending on your use case and the volume of water you are moving you might want a larger or smaller container. The lid on this container made it easy to refill and had room for the sensor.
fig. 3 - Source container (Left) and project enclosure (Right).
Let's start by preparing the project enclosure. This enclosure fits everything quite snuggly, so measure out everything before drilling holes or you may mount something in an “unfortunate" location. You have 3-4 holes to drill in the project enclosure:
- Panel mount DC jack - 1/2 in.
- Peristaltic pump - 1 in. + Dremel or 17/16 in.
- OPTIONAL: USB-B port - I would recommend a Dremel or multiple drill holes + a Dremel.
Once everything is drilled and Dremeled you can mount your components. For the peristaltic pump you will need to drill 1/16 in. pilot holes for the mounting screws.
1 / 4 • fig. 4 - 1/2 in. DC jack and cable gland holes.
Next, let's turn to the source container. There are 3 holes we will need to drill here:
- Vertical float switch - 1/2 in.
- Horizontal float switch - 13/16 in. (3/4 in. works but is a little snug)
The vertical float switch mounts to the top of your container, so the project knows when it is full. It can be anywhere on the lid (you could replace this with another horizontal float switch and mount it near the top if you want to keep you lid clear). The pump hose hole should be near where you project enclosure will be mounted and will not seal so should be on the lid (if you made the vertical float a horizontal float and moved it to the side you could put this hole above that switch).
fig. 8 - Vertical float sensor and pump tubing holes.
The horizontal float which is mounted at the bottom of the container and is used to notify you when your source container is low on water. The exact location does not matter, just know the lower it is the less warning you have that it is low on water. If you later realize you want less notification, you can always rotate the switch 180 deg. Meaning the switch closes when the water rises instead of opening when the water rises. If you make this change you will have to modify the code to adjust for the inversion of the switch states.
fig. 9 - Horizontal float switch mounting
Once the holes are drilled mount your switches!
Finally, we will attach the project enclosure to the source container and wire the sensors, power input, and pump to our project.
- Using sticky velcro attach the project enclosure to the side of the source container.
- Solder leads to the DC jack and cover leads with shrink wrap.
- Solder leads and the 30pF capacitor to the pump and protect with shrink wrap.
- Run the sensor cables through the cable gland and cut to an appropriate length. You will need to cut off the correct end of the servo extension cable in order to get it through the gland and connected to the terminal block. I would recommend tinning the ends of these wires as it will strengthen the connection and make it easier to connect them to the terminal blocks.
- Put your Arduino shield stack into the project enclosure and attach the sensor leads, the power leads, and the motor leads to the correct terminals.
1 / 4 • fig. 10 - Running sensor/switch wires through cable gland.
First things first you will want to get a copy of the Blynk App on your phone.
- Touch the QR icon and point the camera to the code below or open the link below - http://tinyurl.com/kd564yu
fig. 14 - Blynk QR code to clone app.
Once you have gotten the project cloned onto your Blynk account (you will probably need to buy some "energy”), you can send yourself the auth code from the project settings.
Next, we will update the code to work for your Blynk project. Access your WiFi, and enter the calibration info from earlier. There are 3 places you need to edit.
For the auth code find the line that that looks like the code bellow and replace 'authcode' with your code.
char auth[] = "AUTHCODE";
For the WiFi credentials, find the section that looks like the code below and enter your SSID and Password. NOTE: This code is for WPA/WPA2. If you use WEP you are living in the 90s and need to update your WiFi security. Blynk supports WEP, but it is up to you to figure it out. If you have no password leave it blank.
char ssid[] = "SSID";
char pass[] = "PASSWORD";
For the calibration data find the section that looks like below (it is the same code as from the calibration sketch), and edit the variables to match your calibration data.
//Water Sensor Calibration
 #define SERIES_RESISTOR    2000
/* The following are calibration values you can fill in to compute the depth of measured liquid.
* To find these values first start with no liquid present and record the resistance as the
* ZERO_DEPTH_RESISTANCE value.  Next fill the container with a known depth of liquid and record
* the sensor resistance (in ohms) as the CALIBRATION_RESISTANCE value, and the depth (which you've
* measured ahead of time) as CALIBRATION_DEPTH.
*/
 #define ZERO_DEPTH_RESISTANCE   2047.00    // Resistance value (in ohms) when no liquid is present.
 #define CALIBRATION_RESISTANCE    732.00    // Resistance value (in ohms) when liquid is at max line.
 #define CALIBRATION_DEPTH        25.3    // Depth (in any units) of liquid as measured by the eTape. I would recommend submerging at least half the eTape but theoretically any depth should work.
You can now upload your sketch and you should have a working project! There are many variables you could alter in this project to fine tune it to your needs; I will point out some basics below.
14. //BLYNK DEBUG CONFIG
15. #define BLYNK_PRINT Serial
16. //#define BLYNK_DEBUG
17. #define SERIALDEBUG
18.
19. //BLYNK can connect using Wifi or BLE. BLE is in beta and unreliably connects and will randomly drop the connection.
20. //Uncomment the one you wish to use, but not both.
21. #define BLYNK_WIFI //Use WIFI
22. //#define BLYNK_BLE //Use BLE
- Line 15 - This must be the first line of code in your project (it is a Blynk quirk). This allows Blynk to output basic info about connectivity. Comment this out to save space and processing power.
- Line 16 - Uncomment this along with line 15 if you need advanced Blynk debugging.
- Line 17 - Comment this out if you want no serial connectivity. Once your project is up and running, it will keep it from even compiling serial code info onto the Arduino, and save you some space and processing power.
- Line 21 & 22 - You can choose to use Bluetooth (Bluetooth is extremely buggy at this point in time and does not allow "cloud" connectivity) or WiFi (Reliable and allows you to monitor from anywhere on your smart phone). Uncomment whichever line is appropriate for the connection you want to use. The compiler will throw an error if you uncomment both.
Finally, you will need to install the Simple Timer and Time libraries to your IDE. The versions used on this project can be found in the Github repo. You can find instructions on installing custom ZIP libraries to the Arduino IDE here.
Final StepsOnce you are happy with the code and you've tested the functionality you can put on the cover for the project enclosure and revel in the glory of your skills.
ConclusionWe hope you enjoyed our project! It has been a huge learning curve for us, but we have strived to design a product that is useful and easy to use. If you have any questions or need help on the project you can contact us over at Github or here on Hackster.io.


_baVEVgguW1.jpg?auto=compress%2Cformat&w=48&h=48&fit=fill&bg=ffffff)


Comments