Shiva SainiAkhil JarodiaNishant VermaKaramveer
Published

Waterman

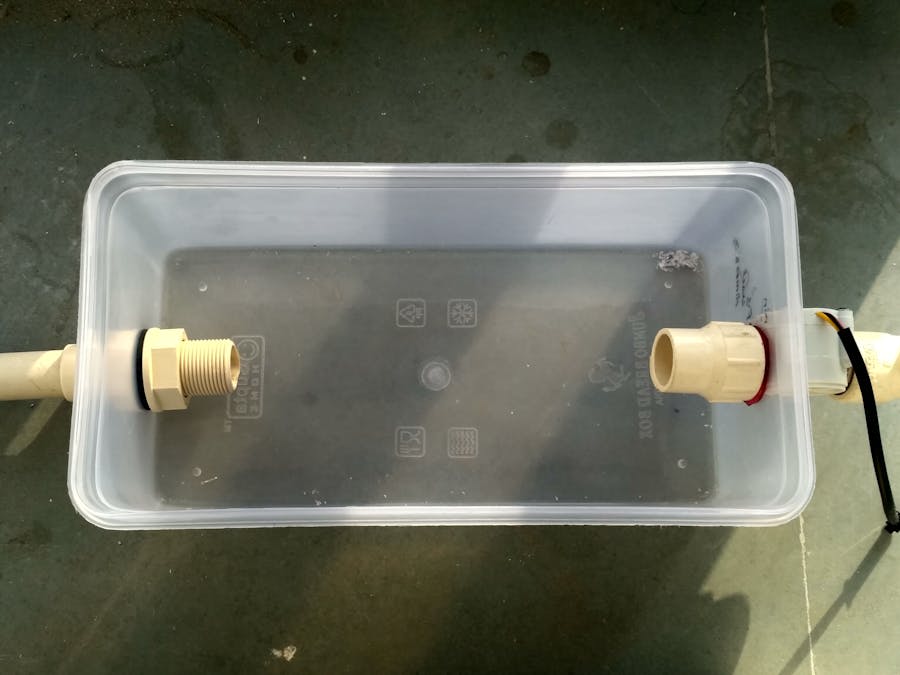
Waterman is a device in form of a box which will check the contamination level of water and also the availability of water in the pipeline.

IntermediateShowcase (no instructions)Over 3 days14,744
Waterman

Things used in this project

Hardware components

Breadboard (generic)
×1
Turbidity Sensor
×1
Conducitvity Sensor
×1
NodeMCU ESP8266 Breakout Board
×1
Arduino UNO
Arduino UNO
×1

Software apps and online services

Blynk
Blynk
Arduino IDE
Arduino IDE

Hand tools and fabrication machines

Hot glue gun (generic)
PVC Pipe

Story

Read more

Custom parts and enclosures

3D model and layout of the project

It will somewhat make you understand ,where each sensor will be placed

Code

Water Man Code

Arduino
void setup() {
  // put your setup code here, to run once:
pinMode(A0,INPUT);Serial.begin(9600);
pinMode(A1,INPUT);pinMode(13,OUTPUT);
pinMode(A2,INPUT);attachInterrupt(A2, pulse, FALLING);
}
float a,b,c;int count=0,flag=0;
void pulse()
{count++;
  }
void loop() {
  // put your main code here, to run repeatedly:
turbidity();
conduct();
flow();
count=0;
attachInterrupt(A2, pulse, FALLING);

if(b>400 || c==0 || a>2)
{flag=1;
  }
  else
  {flag=0;}
 if(flag==1)
 {
  digitalWrite(13,HIGH);} 
  else
  {
    digitalWrite(13,LOW);}
  printf("%f %f %f %d",a,b,c,flag);
}

void turbidity()
{
  a= analogRead(A0)*(5/1023);
  }
  void conduct()
  {
    b= analogRead(A1);
    }
    void flow()
    {
      detachInterrupt(A2);
      if(count>0)
      {
        c= 1;}
        
        else{ 0;}
        
      }

Arduino Code

Arduino
We used it for sending data to the NODE MCU from our sensors
byte sensorInterrupt = 0;  // 0 = digital pin 2
byte sensorPin       = 2;

float calibrationFactor = 4.5;

volatile byte pulseCount;  

float flowRate;

unsigned long oldTime;

void setup()
{
  Serial.begin(9600);
  pinMode(A0,INPUT);
  pinMode(A1,INPUT); 

  pinMode(sensorPin, INPUT);
  digitalWrite(sensorPin, HIGH);

  pulseCount        = 0;
  flowRate          = 0.0;
  flowMilliLitres   = 0;
  totalMilliLitres  = 0;
  oldTime           = 0;
  attachInterrupt(sensorInterrupt, pulseCounter, FALLING);
}

/**
 * Main program loop
 */
void loop()
{
   
   if((millis() - oldTime) > 1000)    // Only process counters once per second
  { 
    // Disable the interrupt while calculating flow rate and sending the value to
    // the host
    detachInterrupt(sensorInterrupt);
        
    // Because this loop may not complete in exactly 1 second intervals we calculate
    // the number of milliseconds that have passed since the last execution and use
    // that to scale the output. We also apply the calibrationFactor to scale the output
    // based on the number of pulses per second per units of measure (litres/minute in
    // this case) coming from the sensor.
    flowRate = ((1000.0 / (millis() - oldTime)) * pulseCount) / calibrationFactor;
    
    // Note the time this processing pass was executed. Note that because we've
    // disabled interrupts the millis() function won't actually be incrementing right
    // at this point, but it will still return the value it was set to just before
    // interrupts went away.
    oldTime = millis();
    
    // Divide the flow rate in litres/minute by 60 to determine how many litres have
    // passed through the sensor in this 1 second interval, then multiply by 1000 to
    // convert to millilitres.
    flowMilliLitres = (flowRate / 60) * 1000;
    
    // Add the millilitres passed in this second to the cumulative total
    totalMilliLitres += flowMilliLitres;
      
    unsigned int frac;
    
    // Print the flow rate for this second in litres / minute
      
    Serial.print(int(flowRate));  // Print the integer part of the variable
    
    Serial.print(" ");  
    Serial.print(analogRead(A0));// Print tab space
    Serial.print(" ");  
    Serial.println(float(analogRead(A1)));
    // Print the cumulative total of litres flowed since starting
    // Reset the pulse counter so we can start incrementing again
    pulseCount = 0;
    
    // Enable the interrupt again now that we've finished sending output
    attachInterrupt(sensorInterrupt, pulseCounter, FALLING);
  }
}

/*
Insterrupt Service Routine
 */
void pulseCounter()
{
  // Increment the pulse counter
  pulseCount++;
}

NODE MCU

Arduino
We used this to recieve the data from Arduino and send to our App made on Blynk. App will recieve the data through Wi-Fi module ESP8266 in nuilted in Node Mcu
#define BLYNK_PRINT Serial

#include <ESP8266WiFi.h>
#include <BlynkSimpleEsp8266.h>

// You should get Auth Token in the Blynk App.
// Go to the Project Settings (nut icon).
char auth[] = "YourAuthToken";

// Your WiFi credentials.
// Set password to "" for open networks.
char ssid[] = "YourNetworkName";
char pass[] = "YourPassword";

void setup()
{
  // Debug console
  Serial.begin(9600);

  Blynk.begin(auth, ssid, pass);
  // You can also specify server:
  //Blynk.begin(auth, ssid, pass, "blynk-cloud.com", 8442);
  //Blynk.begin(auth, ssid, pass, IPAddress(192,168,1,100), 8442);
}

void loop()
{
  Blynk.run();
}

Credits

Shiva Saini

Shiva Saini

1 project • 1 follower
Akhil Jarodia

Akhil Jarodia

2 projects • 2 followers
Nishant Verma

Nishant Verma

1 project • 1 follower
Karamveer

Karamveer

1 project • 1 follower

Comments