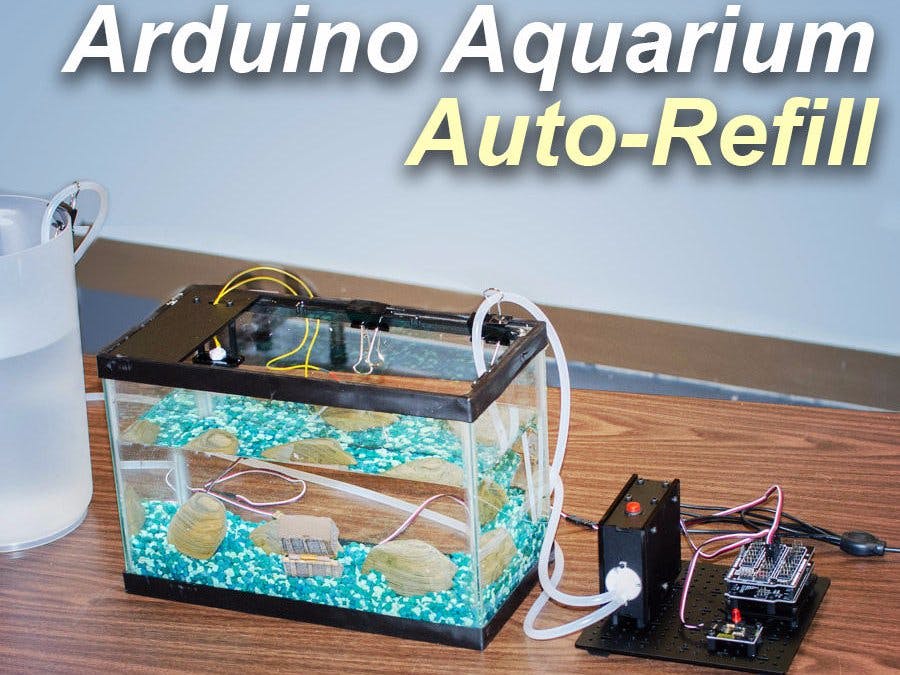
This Arduino Pump Tutorial shows a simple example of how to use a float switch and RobotGeek Pumping Station to refill a reservoir once the level gets too low. For our example we use a small aquarium, but this same project could be used for pet dishes, water fountains, or any other number of similar applications. The Pumping Station is a RobotGeek kit which packages a small liquid pump and relay. To operate a pump using an Arduino microcontroller you need a relay to switch on and off a separate power supply.
Build your pumping station with the directions provided here.
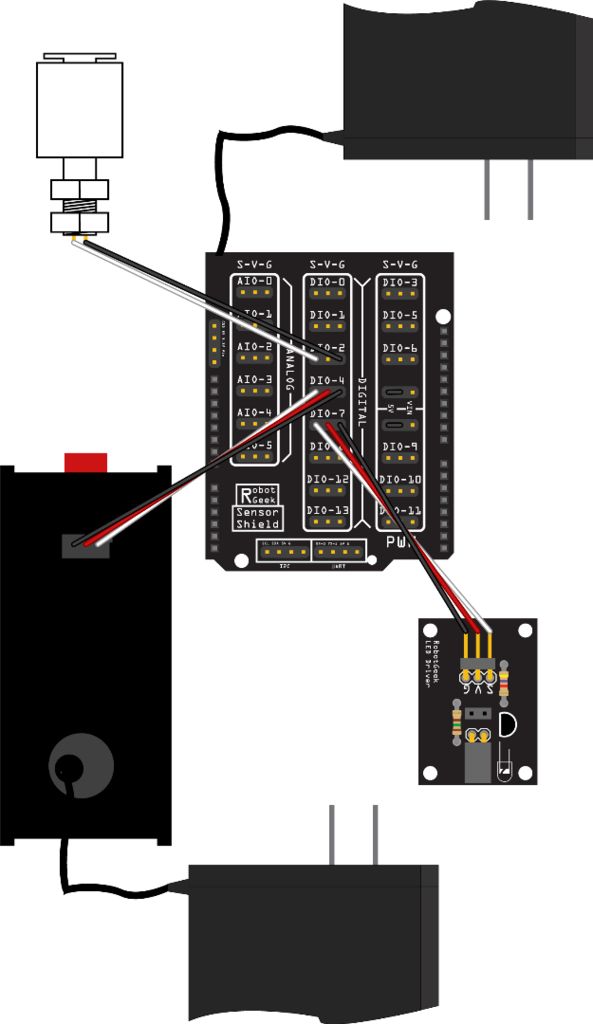
Step 1: Wiring
Step 2: Load your code onto the ArduinoYou can download the code sketch here:
/***********************************************************************************
 * Aquarium Pump Refil Demo
 *                       _______________
 *                      |  ___________  |
 * _____________________| |____       | |
 * |  U       <><             |       | |
 * |                          |       | |
 * | ><>          <><         |      _|_|_
 * |   <><                    |      |   |
 * |__________________________|      |___|
 *
 *  This demo will show you how to control a RobotGeek Pumping Station (or any other
 *  motor/pump via relay) based on input from a float switch. This will allow you to
 *  build an automated Aqurium refil pump, refilling your aquarium whenever it gets
 *  to low.
 *
 *  Wiring
 *  Pin 2 - Float Switch
 *  Pin 4 - RobotGeek Pushbutton relay/pumping station 1
 *  Pin 7 - RobotGeek LED
 *
 *  Control Behavior:
 *    If the float switch is not floating (i.e. empty tank) then turn on the pump and led
 *    If the float switch is floating (i.e. full tank) turn off the pump and LED
 *
 *  External Resources
 *
 ***********************************************************************************/
//define the input/output pins
#define FLOAT_SWITCH_PIN 2
#define PUMP_1_PIN 4
#define LED_PIN 7
//setup runs once
void setup()
{
  //setup input pins for float switch
  //Too use a bare switch with no external pullup resistor, set the pin mode to INPUT_PULLUP to use internal pull resistors. This will invert the standard high/low behavior
  pinMode(FLOAT_SWITCH_PIN, INPUT_PULLUP);

  //setup output pins for relays/pumping station and LED board
  pinMode(PUMP_1_PIN, OUTPUT);
  pinMode(LED_PIN, OUTPUT);

}
//loop() runs indefinitely
void loop()
{
  //check to see the state of the float switch. These states are assuming the pin is using an internal pullup resistor.
  // LOW corresdponds to the float switch being at its lowest point (i.e. low water)
  if(digitalRead(FLOAT_SWITCH_PIN) == LOW)
  {
     digitalWrite(PUMP_1_PIN, HIGH); //turn on the pump
     digitalWrite(LED_PIN, HIGH);    //turn on the LED
  }

  //otherwise the float switch is HIGH
  // HIGH corresponds to the float switch being at its higest point (i.e. full water)
  else
  {
     digitalWrite(PUMP_1_PIN, LOW); //turn off the pump
     digitalWrite(LED_PIN, LOW);    //turn off the LED
  }
}
Step 3: Build
Hook up your pump, running the input line to your reservoir and your output line to the tank you wish to fill.
Attach your float switch to the fish tank so that the cylinder floats at the level you want the water.
Place your reservoir at a lower level than your pump. We do this because the pumping station utilizes a diaphragm pump, which will drip water if gravity allows it to flow into the pump.
Step 4: You're done!So what's next? You could add a water sensor above the float switch as an overflow emergency shutoff. You could automatically refill your pet's water dish, or use it to make a fountain. You could make a punch bowl that never goes dry for a party. Can you think of a way to use this to water plants? What other things do you know of that would benefit from having a steady water level? Get creative and let us know!


_ztBMuBhMHo.jpg?auto=compress%2Cformat&w=48&h=48&fit=fill&bg=ffffff)


Comments