


Hardware components | ||||||
 |
| × | 1 | |||
Software apps and online services | ||||||
| ||||||
 |
| |||||
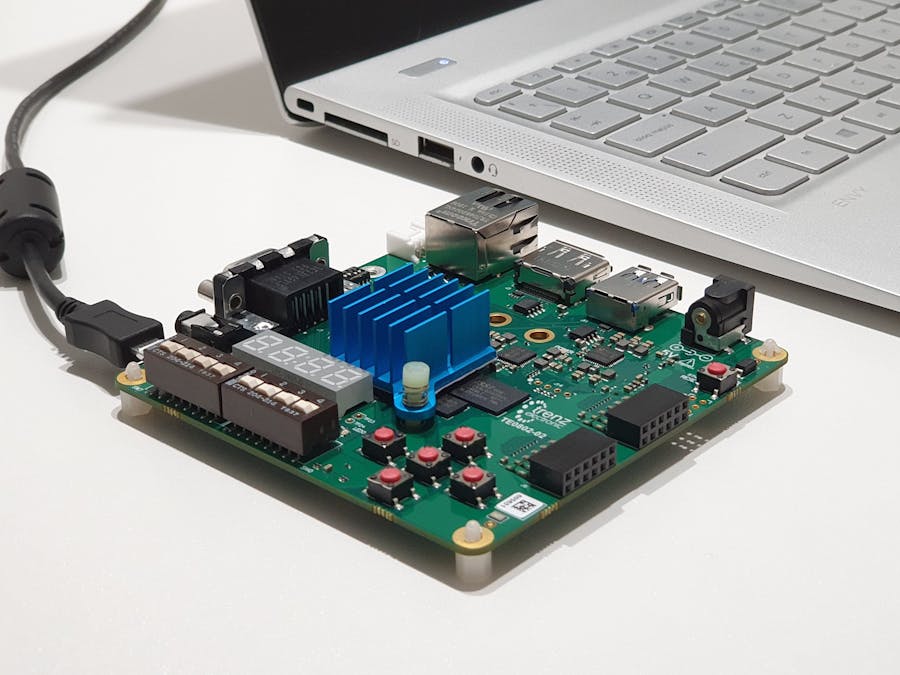
In this project I will show you a workflow to create and run a Python application on Trenz TE0802 board. This board is based on Zynq US+ device, with a 4x7 segments display that we will use for generate an up count. The display will be manage by a python application, but not Pynq, so we avoid generate the pynq image for this board.
Python is a powerful tool for every kind of engineers, and is very useful combine all the power of python, and the speed of the custom AXI IP.
Downloading files.First of all we will download from Trenz webpage files corresponding to TE0802 board. In this case we need the board file, and the device tree file (.dts). Here the link to download page.
From this page we need download the reference design, the no prebuilt file. This zip file contains several folders, but only 2 are interesting for us. First the board_file folder, that we have to copy on
<vivado install dir>/data/boards/board_files
Also we can found device tree file on zip
/test_board/os/petalinux/project-spec/meta-user/recipes-bsp/device-tree/files/
We will save this file for the petalinux build.
Once we have this 2 files, we can create the project.
Creating the Vivado project.Next we have to create a new project, selecting the board TE0802.
Once we are inside a project, the next is create the block design.
Bock design.On block design, we have to add the repository where we can found the AXI IP for manage the 7 segments display. You can found the IP repository on Github in folder 01_7seg_counter/ip_repo. For add this repository to Vivado, we have to open the IP catalog on Window > IP Catalog, and then, right click and Add Repository. Once repository is added, we can found in the IP catalog, the AXI IP driver_7_segments.
Now, by clicking on + symbol, we have to add the Zynq device.
When the Zynq IP is added to the block design, Vivado will show us a banner where we can click on Run block Automation. This will configure the ARM processor to work correctly with the board we had select before.
On Vivado 2020.1, we have to ensure that parameter Effective DRAM Bus Width is set to 32, in other case, Petalinux will crash on boot. The rest of configuration will remain by default.
When Zynq IP is added and configured, we can add the driver_7_segments IP, configure it with Run Block Automation button, and then connect all with the button Run Connection Automation.
When we click on Run Connection Automation, Vivado asks us for the clock that we want to connect the IP. For the IP, I have select the 100MHz clock. If we don't need the rest of the clocks, we can disable them on Clock tab of the Zynq System.
To create the ports for the AXI IP, I always select the port on AXI IP, and then CTRL+K, and a port is generated with the same name as the IP port. In this case, the xdc file on Github, has this name.
The resulting block design can be found in the next figure.
Once we have the block design completed, we have to create the wrapper, bitstream by clicking on Generate Bitstream.
Once the bitstream is generated, we have to export the hardware. For do this, we have to click on File > Export > Export hardware.
On the window opened, we have to select a Platform Type as Fixed, then click Next, and select the option Include bitstream.
Once we have the hardware exported, we can configure and build Petalinux.
Configuring and building Petalinux.To create Petalinux, I am going to follow this guide. In my case, I have Petalinux 2020.1 installed on home/petalinux/petalinux_20.
First we have to add the Petalinux functions to the environment, for that we have to execute next line.
>>> cd petalinux/petalinux_20
>>> source ./settings.sh
>>> pablo@friday:~/petalinux/petalinux_2020$ source settings.sh
PetaLinux environment set to '/home/pablo/petalinux/petalinux_2020'
WARNING: /bin/sh is not bash!
bash is PetaLinux recommended shell. Please set your default shell to bash.
INFO: Checking free disk space
INFO: Checking installed tools
INFO: Checking installed development libraries
INFO: Checking network and other services
WARNING: No tftp server found - please refer to "UG1144 2020.1 PetaLinux Tools Documentation Reference Guide" for its impact and solution
Then, we will create a new petalinux project.
>>> cd ../petalinux_projects/
>>> petalinux-create --type project --template zynqMP --name plnx_7seg_demo
INFO: Create project: plnx_7seg_demo
INFO: New project successfully created in /home/pablo/petalinux/petalinux_projects/plnx_7seg_demo
>>> cd plnx_7seg_demo/
Now, we have to configure Petalinux, For do that, we have to get the hardware exported before. Hardware description is a.xpr file, located at the Vivado project folder.
>>> petalinux-config --get-hw-description ../../../xilinx/test_te0802_7segments
INFO: sourcing build tools
INFO: Getting hardware description...
INFO: Rename test_bd_wrapper.xsa to system.xsa
[INFO] generating Kconfig for project
[INFO] menuconfig project
With this command a new window will opened.
This is the basic configuration of Petalinux, and herar I always change the IP, since per default is configured in Automatic, as I always connect the board to the PC, I need a static IP. For do that, you have to go to the next path.
Subsystem AUTO Hardware Settings > Ethernet Settings
Once do that, we can exit of this window, and Petalinux will be configured.
On this point, inside petalinux folder, we have a Directory tree where we can found the device tree file on
/plnx_7seg_demo/project-spec/meta-user/recipes-bsp/device-tree/files
On this directory, we have to replace the file system-user.dtsi, for the downloaded before from trenz webpage. This file will configure Petalinux with the corresponding drivers for peripherals found in the board.
Next we will configure the file system. On this configuration we will pre install on the distribution some packages.
Packages to install:
Filesystem Packages > devel > python >
python [*]
python-mmap [*]
These 2 packages will be needed for the Python application.
Once do dath, Exit of the rootfs configuration, and then we have to build petalinux.
>>> petalinux-buildAnd after petalinux is built, we need to generate the images for the SD card.
>>> cd images/linux
>>> petalinux-package --boot --u-boot --fpga system.bit --format BIN --force
Finally, in images/linux folder, we can find BOOT.bin. image.ub and boot.src. This files have to be copied on the SD card.
Next, we have to configure the board to boot from SD card, for do that, we have to slide to ON switched 1 and 2. Insert the SD card and power up.
Python development.Python file I've develop is a simple counter for the 7 segments display, but in this case, the important is not the end of the project, but the way like how from python, we can manage a custom AXI IP. For that, we will use the mmap, and os libraries. First we have to open /dev/mem with the instruction os.open, and then, with mmap function, we will work with this "file" opened before for write and read the registers of the IP. Value 0x1000 is the length reserved for the IP, and value 0x80000000 is the base address of the IP. These 2 values can be found on Vivado block design.
import os
import mmap
import struct
import time

# open dev/mem file
foo = os.open("/dev/mem", os.O_RDWR | os.O_SYNC)

# Create peripheral
disp = mmap.mmap(foo, 0x10000, flags=mmap.MAP_SHARED, prot=(mmap.PROT_READ | mmap.PROT_WRITE), offset=0x80000000)

# Counter
for index in range(0,16):
    data2write = index*4096+index*256+index*16+index;
    disp[0:2] = struct.pack("=H", data2write)
    time.sleep(1)
In general, python files will be developed on the computer, and then copied to the board. For me, the easiest way to copy files to the board is using a sftp protocol. For use that, we have to connect a server unit with the ip
sftp://192.168.1.10
On windows we can paste this address to the explorer, and for the Linus users, we have to Connect a server with this IP address. Then we can copy the file, and then execute it from ssh.
I hope this project can be for you the beginning to most complex projects that combines Petalinux and the PL of the Zynq SOC and MPSOC devices.


Comments