


Hardware components | ||||||
 |
| × | 1 | |||
Software apps and online services | ||||||
 |
| |||||
What is the Serial? Serial communication is the process of sending data one bit at a time, sequentially, over a communication channel or computer bus. A serial communications interface (SCI) enables the serial exchange of data between a microprocessor and peripherals such as printers, external drives, scanners, or mice. This is in contrast to parallel communication, where several bits are sent as a whole, on a link with several parallel channels.
How does it work? A serial bus consists of just two wires - one for sending data and another for receiving. As such, serial devices should have two serial pins: the receiver, RX, and the transmitter, TX. A serial interface where both devices may send and receive data is either full-duplex or half-duplex. Full-duplex means both devices can send and receive simultaneously. Half-duplex communication means serial devices must take turns sending and receiving.
What is the Baud Rate? The baud rate specifies how fast data is sent over a serial line. It’s usually expressed in units of bits-per-second (bps). If you invert the baud rate, you can find out just how long it takes to transmit a single bit. This value determines how long the transmitter holds a serial line high/low or at what period the receiving device samples its line. Baud rates can be just about any value within reason. The only requirement is that both devices operate at the same rate. One of the more common baud rates, especially for simple stuff where speed isn’t critical, is 9600 bps. Other “standard” baud are 1200, 2400, 4800, 19200, 38400, 57600, and 115200.
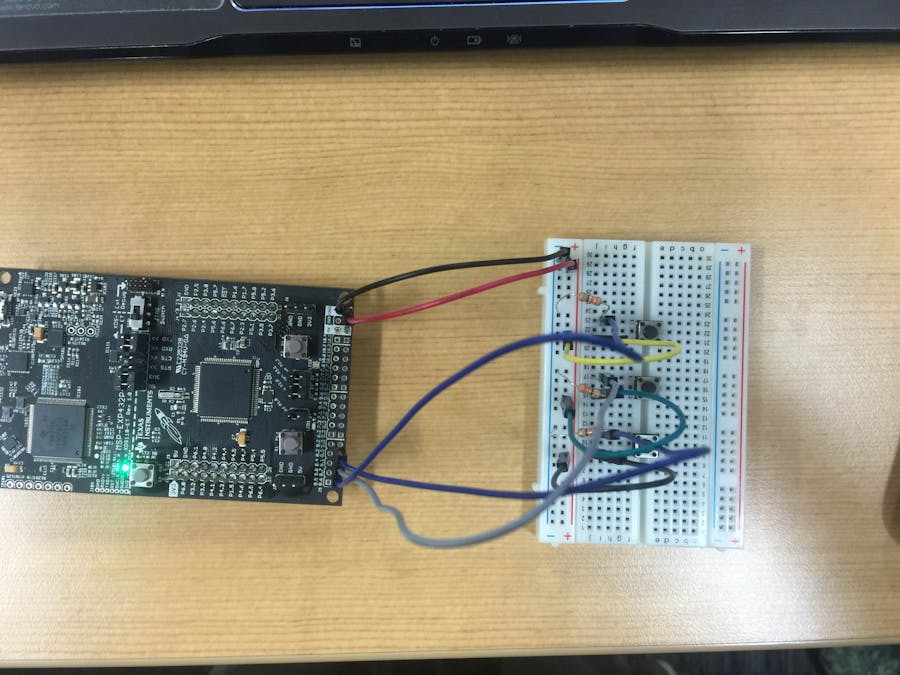
How to set up your circuit
To set up your circuit you will need a Texas Instruments launchpad (we used the MSP432), a breadboard, 3 330 ohm resistors, 8 jumper wires, and 3 momentary push buttons. First you will need to place your buttons on that breadboard as shown above. Take a jumper cable and connect it in the same row as the leftmost pin on the push button. Connect the other end of the jumper wire to the positive column. You will do this process for the rest of the push buttons. Take one jumper wire and connect it to to the positive column and connect the other end to 3.3V on the launchpad. Next, take the one of the 330 ohm resistors and place it in the same row as the rightmost pin on the push button. Place the other end of the resistor in the positive column, you will need to do this for all of the push buttons. The last step in setting up your circuit will be taking a jumper wire and connecting in the same row as the rightmost pin and the resistor. Connect the other end to any of the pins on the launchpad, we chose pins 60, 59, and 58. When your circuit is complete it should look like the example above.
In the lab we will use the buttons to show ASCII pictures in the serial monitor. The buttons will be programmed so that when one button is pushed it will display an ASCII picture. For example if you push the first button, the display will show a batman logo, and if you push another button, it will display another photo.
TROUBLESHOOTING:
Check for errors in Energia debug window. The compiler will tell you what is happening. Errors are in red text.
Sometimes your LaunchPad gets stuck or hung up on the previous code. Unplug your LaunchPad and plug it back in to perform a full reset. This is called a power on reset. Sometimes using the RESET button can work but taking away the power and letting the microcontroller fully reset is often best.
If you have a failure to upload it could be your drivers are not properly installed. Energia will sometimes give the error “No unused FET Found” which means it can’t find a LaunchPad connected to your computer. Make sure you download the drivers for your operating system found on the Getting Started Guide.
If your serial monitor shows different characters that are not specified in you code, try downloading Putty at www.putty.org
Nothing showing on the Serial Monitor? Weird character are showing on the Serial Monitor?
Make sure you have the correct Serial Port for UART selected.
Make sure you have the right baud rate selected in the Serial Monitor. Should be 9600 for this example.
Button not working?
Make sure your button is properly placed, it’s easy to have it turned the wrong direction since it is square. Turn it 90 degrees and see if that fixes your issue.
-
When connecting the legs to the LaunchPad you want to connect one side to GND and one side to a GPIO pin. Make sure they are opposite of each other, the easiest way to avoid mistakes is to connect the legs that are diagonal from each other.
Any comments or questions for better clarifications? Visit energia.nu/references


Comments