

Hardware components | ||||||
| × | 2 | ||||
_ztBMuBhMHo.jpg?auto=compress%2Cformat&w=48&h=48&fit=fill&bg=ffffff) |
| × | 1 | |||
| × | 1 | ||||
| × | 2 | ||||
| × | 2 | ||||
| × | 2 | ||||
 |
| × | 1 | |||
| × | 4 | ||||
| × | 1 | ||||
 |
| × | 1 | |||
 |
| × | 1 | |||
| × | 2 | ||||
 |
| × | 24 | |||
 |
| × | 1 | |||
| × | 1 | ||||
Software apps and online services | ||||||
| ||||||
Hand tools and fabrication machines | ||||||
 |
| |||||
 |
| |||||
| ||||||
 |
| |||||
Form without function is useless. But function without form? That can be said for a lot of the things in the world that work, but fail to catch our eye. It doesn't aesthetically please us.
The inability to aesthetically please is a failure to affect us when we look at something. And if something doesn’t grab our attention at first sight, then it never gets picked up or looked at again. This phase of the project is about adding form to function. It’s about making a bluetooth vehicle that not only runs, but is also shaped and designed in such a way that makes us wonder or feel amazed about it. Only then will we want to pick it up ourselves.
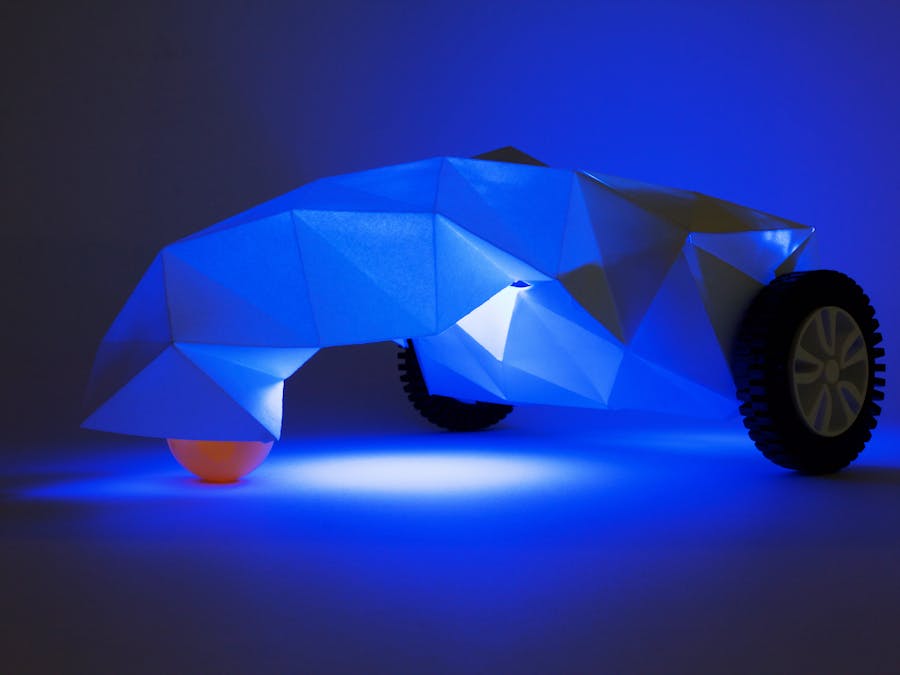
The final design of my vehicle has a low poly-inspired body that is rigidly geometric, yet alive and menacing in its shape. It’s formed through the manipulation of two origami folded from bristol board and a pyramid-shaped key is required to bring the BE∆ST to life.
Everything up to this point was about getting the vehicle to simply work properly.
First Iteration: Creating an initial chassis for a remote-controlled vehicle
Second Iteration: Getting the electronics and differential steering to work
Third Iteration: Adding a wired remote control to the vehicle
Fourth Iteration: Adding wireless bluetooth control
The goal in this final phase is to recreate the chassis such that the vehicle causes wonderment and/or amazement.
I had a general direction in mind with low poly, but the actual design was discovered through a lot of playing around and trial and error.
I folded a few origami patterns and played around with them, sticking parts together and bending them in different directions and shapes to see what would happen.
Eventually, one of the forms stuck with me and I went ahead with it. I hand-folded the first few models, but a classmate of mine (s/o Karen Li) gave me the idea to use laser engraving to get perfect folds. I’ve provided the .AI file at the very end.
The design process consisted of many iterations for every part of the BE∆ST, not just the new chassis. I’ve broken up explaining the process in the order in which the features were determined and added, along with the problems and solutions that arose during each part.
I placed the Arduino Uno, L298, and motors onto a wooden board that fits inside the vehicle by sliding it through the side openings. Well, “sliding” was what I had in mind. What actually happened was more like “pushing” or “forcing”.
Which brings me to two problems I ran into. The first being that the printer paper I was using became bent and damaged very easily from trying to fit the board in. Second, the board wasn’t stable inside and moved all over the place.
To fix the first, I switched to bristol board, which is a stiffer and sturdier type of paper. Folding bristol board into origami also strengthened the overall structure at every fold because of the paper’s stiffness.
I solved the board issue by shaping and cutting the board such that it would lay against and fit with certain touch points along the interior edges.
I used a ping pong ball with a hole in it as an omni-directional caster wheel. The ball is held in place by carbon fiber wires encased in plastic tubing which act as spacers.
I used wood glue mixed with water to stick faces together. Normally, you’d have to wait a while for the wood glue to dry if used on its own because wood glue dries through the paper’s pores by air, but Chris, my professor, taught me a trick to speed up the process. Instead, you use a 1:1 water and wood glue mix. You spread a thin layer of the mix onto both faces you want to stick together with a paint brush. You then let the coats dry, which takes about a minute. After they’re dry, you put on a thicker coat on one of the faces and then stick the two faces together and hold for about 2 minutes, being certain to have coated every bit of space up to the edges, or else the faces won’t stick at those areas.
There was a glaring usability problem that the vehicle had. Turning it on and off required going through the open hatch underneath the body and through the sides to toggle the battery packs. It’s difficult to do and also makes the paper prone to damage unless you have tiny hands.
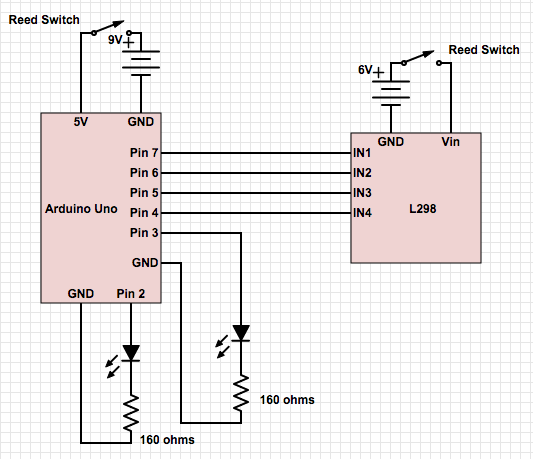
By cutting and rewiring the battery packs using switches and reed switches, I could plug everything together and leave the battery packs toggled “on” without the vehicle actually being turned “on”. I hot glued two reed switches to each other plus a magnet and onto a triangular piece that I placed against the roof’s interior. By laying a second magnet on the roof’s exterior, the reed switches complete the circuit and turn on the vehicle. I created and 3D printed a triangular pyramid with a recess where the magnet is hot glued in with TinkerCad. Now I have a key for my vehicle that’s both usable and aesthetically in line with the low-poly theme.
I learned that you could use a file to file down the sides of a 3D printed part to get rid of the glossy lines and create a matte surface. The points should also be rounded a tiny bit.
I wanted to close the sides of the vehicle in order to hide the electronics inside and add mystery to how the BE∆ST works. I experimented with different solutions, but the best one was inspired from when Chris brought to my attention how closing boxes work.
How it works is a flap is cut on one side and overlaps an uncut side of another flap, thereby hiding the uncut portion and closing the flap. I enclosed the last flap, which isn’t overlapped by another piece, by tucking it into a pocket. The pocket is created by gluing down a triangular piece on the interior, but not gluing the surface area where the flap is supposed to tuck in.
The inspiration for the wheels came from a futuristic Mercedes Benz wheel concept I found on Pinterest. I designed it on Solidworks before 3D printing it.
I actually started making the new wheels at the same time I was starting the side enclosures in order to save time on the 3D printers. A few problems came up, the main one being that I couldn’t print it in one piece because the shaft came out unstable and shaky. I had to print the wheel itself and the shaft separate, with the wheel having a recessed hole for the shaft to be glued into (with CA adhesive aka superglue). I had to go through many iterations of the wheels with regards to d-shaft measurements, correct axle lengths, and the recess measurements for stability. Eventually, I nailed it down. Iterative design process am I right?!
If something breaks with the circuit, it’s nearly impossible to take out them out through the sides to fix. It’s even more difficult to not damage the body because of the side enclosures. After going back and playing around with some earlier prototypes, I discovered I could make the body uncurl itself to open and curl to close. It worked and on top of that, it looked so clean and natural.
I used 4 magnets, 2 on the exterior and 2 on the interior, together to form a latch system and spray painted them white to go along with the body’s white color.
I learned another trick for spray painting during this part. On a piece of cardboard, I taped down a piece of tape with the sticky side facing up. I stuck the magnets onto that piece of tape because one side of the magnets can’t be spray painted in order for them to still properly attract. To speed up drying time, I learned to spray paint in thin coats and wait for them to dry before adding more thin coats rather than trying to spray paint everything in one coat. Spray painting a lot at once creates a thick coat that drips and takes longer to dry overall.
I first tested out an LED circuit by using 3 3mm Blue Water Clear Ultra Bright LEDs on a solderless breadboard with an extra Arduino Uno. I previewed the effect by putting the breadboard into an earlier prototype.
Moving this to the board carrying the circuit was something else entirely. I directly soldered the resistors to the wires and a female header pin where I would insert the LED. I then hot glued the female header pin to the board.
So how did it turn out in the end?
Not too shabby if I say so myself!
Design, though, is living and there’s always more that can be done. For future iterations, I would:
- Refine the side enclosures. They don’t entirely stay closed and sometimes pop out enough to grind against the wheels. This can damage the car and make an annoying noise when driving the car.
This is more of a must-have, while the next two would be nice additions.
- Experiment more with the number of LEDs, where to place them, and the same for the wires. These factors affect the visuals when the car is turned on. Imagine if the BE∆ST had more wires randomly placed everywhere inside the body and it was turned on in the dark. The shadows of the wires would be lit chaotically against the internal surface and would be such a contrast to see versus the clean, all-white look when it’s in the light!
- Incorporating sensors to make the BE∆ST autonomous would be so dope. There are countless directions this could go in.
1. I noticed that I became increasingly OCD during this project.
For example, when I had finished spray painting the magnets and was putting the latch system together, the pair of magnets I was working on accidentally stuck to each other on the painted sides, chipping some of their paint. It wasn’t too noticeable and time was running out (about an hour left before the lab closed and I hadn’t gotten to the LED circuit yet)...but it was noticeable to me and bothered me so much that I sprinted back to the recycle bin to get the cardboard I was using, taped the setup again, and sprinted back outdoors to spray another coat on. Whether or not this was actually obsessive behavior (maybe I’m still in denial), I surprisingly found the process to be intensely satisfying. I loved getting nitty gritty and getting it right down to the last detail, especially since this was my final prototype.
2. Mentorship and having a positive, nurturing surrounding environment is SO POWERFUL.
Chris has ran into every single problem ever possible, and when I run into the same problem and he’s there to go to for help, I learn much faster because I’m learning from his past mistakes that I’m encountering now. Working and talking with him and other students is also great cross pollination. Plain solutions like using the laser cutter for making faster prototypes or creative ideas such as internal LEDs came about from talking to others, asking them about their projects, and trading ideas and suggestions for each other.
3. “Everything you touch should have your take on it.”
Chris said this in the middle of the semester and I frequently think about it because it constantly reminds me about purpose. Every aspect of a product or experience, whether it be digital or analog, should have a reason for it. Anything along the lines of “I don’t know” when asked “Why is that there?” or “Why did you do that here?” is terrible and shows lack of thought, intent, and justice to your own self-expression and creativity.
If you’re interested in making a BE∆ST yourself, I’d be happy to create an Instructables for it so you can get started and modify it yourself. Let me know!


Comments