![Smart Alarm From Arduino [COMPLETE GUIDE] - Lesson #24](https://prod.hackster-cdn.online/assets/transparent-a0c1e3063bcabc548a5f3fa7328f3c1c97f747e6e764da4c14439567baa79ae1.gif)

![Smart Alarm From Arduino [COMPLETE GUIDE] - Lesson #24](https://hackster.imgix.net/uploads/attachments/1957608/_E9vr2Qs8q4.blob?auto=compress%2Cformat&w=900&h=675&fit=min)
Hardware components | ||||||
_ztBMuBhMHo.jpg?auto=compress%2Cformat&w=48&h=48&fit=fill&bg=ffffff) |
| × | 1 | |||
| × | 1 | ||||
 |
| × | 1 | |||
 |
| × | 1 | |||
 |
| × | 1 | |||
 |
| × | 1 | |||
| × | 1 | ||||
 |
| × | 1 | |||
Software apps and online services | ||||||
 |
| |||||
I've recently posted a tutorial about this project on YouTube explaining everything you can read on this article. You can watch it right below.
IntroductionIn this project, you are going to learn how to build a smart alarm system using Arduino. Whenever someone gets close to the sensor, the system triggers an alarm and sends an email notification to the user.
This is a beginner-friendly Internet of Things project that combines sensors, cloud services, and wireless communication into a practical security system.
If you're new here, welcome. This is lesson #24 of a 24-part series called Arduino for Beginners.
To build this project, you'll need:
- Arduino UNO
- I/O expansion shield
- Ultrasonic sensor
- Red LED
- Blue LED
- I2C LCD module
- Wi-Fi IoT module
- And a few jumper wires
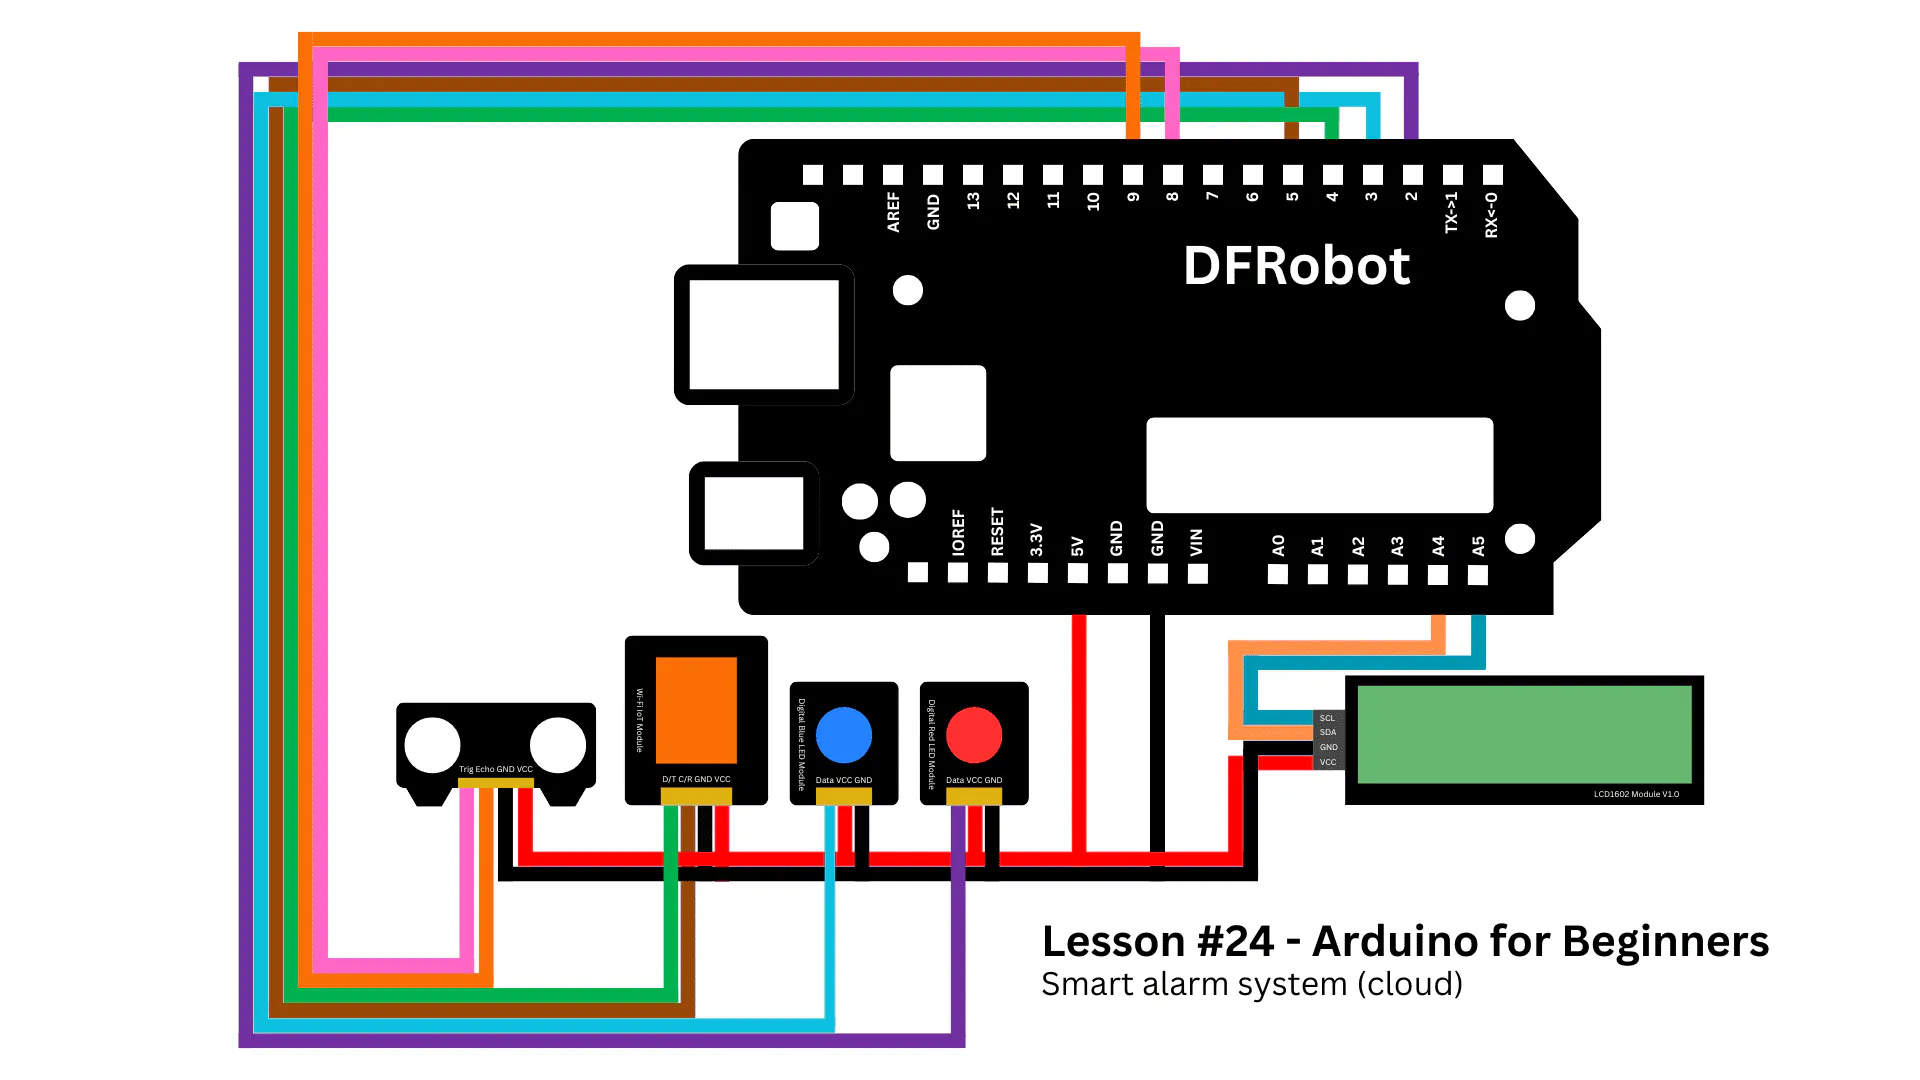
Start by attaching the I/O expansion shield to the Arduino board. This makes the wiring process much easier and cleaner.
Next, connect the red LED to digital port 2 and the blue LED to digital port 3.
Now connect the Wi-Fi IoT module. Connect the D/T pin to digital port 4 and the C/R pin to digital port 5.
After that, connect the ultrasonic sensor. The trig pin goes to digital pin 8, while the echo pin goes to digital pin 9.
Finally, connect the I2C LCD module. Connect the SCL pin to A5 and the SDA pin to A4.
If you need additional help wiring the components, make sure to follow the circuit diagram provided (below) with this project.
Also, remember to set the Wi-Fi module to UART mode before powering the system.
Before continuing, I would like to thank today's sponsor: DFRobot.
If you are not familiar with them yet, DFRobot is one of the leading providers of open-source hardware for students, makers, and engineers.
For this project, they kindly provided the MindPlus Arduino Coding Kit. This kit was designed especially for beginners and includes several components that help newcomers take their first steps into the Arduino ecosystem.
Using a kit like this can significantly improve the learning experience because it provides all the essential hardware needed for multiple projects in one package.
Thanks again to DFRobot for supporting this project.
CloudTo make the alarm system work properly, we need to configure the Arduino to send data to the cloud whenever the alarm is triggered.
This cloud data will activate a script responsible for sending an email notification to the user.
For this project, we are going to use ThingSpeak because it is easy to use and offers several useful features even for free accounts.
Start by creating a ThingSpeak account and logging in.
Creating the Channel
The first step is creating a Channel. Channels are used to receive and store data from the Arduino board.
Go to:
Channels → My Channels → New Channel
Give the channel a name such as "Smart Alarm".
Then create a field called "Triggered".
After that, scroll down and click on "Save Channel".
Creating the MATLAB Script
Now that the channel is ready, we need a script that analyzes the incoming data and sends the email notification.
Go to:
Apps → MATLAB Analysis → New
Under templates, select: "Get data from a private channel". Then click on "Create".
A new page containing MATLAB code will appear. We will not use this default code, so you can safely delete it.
The correct code for this project is available in the GitHub repository of this series.
Copy the contents of the file called: smart-alarm-matlab.m
Then paste the code into the MATLAB editor.
At the beginning of the script, you will find three variables that must be replaced with your own information:
- channelID
- alertApiKey
- readApiKey
Finding the Required Keys
To find the Channel ID, open the channel you created earlier. The Channel ID is displayed at the top of the page.
To find the Read API Key, open the "API Keys" tab and copy the corresponding key.
Finally, to find the Alerts API Key, click on your profile picture in the top-right corner and open "My Profile".
At the bottom of the page, you will find the Alerts API Key.
Once you have all three values, paste them into the MATLAB script.
Creating the TimeControl Rule
Before powering the Arduino board, we still need to configure one final setting.
Unfortunately, free ThingSpeak accounts cannot run MATLAB scripts continuously.
To solve this limitation, we will create a TimeControl rule that periodically runs the script and checks for updates.
Go to:
Apps → TimeControl → New TimeControl
Give it a name such as: "Smart Alarm Time Control".
Then configure the following settings:
- Type: Recurring
- Unit: Minute
- Interval: 5 minutes
Under "Action", select: MATLAB Analysis.
Then choose the MATLAB script you created earlier.
Finally, click on "Save TimeControl".
The script will now run every 5 minutes and check whether the alarm was triggered.
Because we are using a free account, email notifications are not sent instantly. If you need real-time monitoring, you may consider upgrading to a paid ThingSpeak plan.
Uploading the Arduino Sketch
Now go back to the GitHub repository and copy the Arduino sketch called: smart-alarm-system.ino
Paste the sketch into the Arduino IDE.
Before uploading the code, make sure you install the following library: DFRobot_RGBLCD1602.
You must also replace the following variables with your own information:
- ssid
- password
- apiKey
The apiKey is the ThingSpeak Write API Key, which can also be found in the API Keys section of your channel.
After updating the credentials, upload the code to the Arduino board.
ResultsWhen the system is powered on, the Arduino first initializes the Wi-Fi module and attempts to connect to the Internet.
Once connected, the system starts monitoring the ultrasonic sensor.
Whenever someone gets close enough to the sensor, the alarm is triggered.
The LCD displays a warning message while the LEDs blink alternately.
At the same time, the Arduino uploads data to ThingSpeak.
A few minutes later, the user receives an email notification informing them that the alarm was triggered.
Really cool, right?
CodeNow let's understand how the Arduino sketch works.
At the beginning of the program, several variables and objects are created, including the Wi-Fi credentials and LCD configuration.
char ssid[] = "WI-FI NAME";
char password[] = "WI-FI PASSWORD";
char apiKey[] = "WRITE API KEY";

SoftwareSerial wifi(4, 5);
String wifiBuffer = "";
Inside the setup() function, the Arduino initializes communication with the Serial Monitor, LCD module, and Wi-Fi module.
The system waits until the Internet connection is successfully established before continuing.
void setup() {
  Serial.begin(115200);
  wifi.begin(9600);

  pinMode(TRIG_PIN, OUTPUT);
  pinMode(ECHO_PIN, INPUT);

  pinMode(RED_LED, OUTPUT);
  pinMode(BLUE_LED, OUTPUT);

  lcd.init();
  lcd.setColorWhite();
  lcd.clear();
}
The main logic runs inside the loop() function.
While the ultrasonic sensor continuously measures distance, the Arduino also keeps track of time internally.
If one minute passes without detecting any object nearby, the board sends the value 0 to ThingSpeak.
However, if someone enters the detection zone - meaning they are 10 cm or closer to the sensor - the alarm is triggered and the Arduino sends the value 1 to the cloud.
In this system:
- 1 means "alarm triggered"
- 0 means "alarm not triggered"
void loop() {
  readSerial();


  if (!wifiConnected) {
    return;
  }

  long distance = readDistance();

  Serial.print("Distance: ");
  Serial.println(distance);

  if (distance > 0 && distance <= 10 && !alarmActive) {
    triggerAlarm();
    lastSend = millis();
  }

  if (!alarmActive && millis() - lastSend >= interval) {
    lastSend = millis();
    sendZero();
  }

  if (distance > 20 && alarmActive) {
    alarmActive = false;

    lcd.clear();
    lcd.print("Monitoring...");
  }

  delay(300);
}
Inside ThingSpeak, the MATLAB script analyzes all the data uploaded during the previous 5 minutes.
If the script finds at least one value equal to 1 (value > 0), it understands that the alarm was triggered and sends an email notification to the user.
If no value 1 is found, no email is sent.
This verification process is extremely important because it prevents unnecessary emails from being sent repeatedly.
ThingSpeak also includes anti-spam protection, and sending too many emails within a short period of time may activate the spam filter.
ConclusionIf you still have questions about the components used in this project, make sure to check out the other tutorials of this series.
I have published lessons explaining how to use the Wi-Fi module, how ultrasonic sensors work, and many other Arduino-related topics.
Throughout the series, we covered topics ranging from basic breadboard usage to Arduino programming and Internet of Things applications.
If you followed the entire series, congratulations. That level of dedication is truly amazing.
This course took almost one year to complete, and I am very grateful for all the support I received along the way.
I hope you enjoyed learning as much as I enjoyed teaching.
In the future, I plan to continue creating more advanced content, including ESP32 tutorials, hardware projects, and videos documenting my journey of building real hardware products.
Thank you very much for reading until the end, and I will see you in the next project.


Comments