


Hardware components | ||||||
| × | 1 | ||||
_ztBMuBhMHo.jpg?auto=compress%2Cformat&w=48&h=48&fit=fill&bg=ffffff) |
| × | 1 | |||
| × | 1 | ||||
 |
| × | 1 | |||
 |
| × | 1 | |||
| × | 1 | ||||
 |
| × | 1 | |||
Software apps and online services | ||||||
 |
| |||||
I've recently posted a tutorial about this project on YouTube explaining everything you can read on this article. You can watch it right below.
IntroductionWhat if your Arduino could send data to the internet - and you could access it from anywhere in the world?
In this tutorial, you'll learn how to connect your Arduino to Wi-Fi and send real sensor data to a cloud platform. This is your first real step into building IoT systems.
If you're new here, welcome. This is lesson #23 of a 24-part series called Arduino for Beginners.
ExplanationTo bring your Arduino projects online, you need a way to connect them to the internet. That's where the Wi-Fi IoT module comes in. This small board allows a microcontroller like Arduino to communicate with web services and cloud platforms.
The module has four main pins: D/T, C/R, GND, and VCC. D/T and C/R are used for data communication. D/T stands for Data Line/Transmitter, and C/R means Clock Line/Receiver.
If you take a closer look at the module, you'll notice a small switch. This switch allows you to choose between UART and I2C communication. In this project, we'll use UART because it's simpler and widely supported, especially for beginners.
The module operates between 3.3V and 5V and can draw up to 240mA. That's relatively high for an Arduino, so while we'll power it directly from the 5V pin in this simple setup, it's generally a good idea to use an external power supply in more demanding applications.
Another useful feature is the onboard RGB LED. It gives immediate feedback about the connection status (three colors).
- Red indicates that the module is not connected
- Blue means it is trying to connect
- Green confirms that it is successfully connected to Wi-Fi
Now that you understand how the module works, let's put it into practice.
SponsorThis project is part of a series supported by DFRobot.
DFRobot is a well-known company in the open-source hardware space. They provide a wide range of tools, from Arduino-compatible boards to sensors and development kits.
For this series, they provided the MindPlus Arduino Coding Kit. It's a complete set designed for beginners who want to build hands-on projects and learn by doing. If you want to follow along more easily, using a kit like this can make a big difference.
Thanks to DFRobot for sponsoring this content and help making STEM education more accessible.
ProjectIn this project, we'll build a simple system that reads environmental data and sends it to the cloud. This is a basic but powerful example of an IoT application.
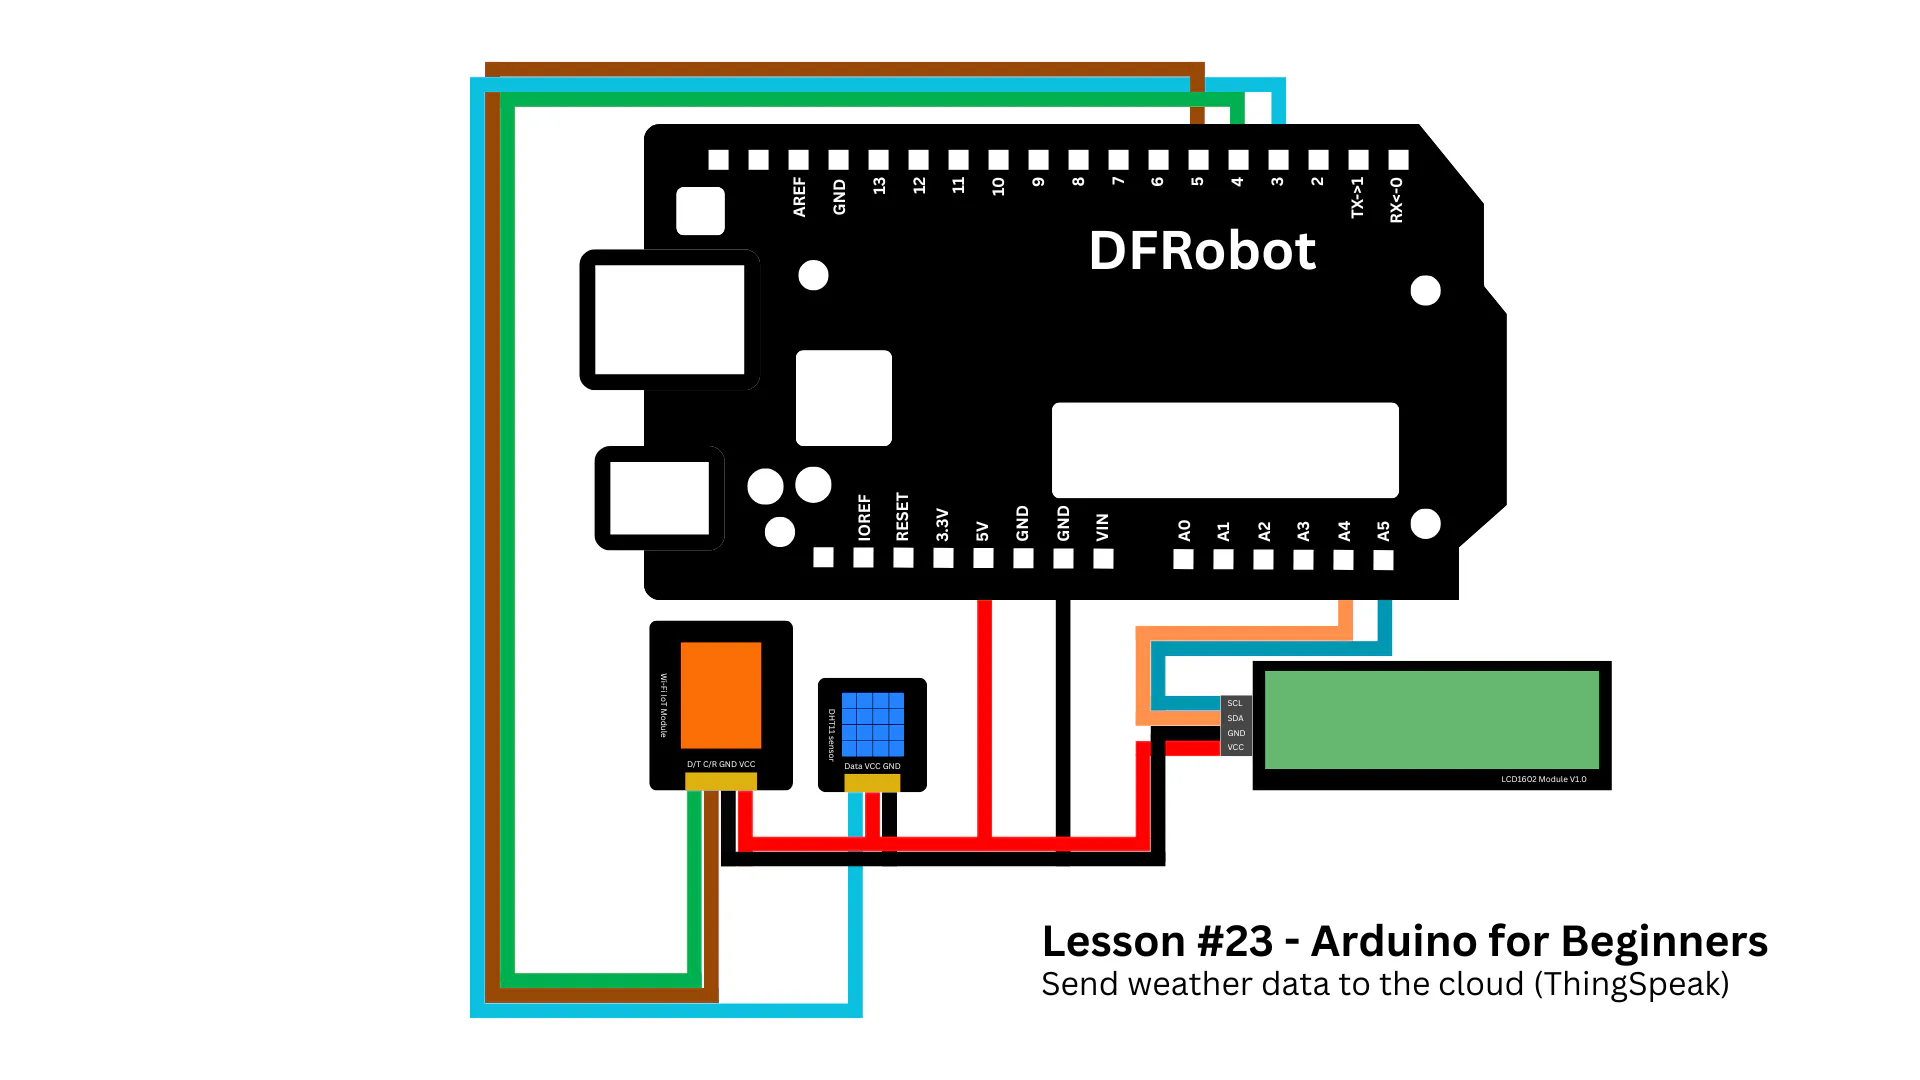
To build this monitor system, start by attaching the I/O expansion shield to the Arduino. This makes the wiring process much easier and cleaner.
Next, connect the DHT11 sensor to digital port 3.
Then connect the Wi-Fi module: the D/T pin goes to digital pin 4, and the C/R pin goes to digital pin 5.
Finally, attach the I2C LCD module, with SCL connected to A5 and SDA to A4.
Once everything is connected, it's time to set up the cloud platform. We'll use ThingSpeak to store and visualize the data.
Create an account and log in. Then navigate to the Channels section and create a new channel. Give it a name like "Arduino Weather Station" and define two fields: one for temperature and one for humidity.
After saving the channel, go to the API Keys tab and copy the Write API Key. This key will allow your Arduino to send data securely to the platform.
To complete the setup, download the project code (cloud-weather-station.ino) from the GitHub repository and open it in the Arduino IDE.
At the beginning of the code, you'll find three variables: ssid, password, and apiKey. These need to be updated with your Wi-Fi credentials and the Write API Key from ThingSpeak.
char ssid[] = "WIFI_NAME";
char password[] = "WIFI_PASSWORD";
char apiKey[] = "THINGSPEAK_WRITER_API_KEY";
The setup() function initializes all the components. It starts the sensor, sets up serial communication, initializes the LCD, and connects the module to your Wi-Fi network. The program waits until the connection is established before moving on.
void setup() {
  Serial.begin(115200);
  wifi.begin(9600);

  dht.begin();

  lcd.init();
  lcd.setColorWhite();
  lcd.clear();

  lcd.setCursor(0, 0);
  lcd.print("Starting...");

  Serial.println("Starting...");

  wifi.print("|1|1|\r");
  waitResponse();

  lcd.clear();
  lcd.print("Connecting WiFi");

  Serial.println("Connecting WiFi...");
  wifi.print("|2|1|");
  wifi.print(ssid);
  wifi.print(",");
  wifi.print(password);
  wifi.print("|\r");

  waitResponse();

  lcd.clear();
  lcd.print("WiFi Connected");
  delay(1500);
}
The main logic runs inside the loop() function. Every 30 seconds, the Arduino reads temperature and humidity from the DHT11 sensor.
if (millis() - lastSend >= interval) {
  lastSend = millis();
  sendData();
}
These values are displayed in the Serial Monitor and on the LCD screen. After that, the data is sent to ThingSpeak using an HTTP request.
void sendData() {
  float temp = dht.readTemperature();
  float hum  = dht.readHumidity();

  if (isnan(temp) || isnan(hum)) {
    Serial.println("DHT read failed");
    lcd.clear();
    lcd.setCursor(0, 0);
    lcd.print("Sensor Error");
    return;
  }

  Serial.print("Temp: ");
  Serial.print(temp);
  Serial.print(" C | Hum: ");
  Serial.println(hum);

  lcd.clear();

  lcd.setCursor(0, 0);
  lcd.print("Temp: ");
  lcd.print(temp, 1);
  lcd.print(" C");

  lcd.setCursor(0, 1);
  lcd.print("Hum : ");
  lcd.print(hum, 0);
  lcd.print(" %");

  String url = "api.thingspeak.com/update?api_key=";
  url += apiKey;
  url += "&field1=";
  url += String(temp, 1);
  url += "&field2=";
  url += String(hum, 0);

  Serial.println("Sending to ThingSpeak...");

  wifi.print("|3|1|http://");
  wifi.print(url);
  wifi.print("|\r");

  waitResponse();
}
Two helper functions support this process. One waits for a response from the server to confirm that the data was received, while the other reads incoming messages from the Wi-Fi module.
void waitResponse() {
  unsigned long t = millis();
  while (millis() - t < 5000) {
    readSerial();
  }
}

void readSerial() {
  while (wifi.available()) {
    char c = wifi.read();
    Serial.print(c);
  }
}
Once you've configured the variables and reviewed the code, upload it to your Arduino.
ResultsWhen the system starts, the Wi-Fi module's LED will guide you through the connection process. It begins in red, indicating that it's not connected. It then turns blue while attempting to connect, and finally green once the connection is successful.
After a few seconds, the LCD will begin displaying temperature and humidity readings in real time.
If you open your ThingSpeak channel, you'll see two graphs updating over time - one for temperature and one for humidity. These values are stored in the cloud, meaning they remain accessible even if your Arduino is turned off.
This is one of the key ideas behind IoT: collecting data locally and making it available globally.
In this project, you built a complete system that reads sensor data and sends it to the internet. This is a fundamental building block for many real-world IoT applications, from weather stations to smart home systems.
Once you understand this workflow - reading data, processing it, and sending it to the cloud - you can start building much more advanced systems.
If you've been following this series, you're almost at the end. And if not, this project is a great introduction to what's possible when you connect your hardware to the internet.
From here, the next step is to expand this system: add more sensors, improve reliability, or create your own dashboards and applications.
That's where things start to get really interesting.
If you enjoyed this article, I recommend you read this other one in which you'll learn how to use LoRa modules in your Arduino projects.
Thanks for reading this lesson, and I'll see you in the next one.


Comments