


Hardware components | ||||||
 |
| × | 1 | |||
| × | 1 | ||||
 |
| × | 1 | |||
 |
| × | 1 | |||
 |
| × | 1 | |||
Software apps and online services | ||||||
 |
| |||||
 |
| |||||
Have you ever switched on your water pump and then completely forgotten about it?
A few minutes later, the terrace is flooded, the tank is overflowing, and someone has to run upstairs to switch the pump off.
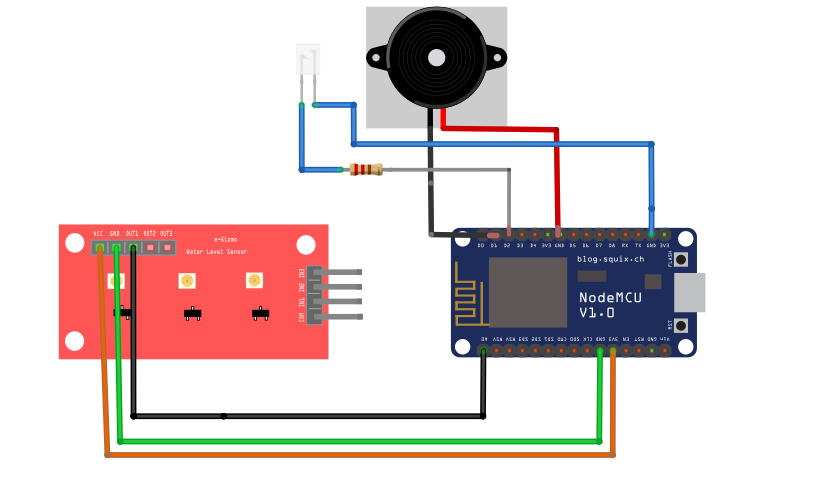
To solve this simple but common problem, I built a WiFi-based water level monitoring system using an ESP8266, an analog water level sensor, and KiwisIoT.
The system continuously measures the water level and sends the data to a cloud dashboard. When the tank reaches a high level, the system can activate an LED and buzzer alert.
The result is a simple IoT system that lets you monitor your water tank from your phone or computer.
What You'll BuildBy the end of this project, you will have:
An ESP8266 NodeMCU reading the water level sensor.
- An ESP8266 NodeMCU reading the water level sensor.
- A live KiwisIoT dashboard displaying the water level.
- Water-level status such as LOW, MEDIUM, HIGH, and FULL.
- An LED indicator for the full-tank condition.
- An optional buzzer for an audible alert.
- WiFi connectivity so the data can be monitored remotely.
The ESP8266 reads the analog sensor every two seconds and sends the processed value to KiwisIoT.
How It WorksThe architecture is simple:
Water Level Sensor → ESP8266 → WiFi → KiwisIoT → Dashboard
The analog sensor produces a value depending on how much of the sensor is in contact with water.
The ESP8266 converts this raw analog value into a percentage between 0% and 100%.
The software then determines the current status:
When the level reaches 90% or above, the LED and optional buzzer are activated.
Why KiwisIoT?There are many IoT platforms available, but for a small project like this, I wanted something simple.
KiwisIoT provides a dashboard where sensor data can be visualized without having to build an entire cloud backend.
The ESP8266 sends two pieces of information:
kiwisiot.send("0", waterLevel);
kiwisiot.send("1", statusMsg);
The first value is used by the gauge widget to display the water percentage.
The second value displays the current status.
This makes it possible to create a simple dashboard without writing a separate server application.
KiwisIoT Dashboard SetupSetting up the dashboard is straightforward.
Step 1 — Create a PanelCreate a new dashboard/panel in KiwisIoT.
Give it a name such as:
Water Tank Monitor
Step 2 — Get Your Topic IDAfter creating the panel, copy the generated Topic ID.
It will look similar to:
dash_xxxxxxxxxxxxxUse your own Topic ID in the Arduino sketch.
Step 3 — Add a GaugeAdd a gauge widget and configure it to receive the water-level value using key:
0This will display the water level from 0–100%.
Step 4 — Add a Status WidgetAdd a text/label widget using key:
1This will display messages such as:
Water Level LOW
Water Level MEDIUM
Water Level HIGH
Water Tank FULL
Once the ESP8266 starts sending data, the dashboard will update automatically.
Arduino CodeInstall the required ESP8266 and KiwisIoT libraries before uploading the sketch.
Replace the WiFi credentials and Topic ID with your own values.
#include <ESP8266WiFi.h>
#include <KiwisIoT.h>

// -----------------------------------------------------
// WiFi
// -----------------------------------------------------
const char* ssid = "YOUR_WIFI_NAME";
const char* pass = "YOUR_WIFI_PASSWORD";

// -----------------------------------------------------
// KiwisIoT
// -----------------------------------------------------
const char* topic = "YOUR_TOPIC_ID";

// -----------------------------------------------------
// Pins
// -----------------------------------------------------
#define WATER_PIN A0
#define FULL_LED D2
#define BUZZER_PIN D1

// -----------------------------------------------------
// Sensor Calibration
// -----------------------------------------------------
#define EMPTY_VALUE 0
#define FULL_VALUE 1023

KiwisIoT kiwisiot(ssid, pass, topic);

void setup()
{
    Serial.begin(115200);

    pinMode(FULL_LED, OUTPUT);
    pinMode(BUZZER_PIN, OUTPUT);

    digitalWrite(FULL_LED, LOW);
    digitalWrite(BUZZER_PIN, LOW);

    kiwisiot.begin();

    Serial.println("Water Level Monitoring Started");
}

void loop()
{
    // Read analog water level sensor
    int sensorValue = analogRead(WATER_PIN);

    // Convert raw value to percentage
    int waterLevel = map(
        sensorValue,
        EMPTY_VALUE,
        FULL_VALUE,
        0,
        100
    );

    waterLevel = constrain(waterLevel, 0, 100);

    String statusMsg;

    // -------------------------------------------------
    // FULL
    // -------------------------------------------------
    if (waterLevel >= 90)
    {
        digitalWrite(FULL_LED, HIGH);
        digitalWrite(BUZZER_PIN, HIGH);

        statusMsg = "Water Tank FULL";
    }

    // -------------------------------------------------
    // HIGH
    // -------------------------------------------------
    else if (waterLevel >= 60)
    {
        digitalWrite(FULL_LED, LOW);
        digitalWrite(BUZZER_PIN, LOW);

        statusMsg = "Water Level HIGH";
    }

    // -------------------------------------------------
    // MEDIUM
    // -------------------------------------------------
    else if (waterLevel >= 30)
    {
        digitalWrite(FULL_LED, LOW);
        digitalWrite(BUZZER_PIN, LOW);

        statusMsg = "Water Level MEDIUM";
    }

    // -------------------------------------------------
    // LOW
    // -------------------------------------------------
    else
    {
        digitalWrite(FULL_LED, LOW);
        digitalWrite(BUZZER_PIN, LOW);

        statusMsg = "Water Level LOW";
    }

    // Serial Monitor
    Serial.print("Water Level: ");
    Serial.print(waterLevel);
    Serial.print("% - ");
    Serial.println(statusMsg);

    // Send data to KiwisIoT
    kiwisiot.send("0", waterLevel);
    kiwisiot.send("1", statusMsg);

    // Keep KiwisIoT connection alive
    kiwisiot.run();

    delay(2000);
}Instead of keeping the LED and buzzer continuously ON, you can make them blink and beep when the tank reaches the full threshold.
Replace the FULL section with:
if (waterLevel >= 90)
{
    bool blink = (millis() / 500) % 2;

    digitalWrite(FULL_LED, blink);
    digitalWrite(BUZZER_PIN, blink);

    statusMsg = "Water Tank FULL";
}
This produces an alternating alert while the tank remains at or above 90%.
Understanding the CodeThe main part of the program is the sensor reading:
int sensorValue = analogRead(WATER_PIN);The ESP8266 reads the analog value from the sensor.
The raw value is then converted into a percentage:
int waterLevel = map(
    sensorValue,
    EMPTY_VALUE,
    FULL_VALUE,
    0,
    100
);
For example:
Raw sensor value → Water percentage

0       → 0%
300     → ~29%
600     → ~59%
900     → ~88%
1023    → 100%
The constrain() function prevents the calculated percentage from going below 0 or above 100.
waterLevel = constrain(waterLevel, 0, 100);The program then checks the percentage against the four thresholds.
Finally, the values are sent to KiwisIoT:
kiwisiot.send("0", waterLevel);
kiwisiot.send("1", statusMsg);
The complete process repeats every two seconds.
CalibrationOne of the most important steps is sensor calibration.
Do not assume that your sensor will produce exactly:
0 = empty
1023 = full
Different sensors can produce different readings depending on the sensor, wiring, water quality, and installation.
Step 1 — Measure the Empty ValueKeep the sensor completely dry.
Open the Serial Monitor at:
115200 baudRecord the sensor reading.
For example:
Sensor reading: 8Submerge the sensor to the desired maximum water level.
For example:
Sensor reading: 980If your measurements are 8 and 980:
#define EMPTY_VALUE 8
#define FULL_VALUE 980
This gives you a much more meaningful percentage.
Calibration is the difference between a simple demonstration and a system that provides useful measurements.
TestingAfter uploading the program:
Open the Serial Monitor.
- Open the Serial Monitor.
- Set the baud rate to 115200.
- Power the ESP8266.
- Slowly expose/submerge the sensor.
- Observe the sensor readings.
- Watch the percentage change.
- Check the KiwisIoT dashboard.
- Cross the 90% threshol
- Verify that the LED and buzzer activate.
A typical Serial Monitor output will look like:
Water Level: 18% - Water Level LOW
Water Level: 35% - Water Level MEDIUM
Water Level: 67% - Water Level HIGH
Water Level: 92% - Water Tank FULL
When the reading reaches 90%, the dashboard should also change to:
Water Tank FULLThe complete sequence is:
Water level increases
        ↓
Sensor output increases
        ↓
ESP8266 reads analog value
        ↓
Value converted to percentage
        ↓
Percentage >= 90%
        ↓
LED ON
        ↓
Buzzer ON
        ↓
"Water Tank FULL"
        ↓
Data sent to KiwisIoT
        ↓
Dashboard updated
This gives you both local hardware feedback and remote monitoring.
Can I Monitor the Tank Remotely?Yes.
Because the ESP8266 connects to WiFi and sends the sensor information to KiwisIoT, the dashboard can be accessed from another device with an internet connection.
For example, you could check the dashboard from:
Smartphone
- Smartphone
- Laptop
- Desktop
- Tablet
This is useful when the water tank is on a rooftop or another location that isn't always visible.
Can I Use an Ultrasonic Sensor?Yes.
Instead of using a water-contact analog sensor, you can use an ultrasonic sensor such as the HC-SR04.
The ultrasonic sensor measures the distance between the sensor and the water surface.
The calculation then becomes:
Tank height
    ↓
Distance to water
    ↓
Water depth
    ↓
Water percentage
An ultrasonic approach can also avoid direct contact between the sensing element and the water.
Can I Automatically Control the Pump?Yes — this is the next logical upgrade.
A relay module can be connected to another GPIO pin and used to control the pump through an appropriate electrical control system.
The basic control logic could be:
Water level <= 20%
        ↓
Pump ON

Water level >= 90%
        ↓
Pump OFF
This introduces hysteresis, preventing the pump from rapidly switching ON and OFF around a single threshold.
Safety: Mains-powered water pumps should not be connected directly to an ESP8266. Use an appropriately rated relay/contactor and proper electrical isolation, enclosure, protection, and installation by a qualified person where required.
Safety: Mains-powered water pumps should not be connected directly to an ESP8266. Use an appropriately rated relay/contactor and proper electrical isolation, enclosure, protection, and installation by a qualified person where required.Possible Future Improvements
This project can be extended considerably.
Automatic Pump ControlAutomatically start and stop the pump based on water level.
Mobile NotificationsAdd push notifications when the tank becomes full or reaches a critically low level.
Historical ChartsStore water-level measurements and visualize daily or weekly consumption patterns.
Multiple TanksMonitor several tanks from one dashboard.
Ultrasonic MeasurementReplace the resistive water-level sensor with a non-contact distance sensor.
Smart Water ManagementCombine tank level with:
- Pump status
- Flow sensor
- Water consumption
- Rainfall data
- Motor current
This could evolve into a complete smart water-management system.
The IoT ArchitectureAlthough this is a small project, it demonstrates the fundamental architecture used in many IoT systems:
             ┌─────────────────────┐
             │  Water Level Sensor │
             └──────────┬──────────┘
                        │
                        ▼
             ┌─────────────────────┐
             │     ESP8266         │
             │  Sensor Processing  │
             └──────────┬──────────┘
                        │
                      WiFi
                        │
                        ▼
             ┌─────────────────────┐
             │      KiwisIoT       │
             │   Cloud Platform    │
             └──────────┬──────────┘
                        │
                        ▼
             ┌─────────────────────┐
             │      Dashboard      │
             │  Gauge + Status     │
             └─────────────────────┘
The same architecture can be reused for many other sensors.
For example:
DHT11       → Temperature / Humidity
Soil Sensor → Soil Moisture
Gas Sensor  → Gas Level
Current     → Power Monitoring
LDR         → Light Level
The sensor changes, but the fundamental IoT pipeline remains similar.
Final ThoughtsThis project started with a simple problem: knowing when a water tank is getting full without constantly checking it manually.
With just an ESP8266, a water-level sensor, a few basic components, and KiwisIoT, we can turn that problem into a connected IoT system.
The project demonstrates the complete path:
Sensor → Microcontroller → WiFi → Cloud → Dashboard → Alert
For someone starting with IoT, this is a useful project because it introduces several concepts that can later be used in larger systems.
And the best part is that the same architecture can be expanded into an automatic pump controller and complete smart water-management system.
If you build this project, try adding the automatic pump-control functionality and let me know how it works.
Happy building!


Comments