Also, I have submitted an Alexa skill set which can be found here:
https://www.hackster.io/justadude/deep-thoughts-5498eb?ref=challenge&ref_id=38&offset=9
My alexa skills app (deep thoughts)
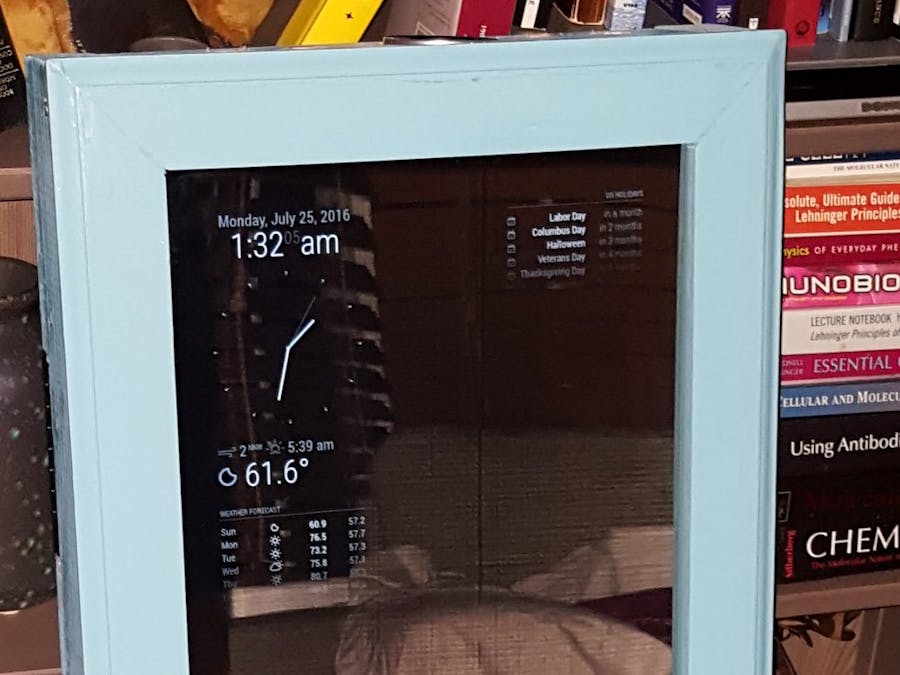
Alexa Magic Mirror v2.1
shark facts on Alexa Skills Store
water facts on Alexa Skills store
quotes on Alexa Skills Store
Hand tools and fabrication machines
Wooden case and outer frame
I had extra 2x4's to make the outer casing. For the outer frame, I went to Home Depot looking for cheap, thin wood.
Part A:Taking apart the 24 inch monitor.
1. Take out the screws at the back of the monitor. For my monitor, there were 8 screws.
2. The back casing should easily come out.
3. The front casing can be easily pried out from the front on most LED monitors. But be careful as there are some fragile wires hanging from the main power source at the back.
4. Keep the monitor control buttons by cutting out the casing which will be used for the control portion of the magic mirror component.
Part B: Building Outside Case
1. This is the best time to paint and make any cuts you need.
2. This includes cutting out a 2½“ diameter on the top piece for the speaker, and several holes for ventilation.
3. On the bottom piece, I cut out a big enough piece to thread both the power cord for the monitor as well as the USB power hub.
4. To prevent the monitor and mirror from falling forward, I added a small stopping brace on the outside of each of the 2x4 so that the mirror will sit flush with the frame. I used pieces from a small bracket I used for my robotic projects. I also wrapped each of the small stopping brackets with electrical tape to prevent it from scratching the mirror.
5. On the magic mirror, I drilled a ½“ hole in the following coordinates assuming the left lower corner is the margin: x=4” and y=7/8”.
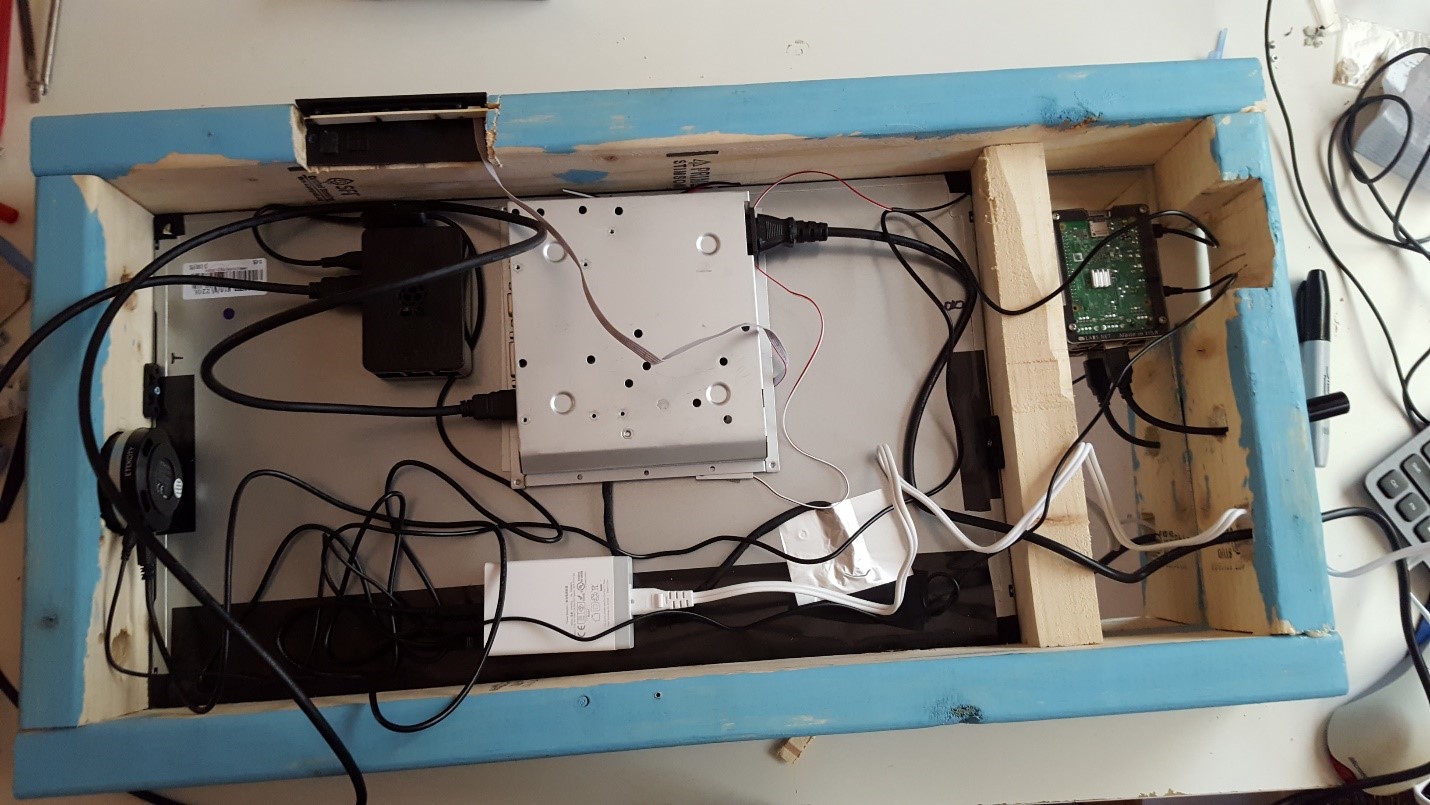
6. Organize the four 2x4s in a frame around the following. Lay the observation mirror securely against the small front brackets. Gently lay the monitor on top of the observational mirror.
7. Determine where you want your pieces on the backside of monitor. Once you’re satisfied, you can secure everything in its place using duck-tape and/or glue. I did a mixture of both.
8. Once you secure the components on the backside of the monitor, it’s time to put the casing together. I used some gorilla glue to fit the 2x4 together and clamped it using a vice grip clamp and let it sit overnight.
9. Once dried, I reinforced the mirror casing by putting in some #8 screws in each end of the 2x4s. Once you pick it up, you’ll see that a little more reinforcement isn’t a bad thing.
Part C. Building outer frame
1. To build the outside frame, you could just put some rectangular pieces of wood together. However, I decided to use some a protractor to measure and cut 45 degree angles. Not a bad job, if I say so myself. The out frame should have the measurements an inner width of 11 5/8” and a height of 26 ¼”
2. Setup Raspberry Pi 3 has been documented extensively everywhere! The official Raspberry Pi website even has made animated instructions: https://www.raspberrypi.org/help/videos/
3. For each Raspberry Pi, I paired it with my Bluetooth keyboard. This is optional but it makes troubleshooting and shutting down/rebooting much more efficient and easy.
Story
Alexa Magic Mirror 2
Alexa thinking
Alexa speaking
Demo of Alexa Magic Mirror 2
Full picture
Intro
I had just moved into a new place where the previous owner went hog-wild on mirrors. I’m not kidding, every room has floor to ceiling mirrors! Not only did I quickly get bored of mirrors, but I got bored at looking at myself in the mirror. Other than the mirrors, my place is cool. Around this time, I had attended one of the Amazon/Hackathon Alexa skills workshop and published a few skills. Then it occurred to me that a talking mirror (i.e. using Alexa) would be awesome.
I then searched the internet to see what other things people have done with their mirrors and came across the Magic Mirror2 and its growing community. I read up on Michael Teeuw’s work on the Magic Mirror2 and realized having both functions (i.e. Alexa voice service and Magic Mirror2) in my mirror would be an awesome combined project. I would like to especially thank Michael Teeuw, the community of magic mirror buffs, and the Raspberry PI Guy for their work and ingenuity. Their files are accessible at the GitHub repository and has inspired me to put together the “Alexa Magic Mirror2”.
Also, I have submitted an Alexa skill set which can be found here:
#Ensure you’re Raspberry Pi is up-to-date:sudoapt-getupdate&&sudoapt-getinstall-f#Install node.js and dependencies using auto-installer-takes about 10 minutescurl-sLhttps://raw.githubusercontent.com/MichMich/MagicMirror/master/installers/raspberry.sh|bash#configure your cursor to vanish if inactive sudoapt-getinstallunclutter#Disable screensaver sudonano/home/pi/.config/lxsession/LXDE-pi/autostart#uncomment third line so it reads "#@screensaver -no-splah" and add the followin:@xsetsnoblank@xsetsoff@xset-dpmssudonano/etc/lightdm/lightdm.conf#Then add the following:xserver-command=X-s0-dpms#Configuration of Magic Mirror2cp/home/pi/MagicMirror/config/config.js.sample/home/pi/MagicMirror/config/config.js#check to make sure you copied file to correct folder.#go into MagicMirror folder and check to see everything is working.cd/home/pi/MagicMirrorDISPLAY=:0npmstart#you should see the following or something similar (see picture)#Configure weather and time zone to your location#go here: http://openweathermap.org/current and create an account.#You'll need to generate an API key. #then go here: http://openweathermap.org/help/city_list.txt to find your location ID:#For example, location ID for Seattle is 5809844#time to set up the autostart using a production process manager (PM2)sudonpminstall-gpm2pm2startup#When done, enter the following cd~sudosu-c"env Path=$PATH:/usr/bin pm2 startup linux -u pi --hp /home/pi"cd~nanomm.sh#then add the followingcd~/MagicMirrorDISPLAY=:0npmstart#save and clone, then make the script executable.chmod+xmm.sh#start Magic Mirror2 with the following:pm2startmm.sh#while Magic Mirror2 and pm2 is running, switch over to your terminal and type the followingpm2save#to rotate screensudonano/boot/config.txtdisplay_rotate=1avoid_warnings=1sudoreboot#You can edit many changes by using your text editor to access the modules, it's amazing!
Alexa Voice Service with sense hat installation
Python
#To use the Amazon’s Alexa voice service, you will need to create an account and register your device in #Amazons developer site. Since I already created an account from publishing some skill sets, the #following instructions pertain to after you created an account.#1. On your Raspberry Pi, get your IP address (e.g. 192.167.1.142).#a. You can get this using the command: ifconfig#2. Click on AlexaAlexa Voice ServiceRegister a Product Type and select Device#3. Enter a unique name in Device Type ID and Display name. I used the same name.#4. From the ‘Select Security Profile’ menu, select ‘Create a new profile.’#5. Click on the Web Settings Tab, click Edit, and enter the following by :#a. Allowed Origins: http://localhost:5000#b. Hit ‘add another’ and add the following:#c. http://(your IP you got from step 1):5000#d. Allowed Return URL’s: http://localhost:5000/code#e. Hit ‘add another’ and add the following:#f. http://(your IP you got from step 1):5000#g. click next#6. The next page is for administrative purposes only. Here’s what I entered:#7. Click next, then go into ‘Security Profile’#NOTE: **You will need need this information to complete setup.#8. Go to your Raspberry Pi and type the following:sudoapt-getupdate&&sudoapt-getinstall–fgitclonehttps://github.com/the-raspberry-pi-guy/Artificial-Intelligence-PicdArtificial-Intelligence-Pisudo./setup.sh#9. Enter the above information you saved from above#a. Product ID : what you entered in step 3#b. Security Profile Description: what you entered in step 3#c. Security Profile ID: what you entered in step 7#d. Client ID: what you entered in step 7#e. Client Secret: what you entered in step 7#10. To get automatic start on bootup:#a. Find out where your main.py script is.#b. For example, consider your main.py is in /home/pi/Artificial-Intelligence-Pi#c. Go to your root folder. Then type the following:sudonanocrontab–e@rebootpython/home/pi/Artificial-Intelligence-Pi/main.py. Open up initd_Alexa.sh and comment out the line that reads: “Python/root/…main.Py &”#12. Save and exitsudoreboot#13. A note about proper shutdown.#if you’re out for an extended period of shutdown and you have followed my instructions #above, you should be able to access both Rasperry Pi’s via Bluetooth keyboard. #For each Raspberry Pi, access the terminal by pressing Cntrl-alt-T, together.#-then type:sudoshutdown–hnow#This will stop all running scripts and properly shuts down the Raspberry Pi.#*And there you have it..the Alexa Magic Mirror2


Comments