

Hardware components | ||||||
 |
| × | 1 | |||
Software apps and online services | ||||||
 |
| |||||
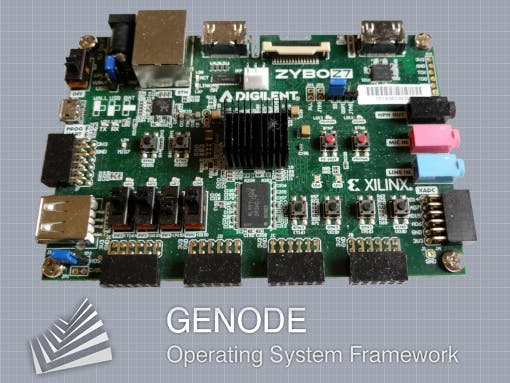
The Genode OS Framework (often referred to as Genode) has been around for over a decade and is still under active development. It is best supported on general-purpose x86 hardware since we at Genode Labs use it productively for our daily business. However, there is also (partial) support for a variety of ARM-based platforms. A recent addition was the support for Digilent's Zybo Z7 boards. This is a beginner-level tutorial on booting a very basic Genode scenario on a Zybo Z7-10 or Zybo Z7-20 board.
PrerequisitesFor Genode development, you need a Linux host. I recommend using Ubuntu LTS on which Genode will build without trouble. Genode uses its own tool chain that must be installed manually. You can download the pre-built tool chain and install it with the following command:
$ sudo tar xPf genode-toolchain-<version>-<arch>.tar.xzPlease make sure to familiarise yourself with Genode by following the getting started guide. This will make sure that you have installed all other required build tools.
Prepare the Zybo Z7 boardThe Zybo Z7 board ships with a preinstalled demo application which is stored in the on-board flash memory. Make sure to set the jumper JP5 to QSPI boot and power on the device. The demo application controls the on-board LEDs and sends a few characters via the UART interface. Both are helpful to check whether the board boots up correctly and to test the UART connection. In order to use the latter, attach a Micro-USB cable to the connector labelled "PROG UART", connect it to your development system and power on the board. A /dev/ttyUSB1 device should pop up. Start a terminal program of your liking (e.g. picocom, screen) and push the reset button to see the board's serial output. I like to use screen as follows:
$ sudo screen /dev/ttyUSB1 115200If you want to exit screen, enter the charactersequence Ctrl+a k.
First, we need to obtain a clone of Genode:
~$ git clone https://github.com/genodelabs/genode.git genodeSecond, we need to clone the companion repository for the Zynq support:
~$ git clone https://github.com/genodelabs/genode-zynq.git genode/repos/zynqGenode uses an out-of-tree build process. We therefore prepare a build directory for our target platform at ~/genode/build/arm_v7a with the following command:
~/genode$ ./tool/create_builddir arm_v7aThe build directory hosts the configuration file ~/genode/build/arm_v7a/etc/build.conf that needs a few modifications.
First, we must tell the build system to use the Zynq repository, which is achieved by uncommenting the following line:
REPOSITORIES += $(GENODE_DIR)/repos/zynqSecond, we are going to set a few variables that will spare us some typing later on.
KERNEL  ?= hw
BOARD   ?= zynq_zybo_z7
RUN_OPT += --depot-auto-updateNext, we are going to build an SD card image. Genode uses u-boot and conveniently compiles everything into a single image. Before we can trigger the make command though, we must download the third-party code of u-boot. This is done via the prepare_port tool:
~/genode$ ./tool/ports/prepare_port zynq_ubootNow, we are ready to build the SD card image as follows:
~/genode$ RUN_OPT='--include image/zynq_uboot_sdcard' make -C build/arm_v7a run/logThis command tells Genode's build system to build the run/log scenario and to include the image creation script. Please refer to the build-system documentation if you are interested in more details. Note that we could also add the RUN_OPT definition into the build.conf. However, I would like to skip the image creation in the future and use TFTP boot when I have initialised the SD card. The build procedure should finish with the following line
Created SD-card image file var/run/log.imgWhen I insert an SD card into my Linux host, a /dev/mmcblk0 device pops up. I thus write the created image to the SD card as follows:
~/genode$ sudo dd if=build/arm_v7a/var/run/log.img of=/dev/mmcblk0 bs=1M conv=fsyncInsert the SD card into the Zybo board and don't forget to set the jumper JP5 to SD boot. Power up the device, connect to the serial console (e.g. using screen), and hit the reset button. You should see the following output:
[init -> test-log] hex range:          [0e00,1680)
[init -> test-log] empty hex range:    [0abc0000,0abc0000) (empty!)
[init -> test-log] hex range to limit: [f8,ff]
[init -> test-log] invalid hex range:  [f8,08) (overflow!)
[init -> test-log] negative hex char:  0xfe
[init -> test-log] positive hex char:  0x02
[init -> test-log] floating point:     1.70
[init -> test-log] multiarg string:    "parent -> child.7"
[init -> test-log] String(Hex(3)):     0x3
[init -> test-log] Very long messages:
[init -> test-log -> log] 1.....................................................................................................................................................................................................................................2
[init -> test-log] 3.....................................................................................................................................................................................................................................4
[init -> test-log] 5.....................................................................................................................................................................................................................................6
[init -> test-log]
[init -> test-log] Test done.

Run script execution successfulSince my clumsy fingers don't deal well with micro SD cards, I'd rather avoid touching them on a regular basis. Instead, I prefer network boot. Fortunately, u-boot supports loading images via TFTP. The u-boot installation on our SD card loads the /boot/uEnv.txt file if present and executes the uenvcmd command. I thus set up the /boot/uEnv.txt file with the following content:
serverip=x.x.x.x
kernel_img=/srv/tftp/usrp/uImage
uenvcmd=tftpboot ${load_addr} ${serverip}:${kernel_img} && bootm start && bootm loados && bootm go
The server_ip refers to my Linux host on which I installed tftp-hpa. Note that kernel_img must refer to a path reachable by the TFTP server. Since I'm not using the servers --secure flag, the path is an absolute path. Otherwise, it must be relative to the TFTP server's root directory.
Now, we need to tell Genode's build system to populate the TFTP directory. This is done by inserting the following lines into the build.conf:
RUN_OPT_zybo  = --include image/uboot
RUN_OPT_zybo += --include load/tftp
RUN_OPT_zybo += --load-tftp-base-dir /srv/tftp/usrp
RUN_OPT_zybo += --load-tftp-absolute
RUN_OPT_zybo += --include log/serial
RUN_OPT_zybo += --log-serial-cmd "picocom -b 115200 /dev/ttyUSB1"
BOARD_RUN_OPT(zynq_zybo_z7) = $(RUN_OPT_zybo)
Note that this also tells the build system to automatically connect to the serial console. Hence, we can run test scenarios that require the host system to evaluate the log output such as run/timer_accuracy:
~/genode$ make -C build/arm_v7a run/timer_accuracyOnce "Terminal ready" appears, we can hit the reset button of the Zybo board. If everything is set up correctly, we should see some output like this:
[init -> test-timer_accuracy]
[init -> test-timer_accuracy]
[init -> test-timer_accuracy]
[init -> test-timer_accuracy]
[init -> test-timer_accuracy]
[init -> test-timer_accuracy]
[init -> test-timer_accuracy]
[init -> test-timer_accuracy]
[init -> test-timer_accuracy]
[init -> test-timer_accuracy]
Good: round 1, host measured 1000 ms, test measured 1007 ms
Good: round 2, host measured 2000 ms, test measured 2228 ms
Good: round 3, host measured 3000 ms, test measured 2764 ms
Good: round 4, host measured 4000 ms, test measured 4003 ms
Good: round 5, host measured 5000 ms, test measured 5007 ms
Good: round 6, host measured 6000 ms, test measured 6002 ms
Good: round 7, host measured 7000 ms, test measured 6995 ms
Good: round 8, host measured 8000 ms, test measured 8001 ms
Good: round 9, host measured 9000 ms, test measured 8993 ms
Congrats, you have successfully set up Genode for the Zybo Z7 board.Happy hacking!


Comments