


Hardware components | ||||||
 |
| × | 1 | |||
 |
| × | 1 | |||
 |
| × | 1 | |||
 |
| × | 1 | |||
 |
| × | 1 | |||
 |
| × | 1 | |||
Software apps and online services | ||||||
| ||||||
| ||||||
Let Raspberry Pico's PIO module control stepper motors. Each PIO can control 4 motors. The only thing the Pico has to do, is to send number of steps, and direction. Anything else is managed by the PIO.
4 motors can be controlled per PIO
- can be used with any stepper motor driver that supports STEP and DIR operation. Examples wit Texas Instrument DRV8711 and Allegro A4988
- can handle as many commands as a PIO state machine FIFO accepts without waiting (default 8).
- each command can autonomously handle 2147483647 steps, and the spin direction
- can notify the calling program when a command has finished
- can report how many commands it processed
Next to the PIO code, this project also has C++ classes to manage motor control and interrupt handling.
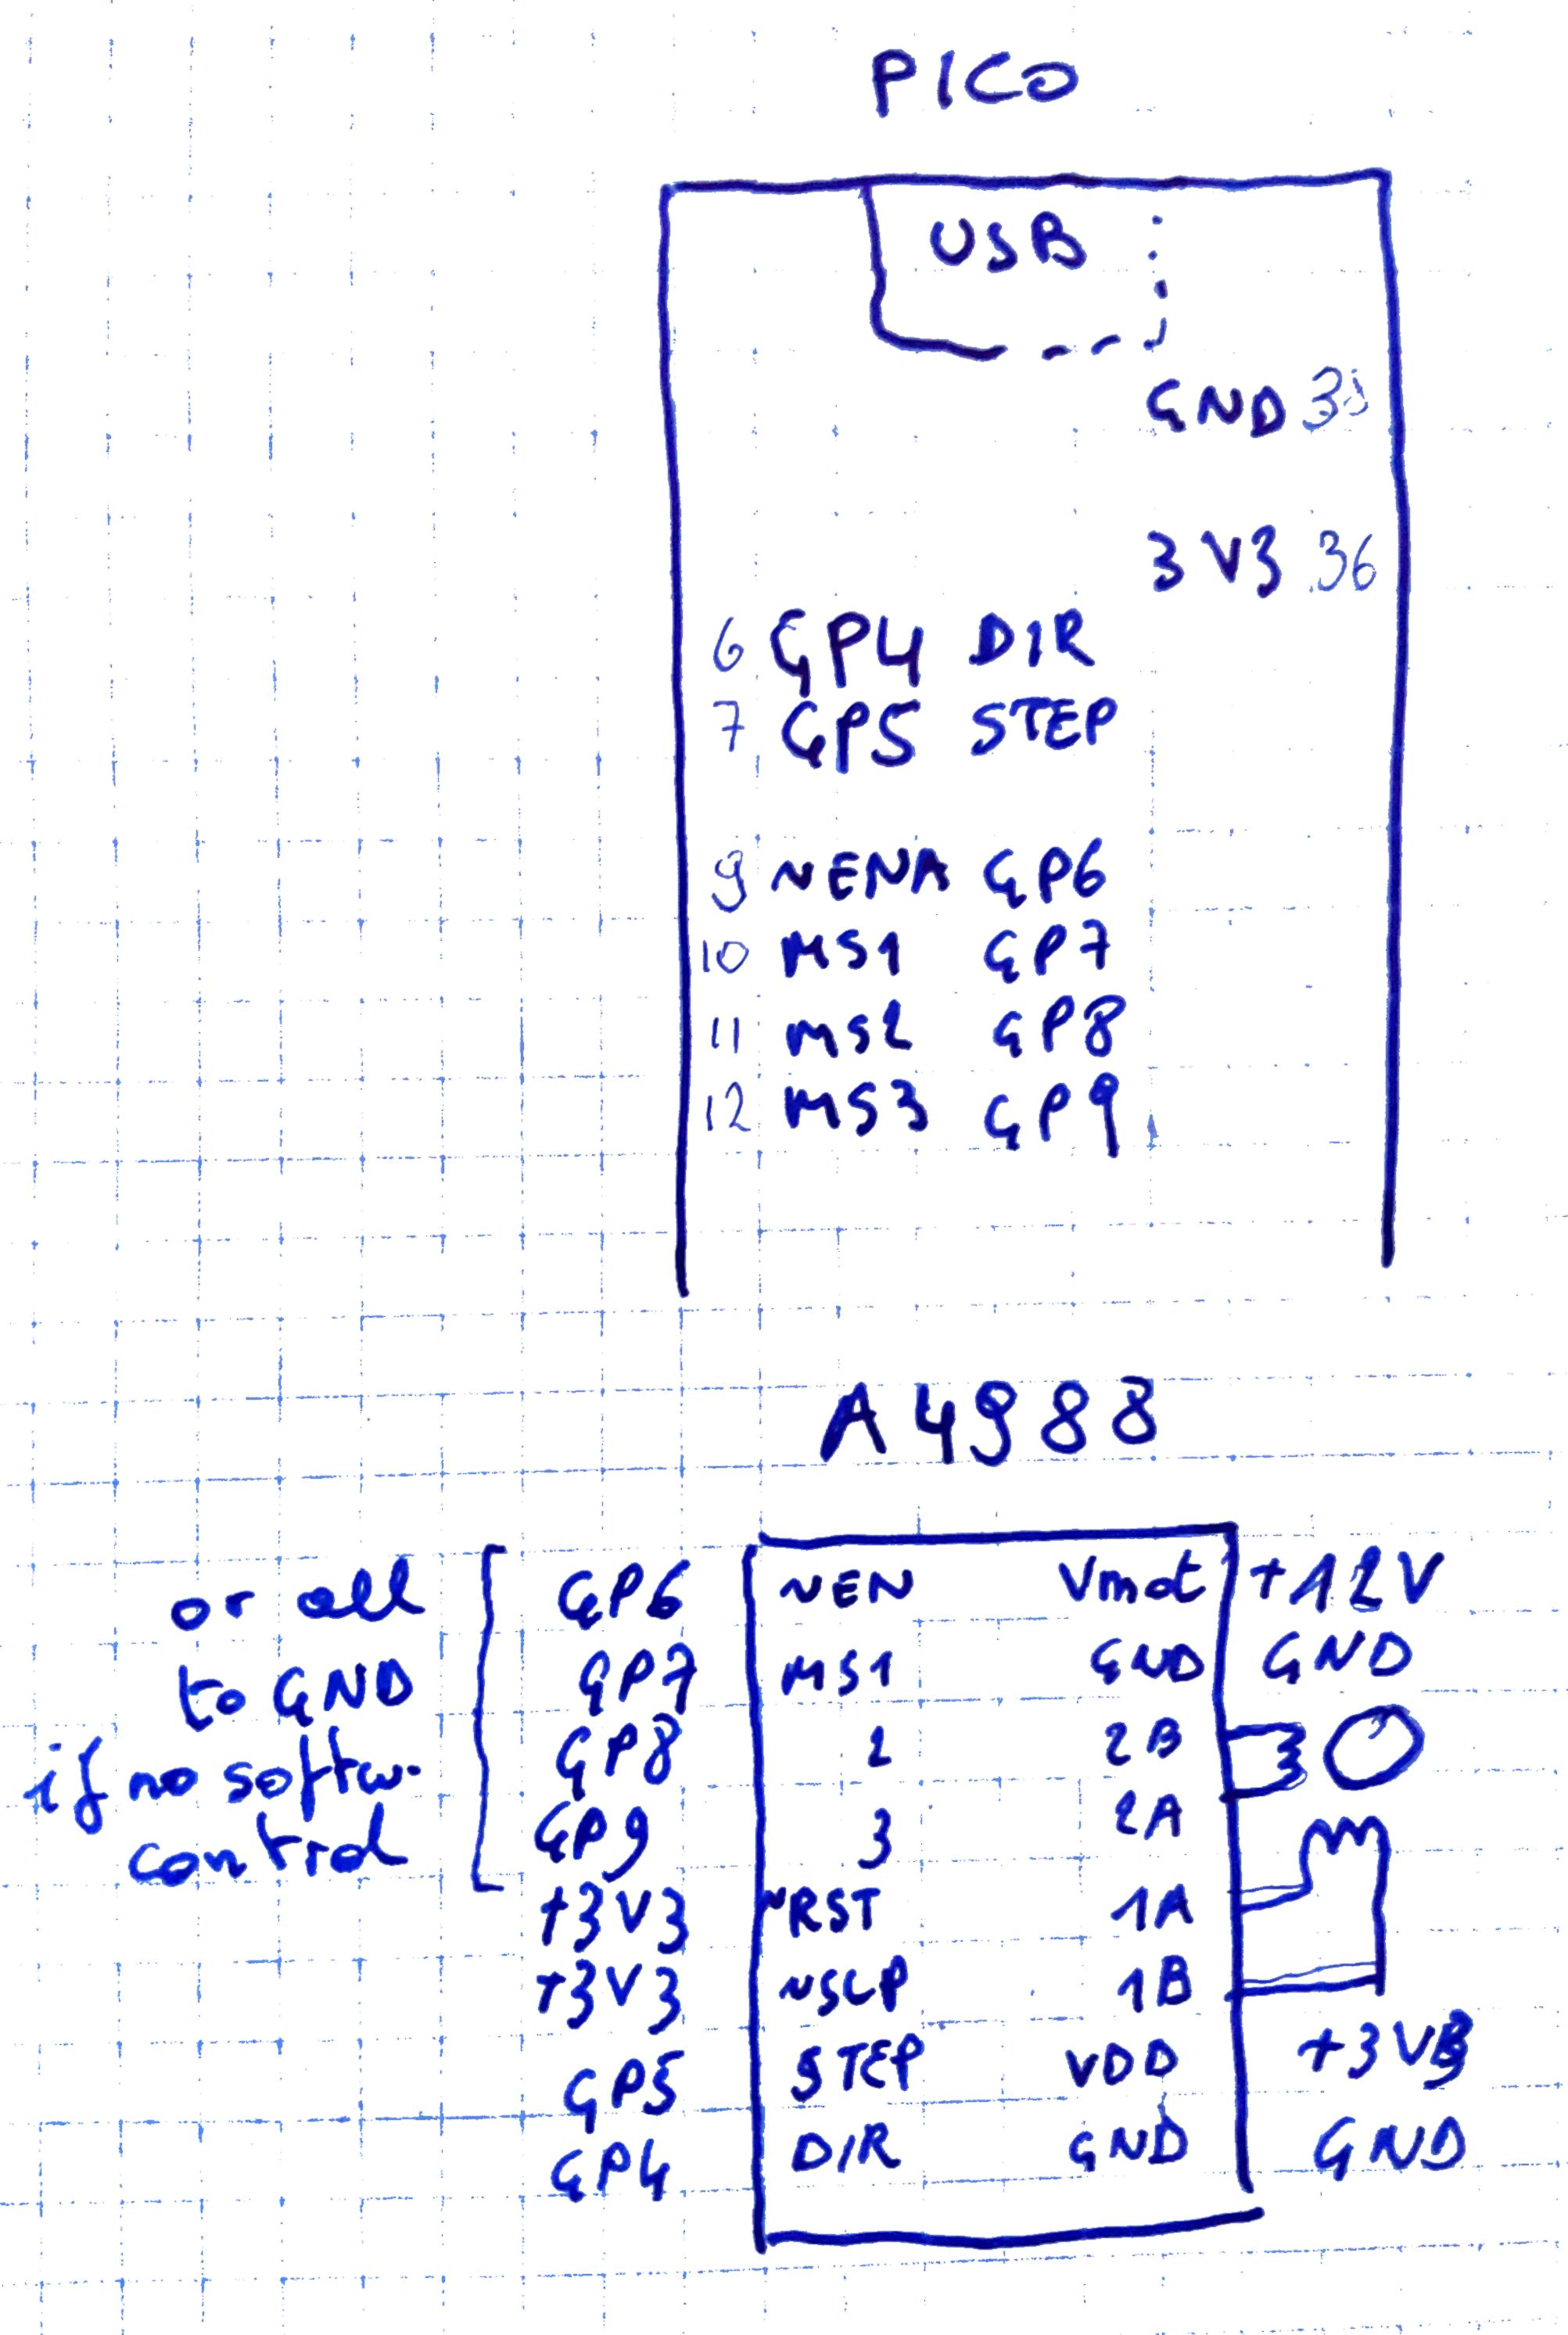
HardwareYou will need a Pico, a stepper motor and a stepper motor driver IC.
At least two signals from Pico to the driver IC are needed for each stepper motor:
- DIR: turn clockwise or counter-clockwise
- STEP: pulse train that makes the motor do its steps
These 2 signals are generated by the PIO state machine, and their pins have to be next to each other. In this example, I use GPIO 4 for DIR. And that means that STEP has to be GPIO5.
Your driver IC will have other pins, that you can either control via software, or hard-wire on the PCB (or on your breadboard):
- enable, sleep, reset
- micro-step configuration
I've tested the library with 2 different driver ICs. TI's DRV8711 has pins for enable, sleep and reset. Micro-steps (and a lot of other settings) are configured over SPI. The Allegro A4988 has all functions as simple input pins.
For this example, let's assume an A4988. Our software will only control the DIR and STEP. Sleep and reset are tied to VCC (disabled). Enable, and the MS1..3 to ground (motor enabled, take full steps).
SoftwareI've written C++ classes to manage the PIO, and to take away the complexity of its interrupt mechanism.
Here is how to instantiate a motor object:
// config what PIO and IRQ channel to use
const auto piostep = pio1;
// use pio irq channel 0. Can be 0 or 1
const uint pio_irq = 0;
// state machine
const uint sm = 2U;
const float clock_divider = 24; // works well for no microsteps

using motor_t = stepper::stepper_callback_controller;
motor_t motor1(piostep, sm);Then configure. This will program the PIO, and prime the DIR and STEP pins.
void init_pio() {
  // program the pio used for the motors
  // do this only once per used pio
  motor_t::pio_program(piostep);
  // initialise and enable the motor state machine
  motor1.register_pio_interrupt(pio_irq, true);
  motor1.pio_init(dir, clock_divider);
  motor1.enable(true);
}
I created a function to put the library to the test. It takes a number of commands and feeds them to the state machine. stepper::command is a lightweight class that just holds direction and steps.
// stepper demo: execute a series of commands ================================
using commands_t = std::span<stepper::command>;
volatile int steps_countdown = 0U;

void on_complete(const motor_t &stepper) {
  if (&motor1 == &stepper) {
    steps_countdown =  steps_countdown - 1;
    printf("motor1 executed command %d\n", motor1.commands());
  }
}

void run_with_delay(const commands_t & cmd, uint32_t delay) {
  printf("delay: %d\n", delay);
  motor1.set_delay(delay);
  steps_countdown = cmd.size();
  for(auto c : cmd) {
    motor1.take_steps(c);
  }
  while(steps_countdown) {}
  printf("interrupts expected: %d, received %d\n", cmd.size(), motor1.commands());
  motor1.reset_commands();
  sleep_ms(500); // pause for demo purpose
}
Here is a snippet of code that lets the stepper do a series of commands:
int main() {
  std::array<stepper::command, 4> cmd{{
    {60 * microstep_x, false},
    {120 * microstep_x, true},
    {120 * microstep_x, false},
    {60 * microstep_x, true}}};

  motor1.on_complete_callback(on_complete);
  while (true) {
    run_with_delay(cmd, 4300);
    sleep_ms(500); // cool off
  }
  return 0;
}
The motor will take these steps, without needing core processor time.
This is the PIO code. The C++ library will take care that it gets loaded for each PIO.
; Side-set pin 0 is used for stepper output (this is pin+1)
; pin is used for dir output
.pio_version 0 // only requires PIO version 0
.program stepper
.side_set 1
.define public DELAY 0
.define public DIR_DELAY 4
.define public PIO_IRQ_DONE 0
.wrap_target
start:
pull block                  side 0 ; Pull from FIFO to OSR
out pins, 1                 side 0 [DIR_DELAY] ; shift direction out of OSR and output to dir. 200 ns before next step
mov x, osr                  side 0 ; Copy rest of OSR to scratch X
jmp !x start                side 0
jmp x-- tocks_h             side 0
tocks_h:
mov y, isr                  side 1 ; ISR contains number of tocks to hold level
count_high:
jmp y-- count_high          side 1 [DELAY] ; keep high for tocks
tocks_l:
mov y, isr                  side 0 ; ISR contains number of tocks to hold level // TODO Note: not needed for both edges ...
count_low:
jmp y-- count_low           side 0 [DELAY] ; keep high for tocks
jmp x-- tocks_h             side 0 ; not done, keep loopins
irq PIO_IRQ_DONE rel        side 0 ; flag that the job's done
.wrap
% c-sdk {
#include "hardware/clocks.h"
const uint clock_factor = 6U;
static inline void stepper_program_init(PIO pio, uint sm, uint offset, uint pin, float clock_divider) {
pio_gpio_init(pio, pin);
pio_gpio_init(pio, pin+1);
pio_sm_config c = stepper_program_get_default_config(offset);
sm_config_set_out_pins(&c, pin, 2);
pio_sm_set_consecutive_pindirs(pio, sm, pin, 2, true);
sm_config_set_sideset_pins(&c, pin+1);
//   float div = clock_get_hz(clk_sys) / (clock_factor * freq);
float div = clock_divider;
sm_config_set_clkdiv(&c, div);
pio_sm_init(pio, sm, offset, &c);
}
%}
Analysis with Jürgen Reuter's PIO emulator:
To use the library in your code, you can use CMake's FetchContent:
include(FetchContent)
FetchContent_Declare(stepper
  GIT_REPOSITORY "https://github.com/jancumps/pio_stepper_lib.git"
  GIT_TAG "origin/main"
)
FetchContent_MakeAvailable(stepper)
CMake will automatically fetch the sources and build the stepper lib. You can link this with your application:
target_link_libraries( ${CMAKE_PROJECT_NAME}
  pico_stdlib
  hardware_gpio
  stepper
)
Tool Chain requirement:
- CMake 3.28 or higher
- GCC 14.2.1 or higher
- Pico C SDK 2.1.1
- tested with Pico 1 and Pico-W
The documentation and tutorials show some advanced examples: 4 motors in parallel, fast linear stepper movement with ramp-up and -down, ...
Happy stepping.


_3u05Tpwasz.png?auto=compress%2Cformat&w=40&h=40&fit=fillmax&bg=fff&dpr=2)

Comments