


Hardware components | ||||||
| × | 1 | ||||
 |
| × | 1 | |||
 |
| × | 1 | |||
 |
| × | 1 | |||
| × | 1 | ||||
Software apps and online services | ||||||
 |
| |||||
Hand tools and fabrication machines | ||||||
 |
| |||||
 |
| |||||
 |
| |||||
Hi there!
My name is Jack Daly and I'm a 17-year-old Maker, Student and founder of 8BitCADE! If you love what you see here and want to grab a kit, check out the 8Bitcade.com website and you'll find out how you can make your very own coonsole! As always, if you have any questions, please don't hesitate to get in contact - I'm here to help!
Best regards,
Jack!
The Current Problem:Remove the hassle and complications of learning through books with the 8bitCADE XL
The world of electronics is fun, exciting and rewarding. Not to mention the growing importance of it within our society. But getting into it can be tough, frustrating and often boring. You could spend a lifetime on books and courses and not feel fulfilled.
You could buy a DIY kit, but how much does that really teach you. Many kits on the market, focus on the kit itself. The specs, screen size and what games it plays.
However, I wanted to shift the focus from the destination to the journey.The 8BitCADE XL is a structured journey that is focused on learning core STEAM skills - what the industry is missing. With 8BitCADE, you are investing in yourself, and to reward yourself, you get a kickass gaming console!
It's an education, a fun one too! That's the difference. That's the key to fixing the major problem of a world shortage of coders, makers, engineers, inventors and designers. Make teaching the core STEM skills fun and exciting in an all in compassing DIY kit.
Introducing the 8bitCADE XLA fun DIY kit that educates anyone about electronics, programming and gaming! The 8BitCADE XL can be used in different ways:
- For makers who love building and want to assemble the 8BitCADE XL.
- For gamers who want to hold a relic of our past and play over +200 retro games, experiencing them on the large 2.42 inch OLED screen with fast access via a memory chip with a customisable menu system.
- For programmers who want to utilize the 8BitCADE XL's features to create fun and interesting programs & games - utilizing the 6 buttons, memory chip, RGB LED and so much more.
- For designers who want to customise the casing, adding their own personal design.
- For artists who want to express their inner creativity through the design of characters, splash screens, animations and more.
- For hackers who want to modify the open-source design, building on the product's capabilities, adding their own personality and innovating their ideas.
We made the 8BitCADE opensource so you can rip it apart to see how it works and develop your own adjustments! The 8BitCADE XL is a learning, making and gaming platform, designed to turn consumers into makers!
The 8BitCADE XL is for everyone, of any ability. We made it open source to give back to the community!This provides a fun educational platform that you can utilise to create a solid foundation and skill set to help get you started in the world of design and electronics.
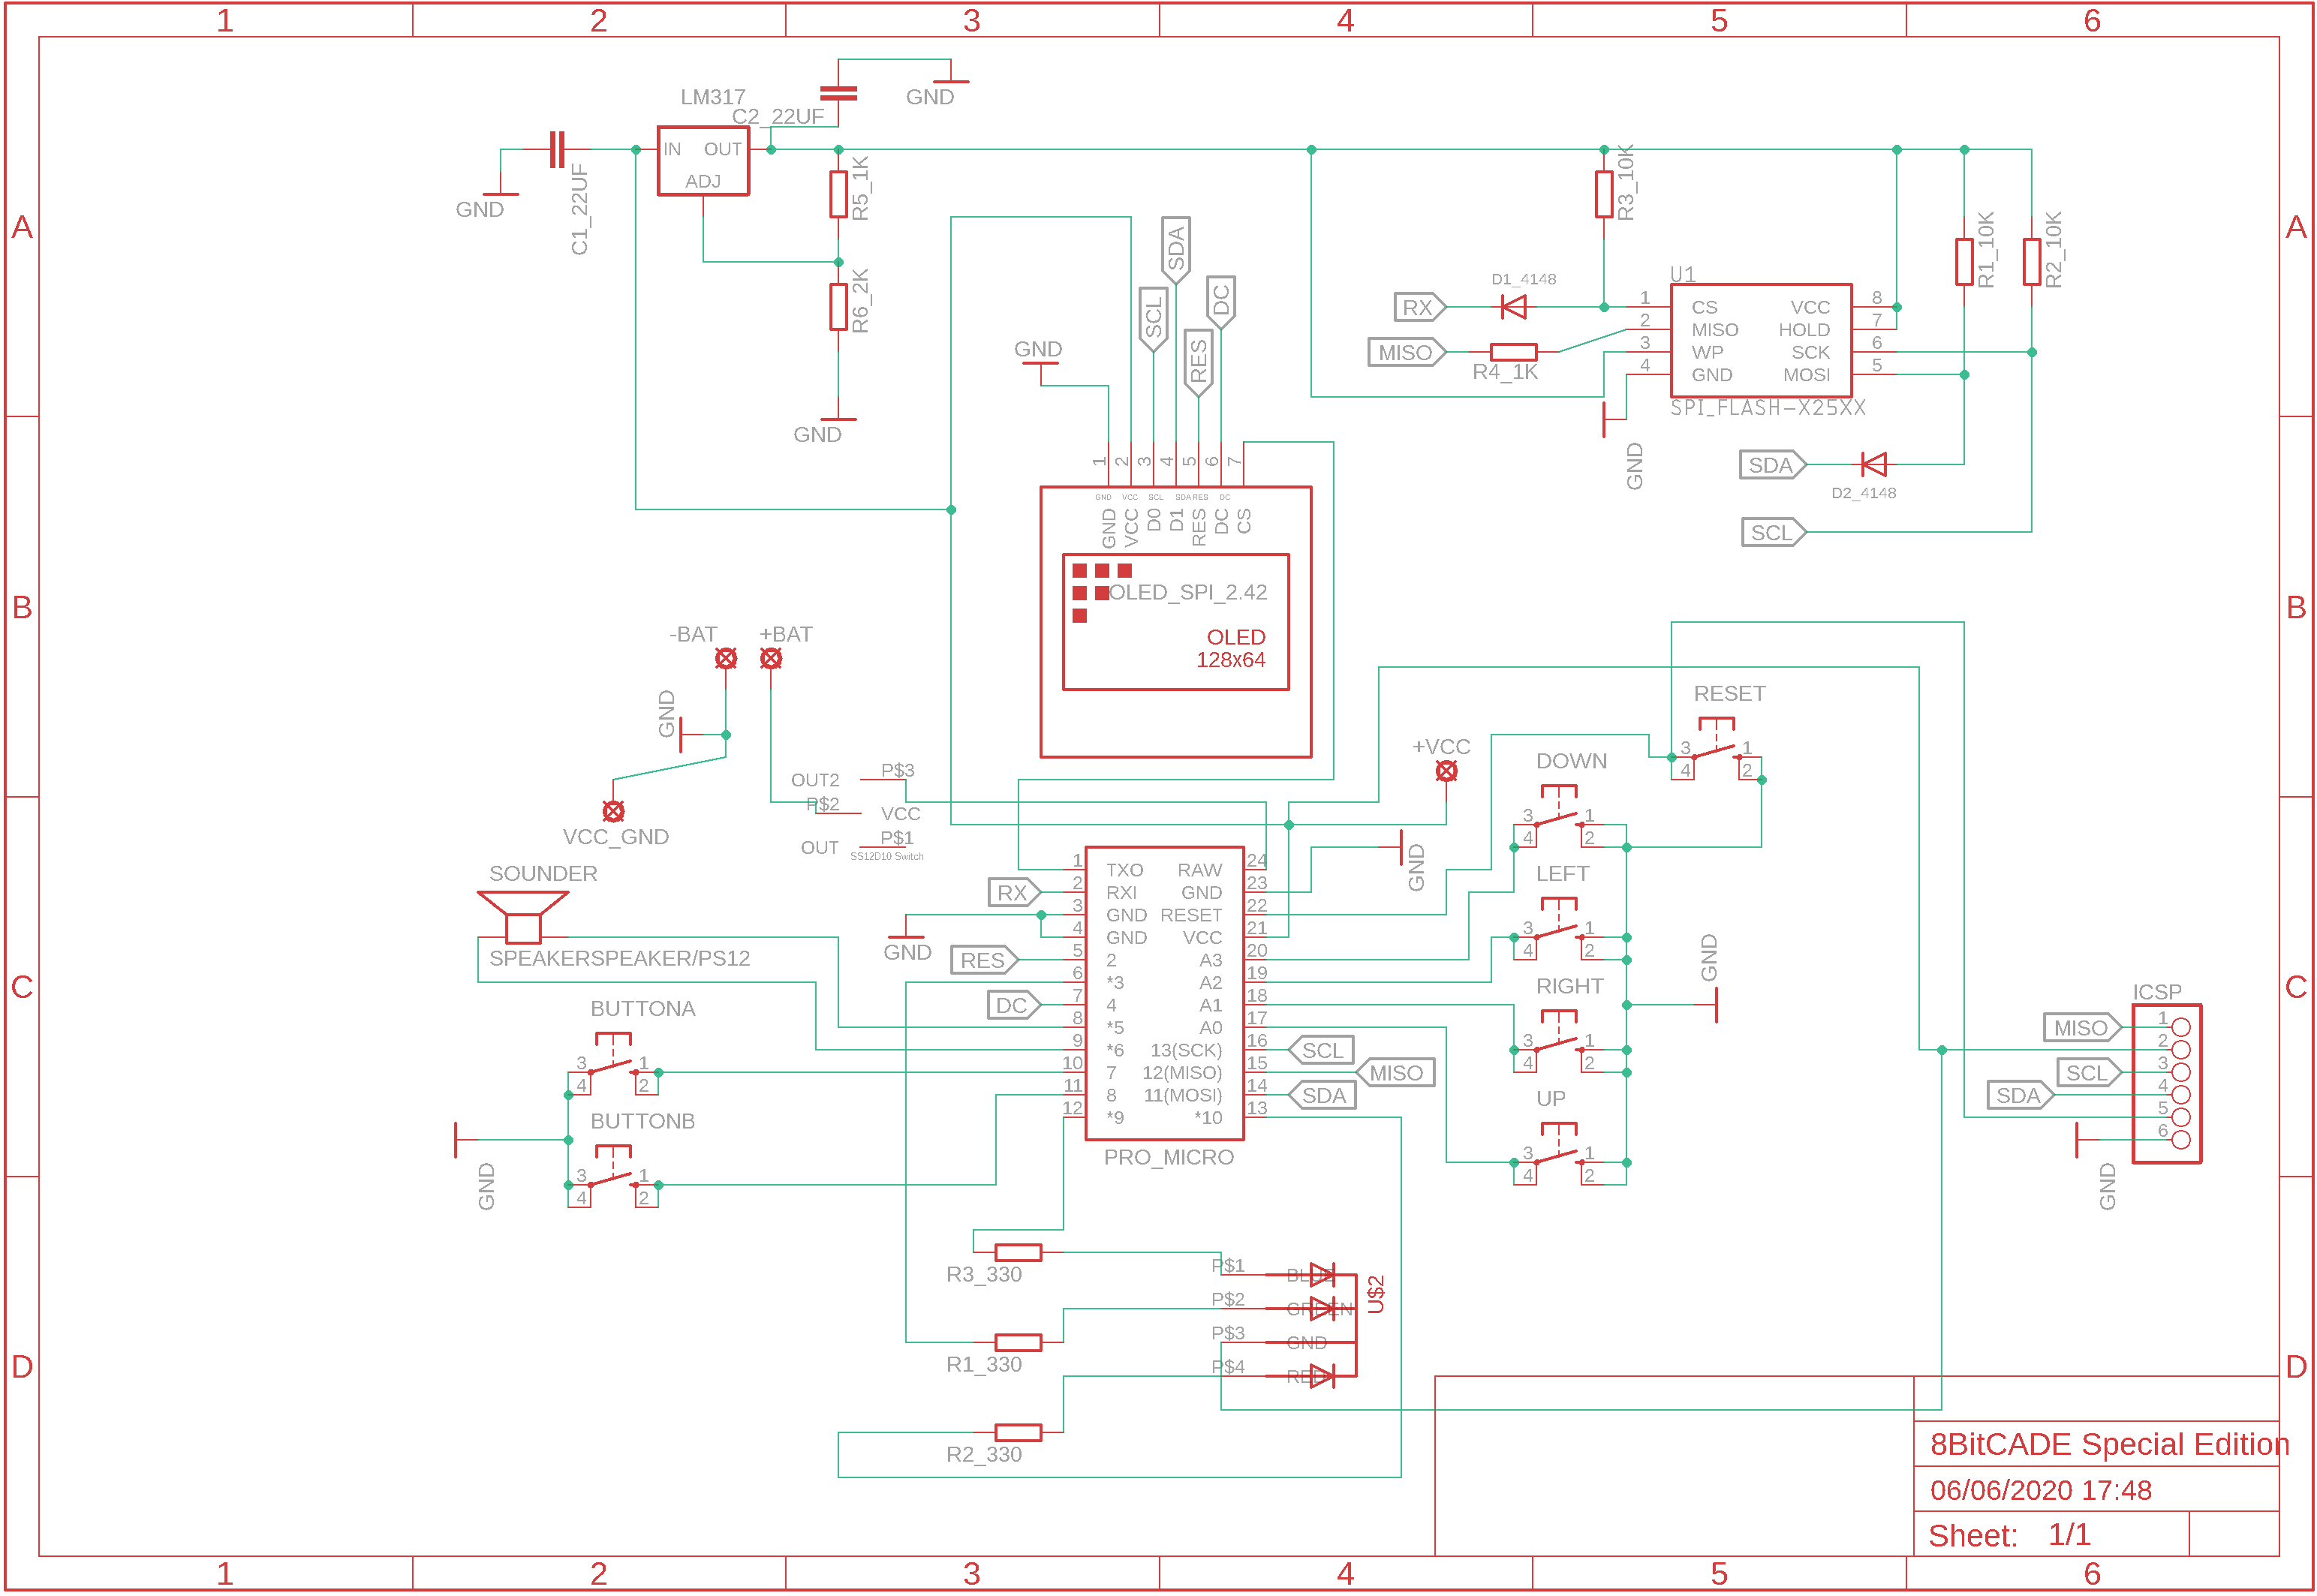
Its time to get down to earth and reveal what powers this beasty console. The 8BitCADE XL packs a range of electronics, from a programmable RGB LED to a 16MB memory chip. Each feature enhances one of the 3 key aspects: learning, making or gaming. The RGB LED helps beginners learn some of the fundamentals of programming while the memory chip can be taken advantage of, allowing programmers to create their own menu system with customised categories, adding and removing games, sketches, animations and much more.
A 16MB onboard memory chip allows for the 8BitCADE XL to store a wide variety of programs. This allows you to have multiple games loaded at once, meaning you can upload, select and play hundreds of games (compatible with Arduboy developed games) which you can play whenever you want! You can also develop your own games using Arduino IDE (a free programming software), upload them to the chip and show your friends what you can do!
Retro AestheticTaking it back to the PSP days, the 8bitcade XL is a retro-styled games console. Show off the retro style as you play classic games such as Pac-man and galaxian.
The 8BitCADE XL packs the largest screen of all the 8BitCADE consoles, sized at 2.42 inches. If you are looking to game on a large screen, this is the console for you.
Arduino Pro MicroPacked with an ATmega32U4, this little board runs at 16MHz and packs 2.5Kb of ram. Being an Arduino based board it’s easy to add your own programmes (called sketches) and upload existing ones. Learn with us or use the wealth of information available on the web!
Pocket-SizedIts slim and thin design allows it to slip into your pocket – enabling you to program and play on the go! Combine this with the 8BitCADE Loader and you'll never be bored! Waiting for a bus? Whip out the 8BitCADE XL and discover a new game!
8BitCADE XL after being soldered up and made!
Charging and Battery Protection BoardPut your mind at ease and leave your 8BitCADE to charge with the Tp4056 lipo charging and protection board. The next generation of 8BitCADE XL's will be fitted with this new protection to ensure you are fully protected and safe while charging. We are working effortlessly to get this integrated for the November delivery.
Making memories!This is not just a compact, stylish 8-bit console, with an extra-large screen and onboard memory. It's a product that brings the past and present together, in one portable but powerful package. The 8BitCADE XL celebrates hundreds of games created by the community, all over the world, while saving enough onboard memory space, for you to create your own special memories. Whether it’s moving a dot around a screen or making your first adventure game, the 8BitCADE XL will be something you can feel proud of Making, Learning & Gaming.
When designing the 8BitCADE XL we knew it had to be a DIY kit, with this in mind, we altered the design accordingly. For example, the transparent case shows off the electronics and gives a 'maker feel'. However, it can also be unscrewed and changed for a different coloured/designed faceplate - allowing for endless customizable opportunities!
An easy to follow Build GuideBefore we get playing we need to get making. In order to make your console, you’re going to need parts. The 8bitcade XL kit comes with all of the parts you’re going to need, from the brains of your console (the pro micro) to the simplest RGB LED.This might be overwhelming, however, we designed the 8bitcade maker guide to ensure your building experience is as fluid as possible. You’ll have step by step instructions on how to assemble your very own 8BitCadeXL.
That's the beauty of making your own game console, you'll learn a new core electronic skill - soldering. The make guide has a full section on the basics of soldering. We go into detail about the common issues you might face when soldering, types of bad solder joints, what they look like and how to identify and fix them.This can be accessed today by heading over to the 8bitcade.com/make section - get ahead of the game by downloading the "soldering guide" now! Note that this is subject to change in the future! As we are constantly updating and improving our tutorials. If you do check it out, we would love to hear your feedback so we can make 8BitCADE better and build it around the community - with you.
At the end of the Make Guide, there is a part dictionary. This covers all of your components in great detail - explaining everything from how a simple LED works to how the brains of your console operates!This section is optional but highly recommended as it will definitely help you learn and understand the hardware involved in your console and some of the basics of electronics!
Of course, the main portion of the build guide is how to build your 8BitCADE XL. We will show you small tricks that can speed up the build process and tips that we, and beta testers, have learned along the way. Overall it should take you 1 hour to build!
The 8BitCADE is a fun project to do at home and uses minimal tools. We designed the 8BitCADE XL to be able to be built independently by 11-year-olds and up. For the young ones, we advise that parents oversee and join in with the build and learning process! Building the 8BitCADE XL can be a great way for parents to work with their children and support them! A learning AND bonding experience!
All of the parts for the 8BitCADE XL casing laid out!
Tools Required- Soldering iron - The main tool in your arsenal that you will be needing.
- Solder Sucker - To remove, fix or clean up any solder joints.
- Wire Cutters - Once your parts are soldered to your PCB, you need to trim them! Wire cutters will come in handy for this.
- Screw Driver - To assemble your 8BitCADE case!
- 8BitCADE XL Kit - The rest is in the kit!
What’s that? You don’t have a soldering iron? Well, 8BitCADE has you covered, with the 8BitCADE tool kit, you'll have all of the tools you need to start your 8BitCade XL project - or any electronic project for that matter.Simply choose the reward tier that has the 8BitCADE Tool Kit and you're covered! Be quick, theseare on limited offer!
The 8BitCADE XL Kit laid out - this is used in the Make Guide to tell you what parts are which!
With our visual parts list (below), you'll be able to check every part in your kit against a picture to make sure you've got the right part - this will also come in handy with learning the component names. This can also be used in combination with the part dictionary to find, identify and understand the parts in your kit, take a look below:
A PDF version of this can be found on the 8BitCADE website
The 8bitcade XL comes preloaded with what we like to call, the 8BitCADE Loader. The 8BitCADE Loader is a menu system that consists of 13 categories, ranging from action to sports, that gives you access to 200 plus games - we lost count at 200.
All 200 games are divided into the above categories Conventional consoles have small screens and few games, limiting your game time to about 30 minutes at most. We wanted to change that. With the 8BitCADE XL’s 16MB memory chip, you’ll be able to store up to 500 games and experience them on its 2.42-inch screen. Its pocket-sized form factor grants easy portability and will survive up to 12+ hours of continuous gaming.
Playing Space Invaders - one of the +200 preinstalled games on the 8BitCADE XL
Arduboy CompatibilityThe 8BitCADE XL is inspired by the brilliant people over at the Arduboy Community. Many of the games on the 8BitCADE XL were created by the community - such as your favourite retro game titles like Virus, Circuit Dude and Donkey Kong.
The Arduboy has a large community of makers, programmers and 8-bit game enthusiasts, created by the great Kevin Bates. It’s the perfect community to help new programmers prosper and I’m excited to introduce 8BitMakers to the expertise of the Arduboy Community, allowing them to learn, grow and program within an established community.
The 8BitCADE Loader is based on the work of the talented Mr Blinky. Because of his hard work, the 8BitCADE XL can also be integrated easily with any Arduboy game using the helpful HomeMade Arduboy Package.
All game code can be accessed on our game page - you can download both the.hex files (for easy upload) or download the.ino files to check out the source code behind every game.
Being compatible with Arduboy also allows you to use the "projectABE" emulator to code and simulate your games before you even upload them to your 8BitCADE XL. ProjectABE is an IDE, or programming environment, that allows you to code, run and compile games virtually - perfect for testing and development. This means you can code your 8BitCADE online - requiring no library or program installations (if you don't fancy downloading the Arduino IDE). We are currently working on implementing project ABE into the 8BitCADE website.
On top of electronics, the 8BitCADE serves as a useful tool to help you learn the basics of coding. You’ll be learning Arduino, a popular programming platform used by thousands across the globe, which is also based off of C/C++ – two widely used languages in the robotics and electronic industry.
Using the Arduino IDE to program the 8BitCADE XL
What You'll LearnWe’ve broken up our learning curriculum into different levels, to keep it bite-sized and easy to digest. The Foundation Tutorials introduce you to programming with Arduino and the project-based case studies dip your toes into game development and more advanced coding theories. Let's dive deeper into what these cover:
Creating a Calculator for the 8BitCADE XL
Basics of ProgrammingThe 8BitCADE Foundation Tutorials act as a platform for you to get to grips with the basics of Arduino (which you can check out at 8bitcade.com/learn/Foundation). These concepts can easily be transferred to other languages. This is your gateway into programming.
The Foundation Tutorials focuses on core programming principles. Tutorials range from how to blink an LED using basic commands, to using more advanced programming techniques such as using classes to create drawing programmes! If you are a programmer, not only will this be a great refresher, but also a place to learn new techniques and skills!
Once you are familiar with the Arduino platform, our curriculum consists of project-based tutorials that will help you dive into programming and game design.
There are some awesome projects, from creating a cool calculator to coding your very first game - and if you're feeling confident you could learn to code the famous “space invaders game” or even Tetris with our tutorials.
Here at 8BitCADE, we are all about learning by doing. We took this principle to heart while writing the tutorials for the 8BitCADE XL and get you coding as soon as you jump in! We use both tasks and example programs to get you familiar with reading and writing code. For project-based tutorials, tasks are set frequently to get you thinking, typing and problem-solving. All the core programming tools required to code the task are taught beforehand allowing you to get creative and think about how you are going to approach a task with the tools at hand.
I believe that learning design and electronics shouldn’t be a boring and systematic process – learning should be an adventurous and rewarding journey. 8BitCADE is set out to:
- Educate the next generation of makers - children and adults alike.
- Make learning electronics enjoyable, intuitive and fun.
- Turn consumers into creators.
- Supply an innovative learning package.
- Produce a quality, hackable, product that can be innovated further.
- Create the ultimate 8bit gaming console.
- Design a customisable product that can be enjoyed time after time.
The 8BitCADE effect - making learning fun again, through integrating education into gaming consoles!
Assembling the case of the 8BitCADE XL
Get Creative with 8BitCADEYou cant call it the "perfect tool to learn STEAM with" if you don't do anything creative or artistic! Using 8Bit tech means artists have to take an entirely different approach when it comes to creating game art and splash screens.
We worked with a school to implement the 8BitCADE Pixel Art Competition in the school to inspire many of the students to create custom pixel characters, scenes, game covers, even custom 8BitCADE Loader screens.
It started with teachers teaching the students how to use https://www.pixilart.com/ to create fun and artistic pixel designs like the one I did below!
Say hi to pixel Jack (Me!)
The 8BitCADE XL can be customizedWant different coloured button caps? Or maybe you want to add your name to the casing? With the 8BitCADE XL's modular case design, you can interchange your own button caps, change the faceplate or even design your own casing! Here are a couple of examples!
The 8BitCADE XL is customisable!
The main drive behind this was due to both the DIY aesthetic of the acrylic panels and also to promote the Maker to go out and create there very own DIY case. We actually have a community member called Levi who has created his very own 3D printed case! Pretty cool right! Well that started a snowball of inspiration as we have another 8BitCADER who is interested in creating a custom wooden case! You can find out more about this here:
https://8bitcade.discourse.group/
We created a Kickstarter for this project!To help bring this project to life, I created a Kickstarter! You can check out the original post below:
https://www.kickstarter.com/projects/jackdaly/8bitcade-xl-a-diy-educational-gaming-kit
Showcasing the Maker tee!
The man behind the Mission - Who am I?Hi! I’m Jack Daly and I am a student & founder of 8BitCADE. Ever since I was young I’ve had a keen interest in anything electronic. I have a passion for design, programming, electronics - but also for retro games and consoles.
The 8BitCADE is my retro passion packaged in a compact, fun and exciting console - providing endless hours of entertainment. I love that I can play games from all over the world, and learn from one of the greatest gaming communities - Arduboy!
Previously, my love for retro consoles took me to something with a larger form factor! I designed an arcade machine with a twist. The casing was made of recycled coffee grounds as I partnered with an international coffee brand.
A customer playing on the CoffeeCADE
During my early stages of learning Arduino, I tinkered with a range of mini-projects. From a machine that gave gifts to young children if they solved math problems, to a smart fish tank system that maintained your tank and fed your fish!
I've also dabbled in educational courses. I've helped deliver robotics and electronics courses using Arduino, a build your own Arcade Machine course (in which the arcade machine was designed by myself and a colleague beforehand) and published my own Udemy course online about the basics of Adobe Illustrator - in which I have taught over 10, 000 students! Check it out, it's free!
My latest project is 8BitCADE.I've been developing 8BitCADE XL for 6 months now and am now ready to take it to the next level with the help of you! I am exceptionally pleased to be able to present my contribution to the world of makers, learners and gamers as I feel the 8BitCADE is a product of a great deal of community work.
I started 8BitCADE when I was only 16 with the 8BitCADE Original. The Original was a small handheld gaming console that was used to run a short after school activity at my school - driven by myself and a colleague. It was used to educate students about electronics, programming and PCB design. I started testing it in my school and noticed that many others loved the idea of building their own game console.
8BitCADE - the first 8BitCADE to be created. The start of my journey.
After gaining student feedback and using my own experience, I realized a couple of core things needed to be updated. The screen size needed to be enlarged, the casing made more comfortable and the addition of a memory chip to store more than one game. I wanted to focus on improving the gaming side of the console by adding these core aspects.
8BitCADE to the 8BitCADE XL
Thus the 8BitCADE XL was born - the ultimate 8Bit gaming device. More Screen, updated board, comfortable case - a retro gamer's dream. The 8BitCADE XL had many prototypes, however, a lot of knowledge was carried forward from the creation of the 8BitCADE. The development of the 8BitCADE helped shape the console you see today - the 8BitCADE XL.
As I had experience creating a curriculum around a gaming console the 8BitCADE predecessor - I decided to enhance the learning potential of the 8BitCADE XL and created the website 8bitcade.com. I designed the platform in an intuitive manner to allow students to access the learning resources on their own accord. As popularity grew, I knew I had to take the 8BitCADE XL to the next level.
This brings me to today, a student working on growing 8BitCADE into an online educational platform that Makers, Gamers and Coders can all come together to share programs, games and information!
The console created for makers, by makers8BitCADE XL
Thank you!Without you, the 8BitCADE XL wouldn't be possible - thank you! I've worked so hard to bring 8BitCADE this far, however, the journey is only just beginning. Let's create a community and begin this journey together!
Keep up to date with how things are going on our social media's below:


_3u05Tpwasz.png?auto=compress%2Cformat&w=40&h=40&fit=fillmax&bg=fff&dpr=2)
Comments