
Hardware components | ||||||
 |
| × | 1 | |||
 |
| × | 1 | |||
| × | 1 | ||||
Software apps and online services | ||||||
 |
| |||||
 |
| |||||
| ||||||
| ||||||
Hand tools and fabrication machines | ||||||
| ||||||
Instructables Wireless Contest 2017 First Prize Winner!!! :D
It's comforting to have a fragrant spring floral house, as if you were in the middle of a lavender garden instead of the concrete jungle where you probably live in. For this, many of the different companies have created air lovers with a multitude of aromas.
There are lot of Air Fresheners in the market: from the old manual sprays, to timer triggered ones. The later ones, although automatic, are quite dumb: they will keep spraying even if you're not even close to feel the smell, wasting those not so inexpensive fragrance refills!
Wouldn't it be nice if your air freshener was capable of communicating with other gadgets and trigger only when you really needed it?
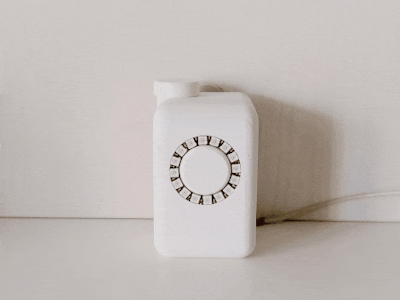
In this project I designed an IoT Air Freshener, using some 3D printing, a NodeMCU, IFTTT and Adafruit.IO. You can use this tutorial to practice several skills: 3d printing skills, soldering, electronics, coding, etc. It might not be very usefull, but it will be fun!
You can find full instructions at: https://www.instructables.com/id/IoT-Air-Freshner-with-NodeMCU-Arduino-IFTTT-and-Ad/
There I show you how I 3D printed it, wired the circuits, and made the code.
Some of the knowledges used here were based on Becky Stern awesome Internet of Things Class. I highly recommended that!
Always have in mind that this is an experimental prototype, and might be used with caution!
Step 1: Tools and MaterialsThe following tools and materials were used in this project:
- 3D printer. In my case I used a Voolt3D, a Grabber i3 based 3D printer;
- 1.75mm PLA of your favorite color;
- Solder wire. You'll need to solder some wires;
- Screwdriver. You'll need it for mounting your case;
- M2x6mm bolts (x11);
- NodeMCU LoLin (link / link) - The NodeMCU LoLin version has a UV pin, which is connected to USB 5V terminal. This way, it's possible to use the 5V from a USB charger, passing through the NodeMCU board, to power the servomotor. Other versions of the NodeMCU doesn't have this UV pin (they have a reserved pin instead). This way, you won't be able to power your servomotor directly if you use one of those other versions;
- 12x12x12 mm push button (link);
- MiniUSB cable, for the connection between NodeMCU and computer (for uploading the code);
- 5V, 2A USB charger (phone charger, for instance) for powering the circuit;
- 5 female-female jumper wires;
- 3 male-female jumper wires;
- Air freshener refill.
The links above are only a suggestion of where you can find the items used in this tutorial (and maybe support my future tutorials). Feel free to search for them elsewhere and buy at your favorite local or online store.
Did you know you can buy a ANET A8 for only $165.99?
Get yours at Gearbest: http://bit.ly/2kqVOdO
Step 2: 3D PrintingThe 3d model was designed using Fusion 360.
The model is composed of five different parts:
- Front case: main body of the gadget. This is where some of the electronics (LED ring and push button), and the servomotor will be attached;
- Back case: using for closing the case body. This is where the NodeMCU and the freshener refill will be installed;
- Button: this part is connected to the pushbutton;
- Cap: this part is threaded to the case back part, and allows replacing the refill
- Holder: this part is used for locking the LED ring and the button in its position.
You can download all the stl files on the following websites:
https://www.thingiverse.com/thing:2613327
https://cults3d.com/en/3d-model/gadget/iot-air-freshner-igorf2
This project is competing in Cults 'The bathroom of tomorrow' contest! Please give us a 'like':
https://cults3d.com/en/3d-model/gadget/iot-air-freshner-igorf2
This is a experimental prototype. Notice that it was designed for a given model of air freshener refill (a Glade one, whose dimensions in milimiters you can find on the pictures). If you want to use a different model, please send a comment and I can see if it's possible to change model dimensions to fit your needs.
If you don't have a 3D printer, here are some things you can do:
- Ask a friend to print it for you;
- Find a hacker/maker space nearby. The parts used in this model can be printed quickly (around 9 hours). Some hacker/maker spaces will only charge your for the materials used;
- Buy your own 3D printer. You can find an Anet A8 for only $165.99 at Gearbest: http://bit.ly/2kqVOdO
- Improvise! You can try to assemble a structure without 3D printed parts;
- Interested in purchasing a DIY Kit? If enough people are interested, I might be offering a DIY kits on Tindie.com. If you would like one, send me a message.
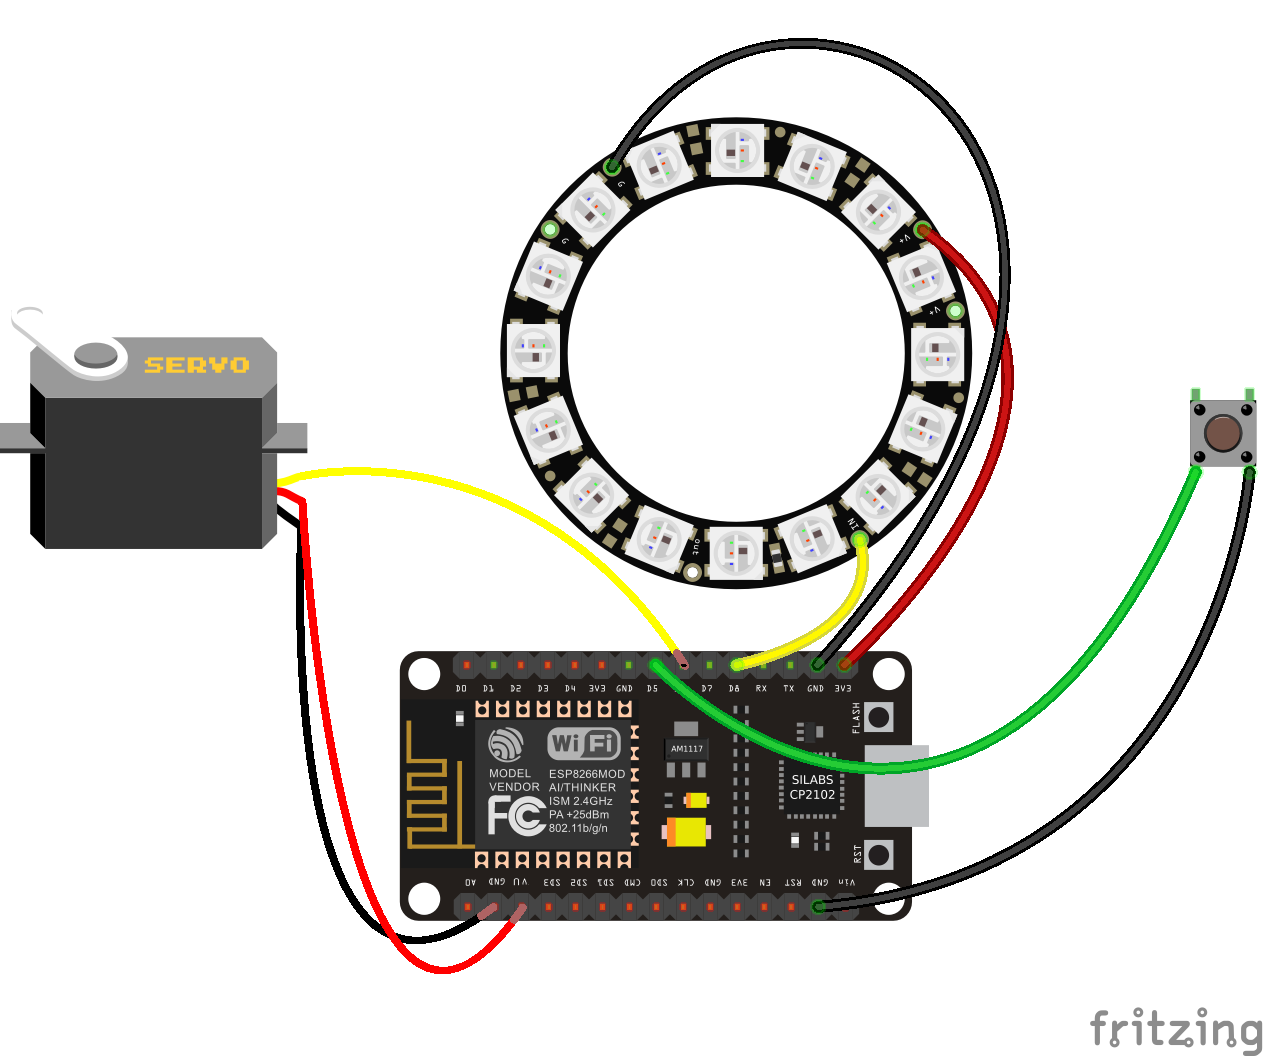
For this project I used a NodeMCU LoLin to controll my gadget. NodeMCU is an open source IoT platform, which runs on an ESP8266 Wi-Fi SoC from Espressif Systems. It's hardware is based on the ESP-12 module.
The development board connects a given Wi-fi network, and receives some commands from Adafruit.io platform. A NeoPixel ring is used for the indication of the status (if the Wi-fi connection was successfull, or if a given command was received, for instance). The control board also actuates a servomotor, that will actuate on an air freshener refill. A push button is used for local commands.
An 5V, 2A USB charger was used to power the control board and all the peripherals. It's important to notice that when the servo is actuated, a considerable peak current is drawn from the power source. This way, don't use the USB port from a computer (or any other gadget) to power your circuit. It might reset or even be damaged.
The figures ilustrate how the components were connected.
Step 4: Prepare the ElectronicsSome of the components used in this project needed to be soldered first. In this step I'll show how they were prepared for an easier connection of components.
1. Solder NeoPixel terminals
NeoPixel rings usually comes without wires connected to their terminals. This means I had to solder some wires for the connection of the LEDs to the microcontroller.
For that I used three female-female jumpers. Cut one side of the jumper and solder it's wires in NeoPixel ring terminals. The other end of each jumper will be with a female terminal, which will be connected later on NodeMCU pins.
- Red wire = 5V
- Black wire = GND
- Yellow wire = Data input
2. Solder push button terminals
In order to connect the push button to the NodeMCU, first I had to solder some jumper wires on two terminals of the button.
I used two female-female jumpers. Cut onde side of the jumper and solder it's wires to the button.
- Green wire = Data input
- Black wire = GND
3. MG995 servomotor
Servomotors usually have a three pin female terminal, but the unfortunately it can't be connected directly to the NodeMCU due to the position of the pins. In order to connect those components I used a male-female jumper wire.
Step 5: Assemble the ComponentesIn this step I'll show you how I assembled the components inside the 3D printed structure. If you don't want to print the case for any reason, you migh jump to next step and see how the circuit is connected.Once your structure is printed, assembling the circuit is quite simple:
- Attach the LED ring inside the front case;
- Put the 3d printed button inside the ring;
- Attach the pushbutton on in the middle of the 3d printed holder;
- Mount the holder inside the front case using four M2x6mm bolts;
- Mount the servomotor inside front case with four screws (the ones that usually come with the servo itself);
- Attach NodeMCU inside the back case using four M2x6mm bolts;
- Position the servo horn according do the picture and lock its position with a bolt. When the servo is at 90 degrees, the hold shall be horizontal;
- Insert the air freshener refill inside the chamber;
- Thead the cap, closing the chamber;
- Connect the circuit (in the next step I'll show you how to do that);
- Close the case using three M2x6mm screws.
Aftert that, you'll be ready for uploading the code.
Step 6: Wire Up the CircuitOnce the components were positioned inside the case, I connected the wires according to the schematics.
- NeoPixel 5V (red wire) => NodeMcu 3V3
- NeoPixel GND (black wire) => NodeMcu GND
- NeoPixel Data input (yellow wire) => NodeMcu GPIO 15 (pin D8)
- Pushbutton pin 1 (green wire) => NodeMcu GPIO 14 (pin D5)
- Pushbutton pin 2 (black wire) => NodeMcu GND
- MG995 servo 5V (red wire) => NodeMcu VU pin
- MG995 servo GNG (brown wire) => NodeMcu GND
- MG995 servo signal (orange wire) => NodeMcu GPIO 12 (pin D6)
For this project I used Arduino IDE for programming my NodeMcu. It's the easier way if you've already used an Arduino before, and you won't need to learn a new programming language, like Python or Lua for instance.
If you've never done this before, first you'll have to add ESP8266 board support to the Arduino software.
1. Download and install Arduino IDE latest version
You can find the latest version for Windows, Linux or MAC OSX on Arduino's website: https://www.arduino.cc/en/main/software
Download it for free, install it on your computer and launch it.
2. Adding ESP8266 board
Arduino IDE already comes with support to a lot of different boards: Arduino Nano, Mine, Uno, Mega, Yún, etc. Unfortunatly ESP8266 isn't by default among those suported development boards. So in order to upload your codes to a ESP8266 base board, you'll have to add its properties to Arduino's software first.
Navigate to File > Preferences (Ctrl + , on Windows OS);
- Add the following URL to Additional Boards Manager textbox (the one on the bottom of the Preferences window):
http://arduino.esp8266.com/stable/package_esp8266com_index.json
Navigate for Tools > Board > Boards Manager for adding your ESP8266 board.
- If the text box wasn't blank, it means had already add other boards before on Arduino IDE before. Add a comma at the end of the previous URL and the one above.
- Hit "Ok" button and close the Preferences Window.
- Type "ESP8266" on the search text box, select "esp8266 by ESP8266 Community" and install it.
Now your Arduino IDE will be ready to work with a lot of ESP8266 based development boards, like the generic ESP8266, NodeMcu (which I used in this tutorial), Adafruit Huzzah, Sparkfun Thing, WeMos, etc.
3. Adding the libraries
The following libraries will be used for our Arduino code. Download the following libraries:
- Adafruit NeoPixel library (https://github.com/adafruit/Adafruit_NeoPixel)
- Arduino http client library (https://github.com/arduino-libraries/ArduinoHttpClient)
- Arduino IO library (https://github.com/adafruit/Adafruit_IO_Arduino)
- Adafruit MQTT library (https://github.com/adafruit/Adafruit_MQTT_Library)
Navigate to Sketch-> Include Library -> Manage Libraries... on your Arduino IDE and add the libraries above.
............
Now that your dev environment is ready, let's move on to the next step!
Step 8: Adafruit.IO ConfigurationThere are a lot of datalogging services available for communicating a microcontroller to the web. With those services you can upload/download data to/from the cloud, and do a lot of cool stuff. Take a look on my tutorial on how to use an Arduino + ESP8266 to send data from a mini-weather station for Thinkgspeak for instance.Adafruit.IO is one of those free services. It's really easy to use and promises to bring internet of things to everyone!
Create Adafruit IO Web Feed
Under Feeds >Create a new Feed add a new feed named "IoT air freshener command". It will create a database, and we will use it store the commands received by the gadget.
- Sign in at https://io.adafruit.com/
On the next step I will show you how to configure IFTTT, another platform I used in this project. The idea here is simple: IFTTT will have some triggers configured and send some data to Adafruit.IO platform when a given logic is true. The gadget will be able to read the data stored in a given feed on Adafruit.IO, execute some logic and perform some actions.
It's also a good time to copy your Adafruit.IO key, which will be later used for allowing your device accessing the database. Navigate for Settings > View AIO key and copy the active key code. You'll need it for your Arduino (NodeMCU) code on next steps.
Step 9: IFTTT ConfigurationIFTTT is a free platform that helps you connects apps and devices. You can use it to connect your smartphone with other gadgets, or to share data between your favourite webservices (like Google, Facebook, Twitter, Instragram, etc.) and other physical devices, for instance. And the best part is that it's really easy to use!
IFTTT uses a "if this then that" logic, where "this" represents a service that will trigger a given action given by "that". This way you create small applets connecting webservices and devices. For the project described in this tutorial, there are several apples you can think of. For instance, the following examples might be used for triggering you device ("this"):
- a virtual button on a smarphone is clicked;
- everyday at a given time;
- a smartphone (GPS) reaches a given location;
- an e-mail notification is received.
In our examples, "that" value will aways be a link to Adafruit.IO, where the commands (result of a given trigger) will be stored, and later read by the NodeMCU.
First you'll have to sign in at:
Then install IFTTT app on your smartphone. You can find it at Google Play Store:
https://play.google.com/store/apps/details?id=com.ifttt.ifttt
On the website, navigate to New Applet (click the arrow button next to your login to access the menu). I the next step I'll show you how to create four different applets. You can use one (or all) of them or develop new ones.
Step 10: Applet #1 - the Lazy BoyFor this applet we will create a vitual push button that will trigger your IoT gadget. In our case, it means you won't have to stand up and turn your air freshener on! Click a button, wait for it, and take a deep breath!
Create the applet on the website:
- Click +This; Type "button" on Seach service text box and select Button widget > Button press. As it's described on IFTTT website, it will create a trigger that fires every time you press the button;
- Now choose +That;
- Type "adafruit" and select Adafruit > Send data to Adafruit IO. This will send data to a feed in your Adafruit IO account whenever the trigger you configured previously (+This) is activated;
- Configure Feed name as "IoT air freshener command" and Data to save as "button".
- Finish your applet and turn it on.
Create a virtual button on Android devices:
- Long press on the background. And choose Widgets;
- Search for IFTTT Small 1 x 1; Now choose Send data to IoT air freshener command feed;
- A button with Adafruit icon will be created.
Testing:
- Click the button you've just created;
- On https://io.adafruit.com/, navigate to your IoT air freshener command feed and check if the command was received. It will shows the last time the action was received if it's working properly.
On further steps I'll show you how to create the code for your ESP8266 to perform an action when the command is received.
Step 11: Applet #2 - IIIIIIIIt's Tiiiiiime!For this applet we will create a timer trigger for your IoT gadget, which will be actuated at certain times. Scented alarm clock ready to wake you up!
Create the applet on the website:
- Click +This;
- Type "Date" on Seach service text box and select Date & Time widget > Every day at. As it's described on IFTTT website, it will create a trigger that fires every day at a certain time;
- Click +That;
- Type "adafruit" and select Adafruit > Send data to Adafruit IO. This will send data to a feed in your Adafruit IO account whenever the trigger you configured previously (+This) is activated;
- Configure Feed name as "IoT air freshener command" and Data to save as "time";
- Finish your applet and turn it on.
Testing:
- For testing if it's working, set the triggering time for a minute after your current time. And wait for it;
- On https://io.adafruit.com/, navigate to your IoT air freshener command feed and check if the command was received. It will shows the last time the action was received if it's working properly.
For this applet we will create a location trigger for your IoT gadget, which will be actuated whenever you enter an specific area (your home, for instance). It will use the Location service of your smarphone (GPS position) to determine if you close to a specific location.
Create the applet on the website:
- Click +This;
- Type "location" on Seach service text box and select Location widget > You enter an area. As it's described on IFTTT website, it will create a trigger that fires every time you enter a specific location;
- Click +That;
- Type "adafruit" and select Adafruit > Send data to Adafruit IO. This will send data to a feed in your Adafruit IO account whenever the trigger you configured previously (+This) is activated;
- Configure Feed name as "IoT air freshener command" and Data to save as "location";
- Specify the address of your location;
- Finish your applet and turn it on.
Testing:
For testing if it's working, you'll have to walk a little bit! You have to get out of the location you specified, and the get back there. :D
Step 13: Applet #4 - You've Got Mail!For this applet we will create a notification trigger for your IoT gadget, which will be actuated whenever an e-mail is received on your gmail account. If a ringtone and a vibration notification wasn't enough, now you can add a smell notification for incoming messages!
Create the applet on the website:
- Click +This;
- Type "gmail" on Seach service text box and select Gmail widget > Any new email in inbox. As it's described on IFTTT website, it will create a trigger that fires every time a new message arrives on your Gmail;
- Click +That;
- Type "adafruit" and select Adafruit > Send data to Adafruit IO. This will send data to a feed in your Adafruit IO account whenever the trigger you configured previously (+This) is activated;
- Configure Feed name as "IoT air freshener command" and Data to save as "mail";
- Finish your applet and turn it on.
Testing
- For testing if it's working, send you and e-mail;
- On https://io.adafruit.com/, navigate to your IoT air freshener command feed and check if the command was received. It will shows the last time the action was received if it's working properly.
Now that your triggers are set, let's work on your ESP8266 code.
Basically, your gadget will connect a given wi-fi network and wait untill a new command is received on Arduino.IO. Whenever a message is received, the IoT air freshener will perform its actions (move a servo motor for release some perfume, changing LED colors), and return for the idle state. The circuit will also use a pushbutton as an input.
For uploading your code, select the NodeMCU 0.9 (ESP-12 Module) (if you're using a NodeMCU) with 11520 kbps upload speed. Disconnect the servomotor from the NodeMCU, plug NodeMCU to your computer's USB port and upload the code.
It will take a while (much more than compliling and uploading a sketch for an Arduino... be patient...). Now it's a good time for you to give a like on this tutorial while you wait! :D
After the upload was complete, unplug the USB cable, connect the servomotor and power your circuit from a USB charger.
Code explained:
For the Adafruit IO configuration, you'll have to replace the user name (XXXXXXXXXX) and io key (YYYYYYYYY). Visit adafruit.io, log into your account and copy the io key (as it was described in previous steps).
/************************ Adafruit IO Configuration *******************************/
// visit io.adafruit.com if you need to create an account, or if you need your Adafruit IO key.
#define IO_USERNAME    "XXXXXXXXXX"
#define IO_KEY         "YYYYYYYYY"
You'll also need to specify the SSID and password for your Wi-Fi router. Replace WWWWWWWWWW and ZZZZZZZZZZ to configure your Wi-Fi connection.
******************************* WIFI Configuration **************************************/
#define WIFI_SSID       "WWWWWWWWWW"
#define WIFI_PASS       "ZZZZZZZZZZ"
#include "AdafruitIO_WiFi.h"
AdafruitIO_WiFi io(IO_USERNAME, IO_KEY, WIFI_SSID, WIFI_PASS);
The following libraries will be used (as described in previous steps). You'll need to add them on the Arduino ide before compiling the code.
/************************ Main Program Starts Here *******************************/
#include <ESP6266WiFi.h>
#include <AdafruitIO.h>
#include <AdafruitMQTT.h>
#include <ArduinoHttpClient.h>
#include "Servo.h"
Several things (pins and LED parameters) are defined before the setup:
#define SERV1 12 // Pin connected to the Servomotor
Servo s1;
#define BUTTON_PIN 14 // Pin connected to the pushbutton
#define PIXELS_PIN 15   // Pin connected to the NeoPixel data input
#define NUM_LEDS   16   // Number of NeoPixels
#define BRIGHTNESS 30
#define PIXEL_TYPE NEO_GRB + NEO_KHZ800   // Type of the NeoPixels (see strandtest example).
Adafruit_NeoPixel ring = Adafruit_NeoPixel(NUM_LEDS, PIXELS_PIN, PIXEL_TYPE);// + NEO_KHZ800);
AdafruitIO_Feed *command = io.feed("iot-air-freshener-command"); // set up the 'command' feed
During the setup, the NodeMCU will initialize the LEDs (turn then off), start the serial communication port and connect to Adafruit.io. An animation will be displayed while it attemps to connect.
Inputs (pushbutton) and outputs (servomotor) are also configured during the setup.
void setup() {
  ring.setBrightness(BRIGHTNESS);
  ring.begin();
  ring.show(); // Initialize all pixels to 'off'
  // start the serial connection</p><p>  Serial.begin(115200);
  // connect to io.adafruit.com
  Serial.print("Connecting to Adafruit IO");
  io.connect();

  // set up a message handler for the 'command' feed.
  // the handleMessage function (defined below)
  // will be called whenever a message is
  // received from adafruit io.
  command->onMessage(handleMessage);
  // wait for a connection
  int i = NUM_LEDS - 1;
  int color = 255;
  // animate LEDs while waiting for connection
  while(io.status() < AIO_CONNECTED) {
    Serial.print(".");
    ring.setPixelColor(i, 0, 0, color);
    ring.show();
    i = i - 1;
    if (i < 0) {
      if (color == 255) {
        color = 0;
      }
      else {
        color = 255;
      }
      i = NUM_LEDS - 1;
    }
    delay(50);
  }
  lightPixels(ring.Color(0, 0, 0, 0)); // reset all pixels to off when connected
  // we are connected
  Serial.println();
  Serial.println(io.statusText());
  // move servomotor to neutral position
  s1.attach(SERV1);
  s1.write(90);
  delay(500);
  s1.detach();
  // set button pin as an input
  pinMode(BUTTON_PIN, INPUT_PULLUP);
}
The main loop is quite short. It verifies if there is incoming data from Adafruit.io, and check if the pushbutton was pressed. If one presses the button, it sends a data to Adafruit.io.
void loop() {
  // io.run(); is required for all sketches.
  // it should always be present at the top of your loop
  // function. it keeps the client connected to
  // io.adafruit.com, and processes any incoming data.
  io.run();
  if(digitalRead(BUTTON_PIN) == LOW) {
    command->save("button");
  }
}
Whenever a message is receive, handleMessage function is called. This function reads the last data received on a given feed on the Adafruit.io, and check if one of the known command strings was receive ('button', 'timer', 'location' or 'mail').
Depending on the command receive, the LEDs will blink with different colors, and the servo motor will be actuated.
// this function is called whenever a message<br>// is received from Adafruit IO. it was attached to
// the feed in the setup() function above.
void handleMessage(AdafruitIO_Data *data) {

  lightPixels(ring.Color(0, 0, 0, 0)); // reset all pixels to off when new info is received
  String commandStr = data->toString(); // store the incoming commands in a string

  Serial.print("received <- ");
  Serial.println(commandStr);

  // These if statements compare the incoming weather variable to the stored conditions, and control the NeoPixels accordingly.

  // if virtual push button was pressed
  if (commandStr.equalsIgnoreCase("button")){
    Serial.println("Virtual push button");
    rotatingPixels(ring.Color(255, 255, 0, 0)); // display animation
    lightPixels(ring.Color(255, 255, 0, 0)); // display animation
    launch(1);
    lightPixels(ring.Color(0, 0, 0, 0)); // reset all pixels to off when new info is received
  }

  // if it's time
  if (commandStr.equalsIgnoreCase("timer")){
    Serial.println("it's time");
    rotatingPixels(ring.Color(0, 0, 255, 0)); // display animation
    lightPixels(ring.Color(0, 0, 255, 0)); // display animation
    launch(2);
    lightPixels(ring.Color(0, 0, 0, 0)); // reset all pixels to off when new info is received
  }

  // if location reached
  if (commandStr.equalsIgnoreCase("location")){
    Serial.println("welcome home!");
    rotatingPixels(ring.Color(0, 255, 0, 0)); // display animation
    lightPixels(ring.Color(0, 255, 0, 0)); // display animation
    launch(2);
    lightPixels(ring.Color(0, 0, 0, 0)); // reset all pixels to off when new info is received
  }

  // if you've got mail
  if (commandStr.equalsIgnoreCase("mail")){
    Serial.println("you've got mail!");
    rotatingPixels(ring.Color(255, 0, 0, 0)); // display animation
    lightPixels(ring.Color(255, 0, 0, 0)); // display animation
    launch(1);
    lightPixels(ring.Color(0, 0, 0, 0)); // reset all pixels to off when new info is received
   }
  } <br>
The auxiliar function rotatingPixels was developed to display an animation. The color is received as an input for this variable.
<p>//Funcion NeoPixels full rotation</p><p>void rotatingPixels(uint32_t color) {
  for (int j = 0; j < 3; j++) {
    for (int i=NUM_LEDS-1; i>=0; i--) {
      ring.setPixelColor(i, color);
      ring.show();
      delay(50);
      ring.setPixelColor(i, 0, 0, 0);
      ring.show();
    }
  }
}
launch function is used for controlling the servomotor. It cycles its position from 90° to 175° a given amount of times.
//Actuates the servomotor<br>void launch (int number) {
  s1.attach(SERV1);
  for (int i = 0; i < number; i++) {
    s1.write(175);
    delay(1000);
    s1.write(90);
    delay(1000);
  }
  s1.detach();
}
Now plug it on the power source and it's done!
Always have in mind that this is an experimental prototype, and might be used with caution!


_t9PF3orMPd.png?auto=compress%2Cformat&w=40&h=40&fit=fillmax&bg=fff&dpr=2)


Comments