

Hardware components | ||||||
 |
| × | 1 | |||
| × | 1 | ||||
 |
| × | 3 | |||
 |
| × | 1 | |||
| × | 1 | ||||
Software apps and online services | ||||||
 |
| |||||
 |
| |||||
| ||||||
"Cheap, easy, good. Pick three!" It isn't supposed to be this way, but it is. The Huzzah Feather is all three. "Cheap, easy, good. Pick three!" It isn't supposed to be this way, but it is. PubNub is all three.
The Huzzah Feather is an ESP8266 based microcontroller board. It is inexpensive, WiFi capable and is easily programmable with the Arduino IDE. This makes it a nice option to explore IoT.
PubNubPubNub is a service that allows real time streaming of JSON encoded data over the internet. It probably best described in their own words:
PubNub provides an SDK for over 70 platforms. One being Arduino. With a few easy tweaks, we'll be able to use it with the Huzzah Feather which is based on the ESP8266.
Actually, PubNub is much more than this, and hopefully this project will stimulate your interest to explore it! For example, Eon is a library of data display widgets made to work with JSON messages sent with PubNub. I demonstrate the use of Eon in this project.
AssumptionsI would like this project/pro tip tutorial to focus on the topics I found challenging, interesting and perhaps not as well documented or not documented in a single place. So . . . I assume that you can get your Arduino IDE setup to program the Adafruit Huzzah Feather and that you can get your own PubNub account and set up a channel to publish to.
Both the Adafruit and PubNub site's have a wealth of easy to follow information on this.
I felt a little bit guilty about this until my newest book, "Fritzing For Inventors" by Simon Monk(ISBN#:0071844635) arrived, and I read this:
"The best way to learn things is to try them yourself." Chapter 2, Page 11.
Thanks Simon!
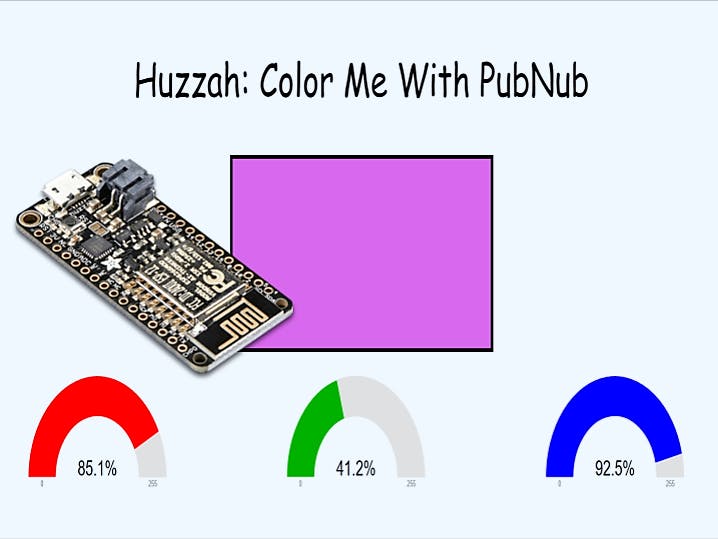
The ProjectSince I wanted to experiment with using PubNub's realtime data streaming with the Huzzah Feather's WiFi capability, I came up with a fun "demo" that I shows some of the power, potential and ease of use of both. We'll use PubNub to stream data from our Huzzah Feather to a dashboard written in HTML & JavaScript. The data consist of 3 numbers generated by 3 potentiometers. This three numbers will represent R-G-B values and change the color of a canvas element on an HTML page.
Getting Started with PubNubGetting started with PubNub is simple. I already have an account, so I did not want to create a bogus one just to collect Screen shots for this tutorial. Trust me, it is easy, just go to their main site, click on the Get Started Button at the top right hand side of the screen and follow the instructions, read some of the information provided and watch a few of the videos. A few account allows you to publish 2 million messages/payloads per month. This is very generous for a maker/free account.
Also do not forget to check out all the great PubNub projects on Hackster.io and the many great Arduino tutorials on the PubNub website.
Getting Started with the Huzzah FeatherFirst make sure your Arduino IDE is setup to compile and upload the Huzzah Feather. If you haven't done this, go the Adafruit site tutorial, then come back here.
Once you have confirmed your ability to program the Huzzah Feather with the Arduino IDE (I recommend confirming with the blink example sketch), we can get started with PubNub. When this step is completed the PubNub SDK will work through the Huzzah Feather's WiFi connection to publish data and subscribe to channels to receive data. Once the "connection" between the PubNub SDK and your Huzzah Feather is made, you can ignore the fact that your are using the ESP8266 board and program away with the PubNub arduino tutorials. Now that's abstraction!
Make sure you also check out PubNub's github page on using the Arduino SDK. It's where I learned most of this.
Open up your Arduino IDE. Go to the Sketch tab and then select Manage Libraries from the drop down menu. When the Library Manager Window pops up, type in PubNub to filter your search...
In order to use this PubNub SDK with the Huzzah Feather and get your programs to compile, you will need to add the following lines to the top of your sketch, in this order:
#include <ESP8266WiFi.h>
#define PubNub_BASE_CLIENT WiFiClient
#define PUBNUB_DEFINE_STRSPN_AND_STRNCASECMP
#include <PubNub.h>
So as far as using PubNub goes, we are all set to use the SDK. We, do, however have to connect to WiFi. Since one of the key features of the Huzzah Feather is the WiFi and therefore IoT capability.
...
const char* ssid     = "your ssid here";
const char* password = "your password here";
...
void setup() {
 // All the serial output is essentially for debugging purposes so basically
 // including the char* above, you get online in about 6 lines of code!
 Serial.begin(115200);
 delay(10);
 // We start by connecting to a WiFi network
 Serial.println();
 Serial.println();
 Serial.print("Connecting to ");
 Serial.println(ssid);
 WiFi.begin(ssid, password);
 while (WiFi.status() != WL_CONNECTED) {
   delay(500);
   Serial.print(".");
 }
 Serial.println("");
 Serial.println("WiFi connected");
 Serial.println("IP address: ");
 Serial.println(WiFi.localIP());
 ...
}
Data is streamed by PubNub using JSON(JavaScript Object Notation). As JSON uses strings, you will have to be comfortable working with strings in the Arduino IDE. Fortunately there are many solutions to help you.
The PubNub Arduino MKR1000 tutorials are outstanding and offer up some code that you could cut and paste directly into your sketch. The following code segments are taken directly from their tutorial:
To convert the data from a float to a JSON, you need to define two helper functions. The first is a commonly used functions that converts the float that the sensor records to a string:
char *dtostrf (double val, signed char width, unsigned char dec, char *s) {
    char m[20];
    sprintf(m, "%%%d.%df", width, dec);
    sprintf(s, m, val);
    return s;
}
The other function joins long strings together, which you need to do in order to create a JSON:
char longString[100];
char *joinStrings(char* string1, char* string2, char* string3) {
    longString[0] = 0;
    strcat(longString, string1);
    strcat (longString, string2);
    strcat (longString, string3);
    return longString;
}
And finally, Using those functions, we can convert the float data into a JSON. If you’re using various locations to transmit your data, like I am, then you need to change the “Location” term in the JSON to reflect the different locations. For this project, one of my MKR1000s runs code that says “SoMa” while another says “Ingleside,” and so on.
char msg[200];
dtostrf(temp, 7, 2, msg);
char* json = joinStrings("{\"eon\":{\"Location\":\"", msg, "\"}}");
Again, the above code comes directly from the PubNub Arduino MKR1000 tutorials, but I included for completeness sake and also it is quite generic for string handling jobs of any sort and I learned a lot from it.
My solution was different. Each of the functions below individually does the same as the PubNub code above but does so with the help of ArduinoJson. Many Arduino types, like myself, are using and are familiar with the ArduinoJson library. The library is easy to import/install in the Arduino IDE and has many useful features.
I created two functions to work with the JSON. The first function, createJsonPayload():
char jsonPayload[100];
...
void createJsonPayload()
   {
     StaticJsonBuffer<100> jsonBuffer;
     JsonObject& root = jsonBuffer.createObject();
     root["R"] = mappedRed;
     root["G"] = mappedGreen;
     root["B"] = mappedBlue;
     root.printTo(jsonPayload,sizeof(jsonPayload));
   }
was created to test out the Huzzah and PubNub working together.
The second function, createEonPayload():
char eonPayload[150];
...
void createEonPayload()
   {
     StaticJsonBuffer<150> jsonBuffer;
     JsonObject& colorValues = jsonBuffer.createObject();
     JsonObject& nestedColorValues = colorValues.createNestedObject("eon");
     nestedColorValues["R"] = mappedRed;
     nestedColorValues["G"] = mappedGreen;
     nestedColorValues["B"] = mappedBlue;
     colorValues.printTo(eonPayload, sizeof(eonPayload));
   }
was to make my JSON package compatible with Eon message format.
With ArduinoJson, you can allocate memory for your Json payload in a static or a dynamic manner. For smaller scale embedded processors, the static option may be the better choice. A dynamic allocation could in principle override the limited memory resources of an embedded processor. I once read that dynamic memory should never be used with embedded hardware. However as memory resources improve, this will become less problematical for Maker/Hobbyist applications that are not mission critical projects. All that being said, I choose the static option anyway.
A 'string' in the Arduino IDE(C/C++) is represented as array of type char(there is also a String class which you could look into using). I created two static arrays of type char of size 100 and 150. This was not a random choice of numbers. The ArduinoJson site contains an excellent tool, ArduinoJson Assistant, for determining the memory size allocation needed for Json payloads:
The size of 150 and 100 bytes I choose were rounded up from the 102 and 74 byte sizes created using ArduioJson Assistant.
Why bother creating the array of char in the first place? We want to create our JSON payloads separately from the act of sending them and variables declared in the scope of a function, will be "deleted" after the function is completed . So by creating these arrays outside of the function, we allow our payload creation functions the ability to reach into the variable and change it so that it will remain when the function and it's variables are "popped off the stack." Whoa this is some serious C/C++ stuff! :)
colorValues.printTo(eonPayload, sizeof(eonPayload));
The line above, from createEonPayload(), accomplishes this by writing to the array of char type we created called eonPayload.
What is Eon you ask? Let's answer this question and now turn our attention away from the Arduino sketch and to our Javascript/HTML/CSS dashboard.
The Javascript/HTML/CSS DashboardThe job of our dashboard is to subscribe to the PubNub channel and parse the JSON payload it receives. The RGB data we receive will be used to change the color of a <canvas> element. We will also display individual RGB data using Eon widgets.
One of the advantages of using Eon is the ease of which you can add standard widgets to your dashboard. Eon can be used with many different programming languages. In this case I will be using JavaScript within and HTML page.
In order to do this, we have import the correct libraries in our HTML page:
...
<title>Huzzah: Color Me PubNub</title>
   <script src="https://cdn.pubnub.com/sdk/javascript/pubnub.4.5.0.js"></script>
   <script type="text/javascript" src="https://pubnub.github.io/eon/v/eon/1.0.0/eon.js"></script>
...
Following this we create some simple CSS to format our page and then some very simple HTML to create our page:
...
<body>
   <p id="myTitle"> Huzzah: Color Me With PubNub </p>
   <canvas id="myCanvas" width="500" height="250" style="border:5px solid #000000;"></canvas>
   <p></p>
   <div id="divLine">
     <div id="redGauge"></div>
     <div id="greenGauge"></div>
     <div id="blueGauge"></div>
   </div>
...
The <canvas> element creates a rectangular piece of real estate that we will color based on the values sent over PubNub.
The <div> elements with id's specified as "redGauge", etc. are very important. They let Eon know where to put the graphical gauge widgets. More on this below.
In order to receive JSON payloads we need to subscribe to our pubnub channel:
<script type="text/javascript">
...
 var pubnub = new PubNub({
     subscribeKey : "your subscribe key here",
 });
 // subscride to your channel here:
 pubnub.subscribe({channels: ['HuzzahChannel']});
...
Where you see 'HuzzahChannel' , you would be replace this with your channel name.
Now that we are subscribed, our dashboard will parse the JSON payload in two ways.
First we will use the addListener method from the pubnub SDK. Using the message event we get access to the JSON payload. In the code below, you can ignore the console.log commands, these are present to help in debugging.
pubnub.addListener({
   message: function(m){
       var msg = m.message;
       var chan = m.channel;
       console.log(JSON.stringify(msg));
       console.log(chan);
       var colorMsg = JSON.parse(JSON.stringify(msg));
       console.log("eon: " + colorMsg["eon"].R);
       updateCanvasColor(colorMsg["eon"].R,colorMsg["eon"].G,colorMsg["eon"].B);
     }
 });
 function updateCanvasColor( red, green, blue)
 {
   var newCanvasColor = 'rgb('+red+','+green+','+blue+')';
   document.getElementById("myCanvas").style.backgroundColor = newCanvasColor;
 }
The Eon message is a nested JSON payload, and we have to grab the RGB values from within the eon tag. To keep the code clean and separate out functionality, we do not change the color of the <canvas> element directly in the addListener method, but call the updateCanvasColor function with the parsed JSON RGB values.
After this, the next set of code demonstrates how to use Eon widgets with your JSON payload. The Eon SDK does the heavy lifting for you.
eon.chart({
     pubnub: pubnub,
     channels: ["HuzzahChannel"],
     generate: {
         bindto: '#redGauge',
         data: {
             labels: true,
             type:'gauge'
           },
           gauge: {
             min: 0,
             max: 255
           },
           color: {
             pattern: ['#550000', '#B10000', '#FF0000'],
             threshold: {
               values: [85, 177, 255]
             }
           }
         },
         pubnub: pubnub,
         transform: function(m) {
           return { eon: {
               redGauge: m.eon.R
           }}
         }
 });
First off, we have to tell Eon what channel we are getting the data from:
 eon.chart({
     pubnub: pubnub,
     channels: ["HuzzahChannel"], . . .
Your channel name would go in place of "HuzzahChannel" channel here. Next we tell Eon where this widget should displayed and what type of widget we want. Remember the <div> ids above? Here is where they come into play.
generate: {
         bindto: '#redGauge',
         data: {
             labels: true,
             type:'gauge'
           }, . . .
After this is formatting information, much like CSS, and I will let you explore this on your own. Because the last bit of code for this particular Eon widget is very important. Our Eon JSON payload contains 3 values. For this particular widget, a gauge in this case, we only want to extract the "R" or Red value from the Eon payload, hence the "transform" event:
pubnub: pubnub,
         transform: function(m) {
           return { eon: {
               redGauge: m.eon.R
           }}
         }
This lets us tell Eon, we only want the gauge to display the red value. Otherwise all 3 values will be displayed overlapping one another.
Please note, no server is required to utilize the HTML file. Once we have specified the correct subscription key, we can load up the HTML file anywhere we have an active WiFi connection. Just load up the file in a browser from a local directory! That's one example of the ease of use and power of data streaming with PubNub. A full and complete guide to using the PubNub Javascript SDK is provided and is the best place to see code examples of how to use it.
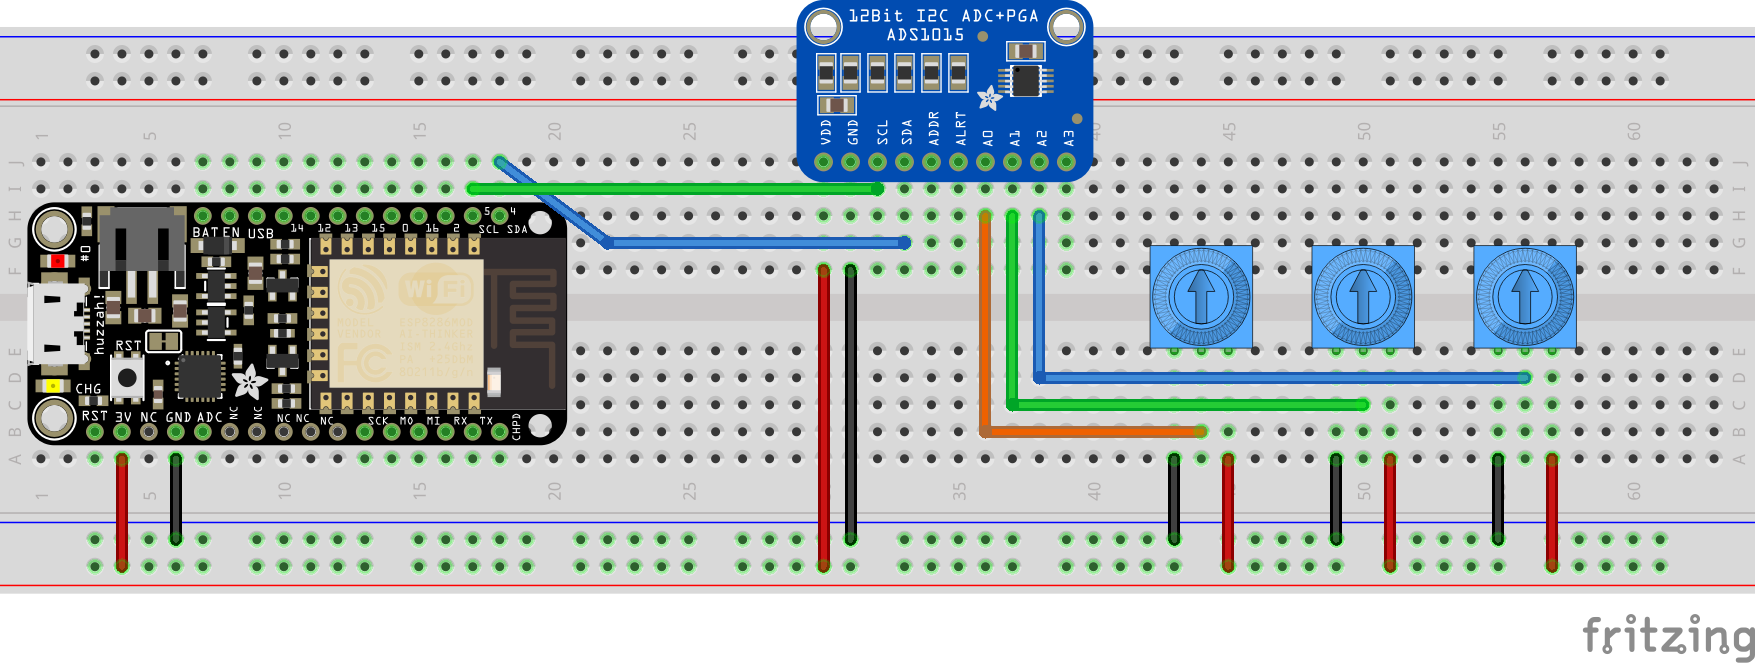
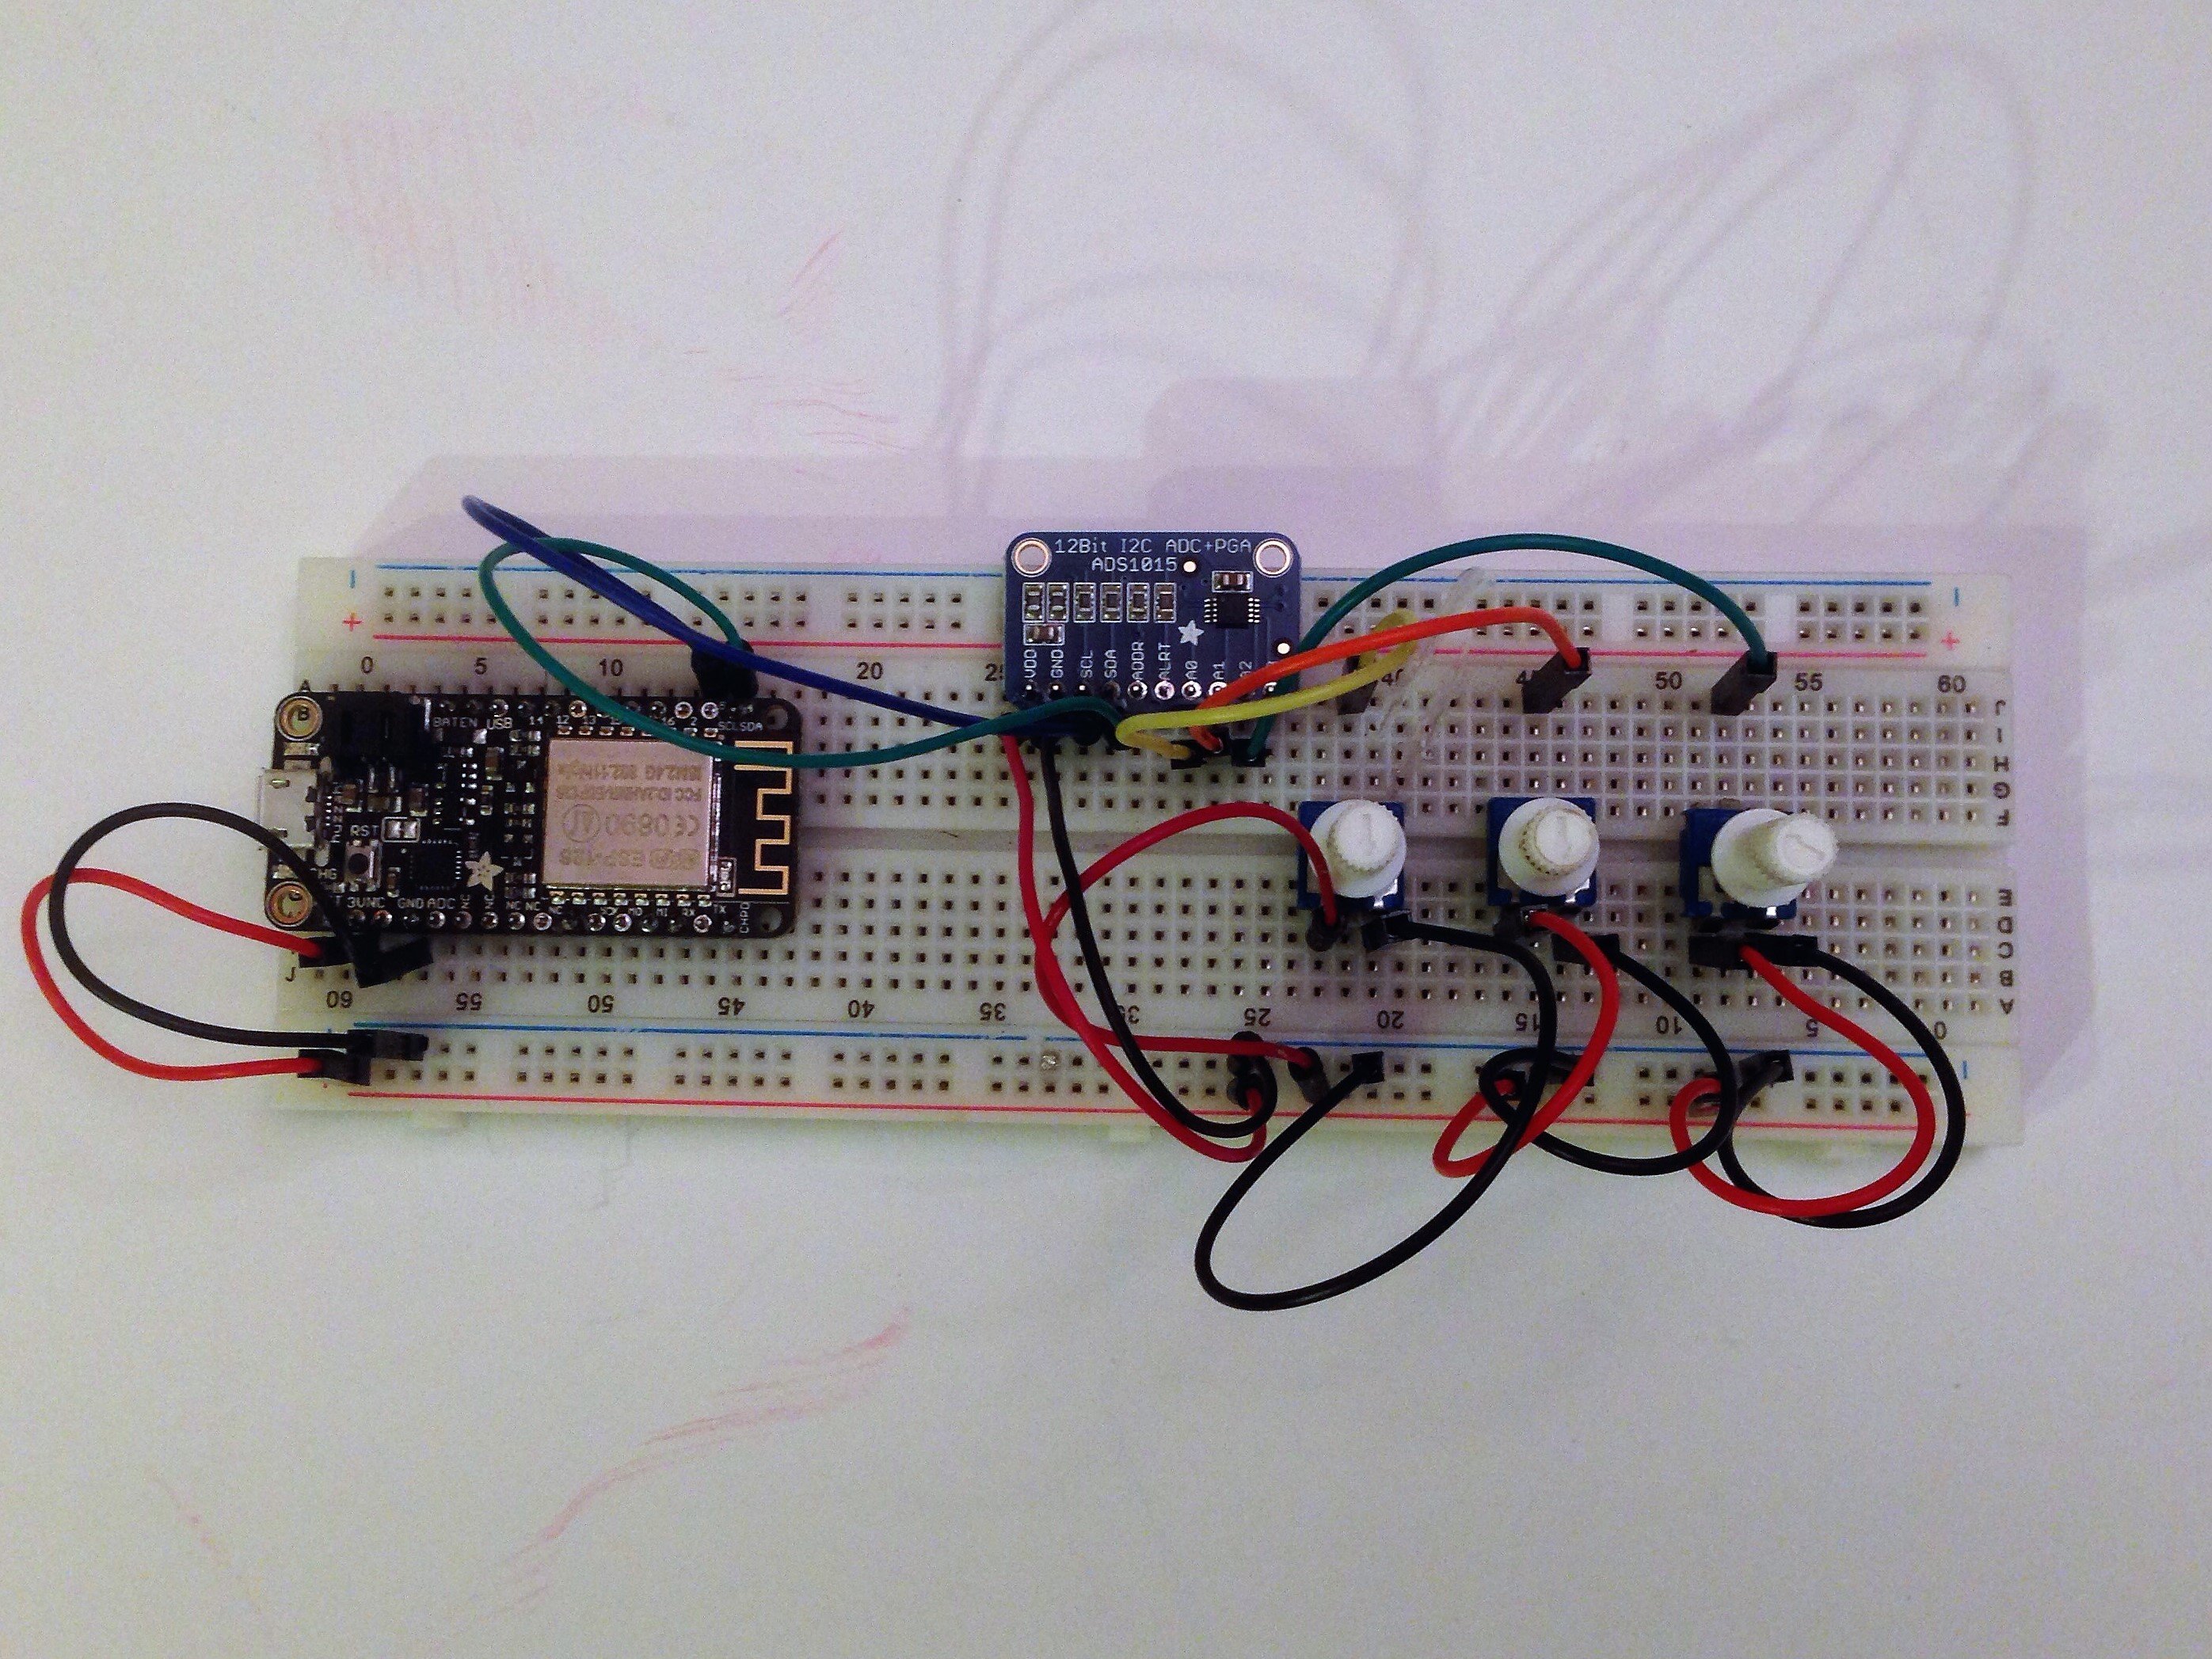
Fluffing Up the Huzzah FeatherOk, so you can't completely ignore the underlying board. So let's go to the hardware part of this project. The circuit is easy to complete from the Fritzing diagram.
One area where the Feather is limited, is in the analog-to-digital pin department. The Huzzah Feather only has one:
Analog Pins:
- There is also a single analog input pin called A. This pin has a ~1.0V maximum voltage, so if you have an analog voltage you want to read that is higher, it will have to be divided down to 0 - 1.0V range.
However, in order to complete this project, we will need at least 3 analog inputs to represent our R-G-B color values.
We can easily expand our ADC capabilities through I2C. Adafruit sells a few versions of 4-channel ADC breakout boards using I2C to communicate. I purchased the ADS1015 12-Bit ADC - 4 Channel with Programmable Gain Amplifier. We only need 3 channels, so we will have one to spare. The API library provided by Adafruit is compatible with the ESP 8266. I went to the github site for the library, Adafruit_ADS1X15, and downloaded it as a zip file and then imported to my Arduino IDE.
Using it is very simple, we create and object called ADC which can be constantly updated from the sketch's loop() function. This is a paradigm for multitasking I learned from Bill Earl's set of Arduino multitasking tutorials at Adafruit.
void Update()
   {
     currentMillis = millis();
     if( (currentMillis - previousMillis) > 250)
     {
       red = ads.readADC_SingleEnded(0);
       green = ads.readADC_SingleEnded(1);
       blue =  ads.readADC_SingleEnded(2);
       // map(value, fromLow, fromHigh, toLow, toHigh)
       mappedRed = map(red, 0, 1095, 0, 255);
       mappedGreen = map(green, 0, 1095, 0, 255);
       mappedBlue = map(blue, 0, 1095, 0, 255);
       colorChange(mappedRed, mappedGreen, mappedBlue);
     }
The Update() function is called constantly. but will only check the 3 ADC values every 250 milliseconds. The ADS1015 will send a value between 0 and 1095, so we map this to 0 to 255 for sending to our HTML dashboard. We then send these mapped values to the colorChange() function. We don't want to send color values if there have been no significant changes:
void colorChange( uint8_t currRed, uint8_t currGreen, uint8_t currBlue)
   {
     int deltaRed = currRed-oldRed;
     int deltaGreen = currGreen-oldGreen;
     int deltaBlue = currBlue-oldBlue;
     if ( abs(deltaRed) > 3 || abs(deltaGreen) >3 || abs(deltaBlue) > 3) {
         //debugging
         Serial.println("color change detected");
         // createJsonPayload();
         createEonPayload();
         colorChanged = true;
         oldRed = currRed;
         oldGreen = currGreen;
         oldBlue = currBlue;
     }
     else {colorChanged = false;}
   }
If the color values have changed more than 3 RGB units, we set the colorChanged flag to true and write up our JSON payload to send.
This is then used in the loop() function to send a JSON payload if a change is detected:
void loop() {
 // Use WiFiClient class to create TCP connections
 WiFiClient *client;
 adc.Update();
 if (adc.getColorChanged()) {
   client = PubNub.publish("HuzzahChannel", adc.getEonPayload());
 }
}
Conclusion:
I learned a lot about using PubNub, Eon and the Adafruit Huzzah Feather with this project and hope you can learn from this as well!


Comments