

Software apps and online services | ||||||
| ||||||
I'm working on a pair of glasses to help me achieve lucid dreaming, called DreamGlass. Here's how I made a case for the battery, using Fusion 360, beginner-friendly CAD software. You can download the case and mod or print it yourself!
Fusion is a step up from Tinkercad in terms of complexity, but much more powerful in terms of placing things exactly where you want by entering numerical parameters. It also has a fancy shmancy timeline that allows you to edit previous construction steps.
However, it also has a much easier learning curve than most of the established software – SketchUp, Rhino, Maya, SolidWorks, and so forth – including visual icons for each tool, as well as tooltips that explain their use. Best of all, you can get it for free!
Dimensions
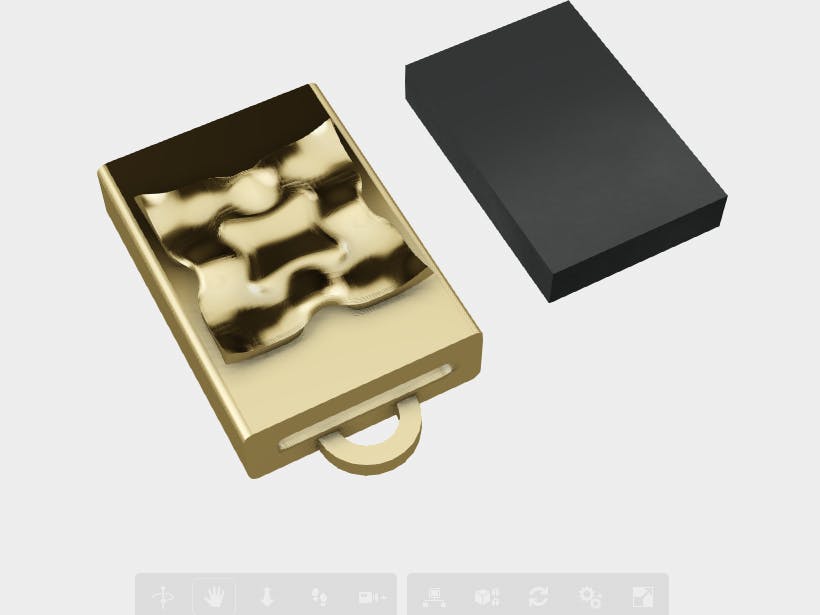
The black oblong in the model is a mock-up of the battery. I always measure generously, so there's a little slip around the actual dimensions of the object. The packaging of this battery squishes a little, but likes to stay at about 20 x 30 x 5mm. (I prefer to work in mm because it's precise and easy to visualize at the scale where I usually build.)
Most of my enclosures end up with 1.5-2mm thick walls, so they're quite sturdy, to take the stress I put them through.
The top of the enclosure has a wide opening, to slot the battery in, while the bottom slot allows you to pull the wires through to connect it, or push the battery out of the case... a requirement that's often overlooked until you're jabbing at things with teeny screwdrivers and cursing.
It also has little loops as connectors, to attach it in a chain to the arm of my glasses and the other enclosure, which will be carved amber.
Design
To give the design a bit of visual flair, and tie it in with the TinyLily, I added a floral design on the top.
Then, I combined the two. At first, I tried to use Fusion's "Replace Face" feature, but however I tweaked the fillets, sizing, and placement, it didn't want to work (though I've successfully used this before). In the end, I used "Thicken" to turn the sculpted plane into an object, and grafted it onto the enclosure.
A couple of final tweaks, and we're done!
Et voilà! Download my enclosure here, or go forth and make your own. It's free, it's easy, and it's hella fun!


_t9PF3orMPd.png?auto=compress%2Cformat&w=40&h=40&fit=fillmax&bg=fff&dpr=2)
Comments