

Software apps and online services | ||||||
 |
| |||||
 |
| |||||
 |
| |||||
| ||||||
 |
| |||||
This project is part of an assignment for the course of Internet of Things at the Sapienza University of Rome. The aim is to build a Crowd Sensing application based on Amazon Web Services (AWS) that determines, through the smartphone's accelerometer, the user activity. The analysis of the data provided by the accelerometer will be operated in two ways:
- on the smartphone itself (edge-based)
- on the cloud (cloud-based)
It's useful to know that I built another project based on AWS. In this previous project, composed of three parts, I explained some AWS basics, for example how to create a Thing in IoT Core and how to create a DynamoDb table, that I will assume you already know for this project. You can find the first part here.
This application is structured for working on an Android device, using Google Chrome.
Another useful thing to know is that if you run the server needed for this project in a Virtual Machine, you have to check the VM's network configuration! It is necessary that it is set on "Bridged network" so you can easily reach the local-hosted server.
Lastly, keep in mind that all the code that I used for this project is available in my Github repository.
The serverThe server is built through Node.js and you can find the documentation here.
You need to create some SSL self-signed certificates. Type in terminal, in your chosen folder:
openssl req -x509 -newkey rsa:4096 -keyout key.pem -out cert.pem -days 365Of course, you can change the value of -days that represents the duration of the certificates. The system may ask you for other information: provide or invent them, it is not important for our purpose. You can then find your certificate and your key in your chosen folder: copy their path where is necessary in the code.
For what concerns the AWS's key and certificates of your AWS IoT Core Thing, it is suggested to check out my previous project if you don't know how to get them. When you have configured every needed parameter, simply run your server with your terminal, obviously going in the right folder:
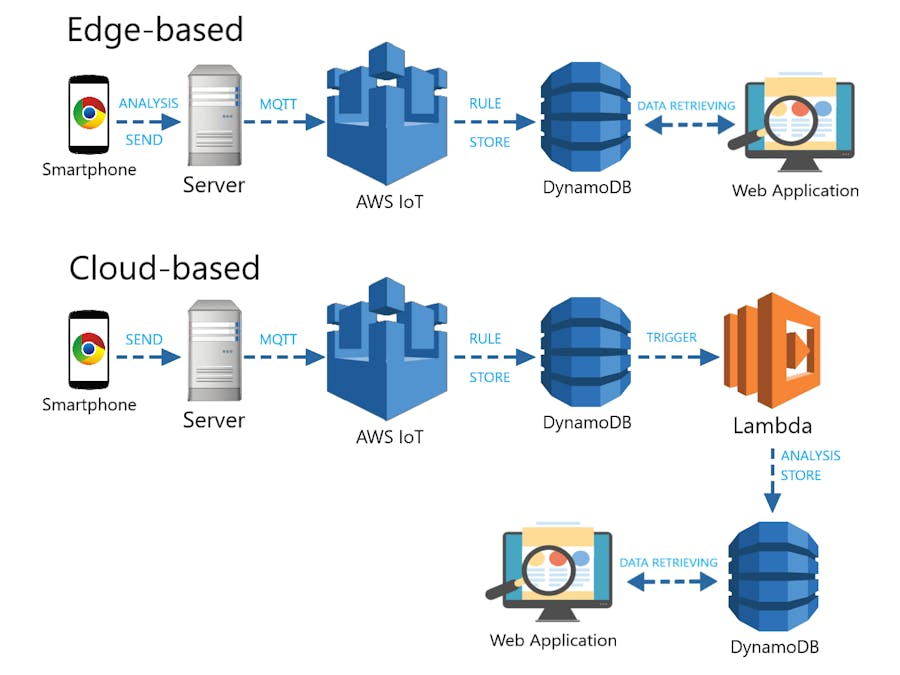
node server.jsIn the edge-based deployment, the data provided by the accelerometer will be analyzed (in a very simple way) on the smartphone itself, then they will be sent to AWS and finally displayed on a web page.
Through an HTML5 application, using the Generic Sensor API we are able to get the accelerometer's x-y-z data.
Then, the data are analyzed on the device with an extremely simple model (you can obviously improve it), that determines the activity of the user, and passed to the server that forwards them to AWS IoT Core. If everything is working properly, you should see the data both in the terminal where you run the server and on AWS IoT Core, subscribing in the Test tab to the same topic on which the server is publishing.
When the data reach AWS IoT Core, they trigger a Rule that stores them in AWS DynamoDB.
Create a Rule is quite simple, you have to go in the Act tab in the AWS IoT Core and then choose the Rules sub-tab; then click on Create. Essentially you have to fill the required fields, choose a topic from which read the data, and choose an action to do when the Rule is invoked. In this case, you have to choose "Insert in a DynamoDB table". Of course, you have first to create a DynamoDB table properly structured.
Finally, a web page that runs in localhost for this project (you may remember it from my previous project...) retrieves the data from the database. The web page will display the last detection and the stored data for the last hour.
In the cloud-based deployment, the data provided by the accelerometer will be sent to AWS, analyzed through an AWS Lambda function (in a very simple way), and finally displayed on a web page.
Through an HTML5 application, using the Generic Sensor API we are able to get the accelerometer's x-y-z data.
The interface is quite similar, but this time we have an Expected status, just as a test because the real data analysis will occur on the cloud service. Then, the data are passed to the server that forwards them to AWS IoT Core. If everything is working properly, you should see the data both in the terminal where you run the server and on AWS IoT Core, subscribing in the Test tab to the same topic on which the server is publishing.
When the data reach AWS IoT Core, they trigger two Rules. The first Rule triggered stores the raw data in AWS DynamoDB, in the same table you saw for the Edge-based mode; the second Rule triggered retrieves them from the DynamoDB table, analyzes them providing the resulting activity, and stores them in a second DynamoDB table. Maybe the decision of using two different tables is a little bit tricky, but I did this to have two separates tables: one for Edge-based mode and Cloud-based mode raw data, and one for Cloud-based mode processed data. You can modify your Lambda function as you prefer.
Using AWS Lambda is quite simple. When you want to create a new function, go to the AWS Lambda console, then click on Create function:
Give a name to your function, then choose your favorite language. In the Permission section you have to choose an execution role for your function, giving it the necessary policy. Notice that you can create personalized roles in AWS Identiy & Access Management (IAM), creating your personalized policy for each role. In this case, I created a role with full DynamoDB permissions.
As before, the same web page retrieves the data from the database. The web page will display the last detection and the stored data for the last hour.
Of course, there are other possible solutions, like AWS API Gateway, if you don't want to use two different DynamoDB tables but you want to get directly the data processed by Lambda.
How the system worksThe code is available in my Github repository and obviously if you want to use it you have to change some parameters as I explained in the previous sections. If everything has been done correctly, you can run the system in the following way (I hope is not necessary to say that you have to be in the right folder for every step :-) ):
- (optional) Run the localhost page typing in one terminal:
>python3 manage.py runserverThe file is located in crowd_sensing/django_web folder - Run your server typing in a different terminal:
>nodeserver.js - With your smartphone, using Google Chrome and the same Wi-Fi that is used from the machine where your server is running, go to your localhost:3000 web app. Choose your mode: edge-based or cloud-based.
- (optional) You can see your data passing through the server and through your AWS IoT Core
- (optional) You can see the last detection and the last hour data in your localhost:8000 web page
- First part - previous project
- Second part - previous project
- Thrid part - previous project
- Github repository
- YouTube presentation
- LinkedIn profile


Comments