
Software apps and online services | ||||||
 |
| |||||
 |
| |||||
 |
| |||||
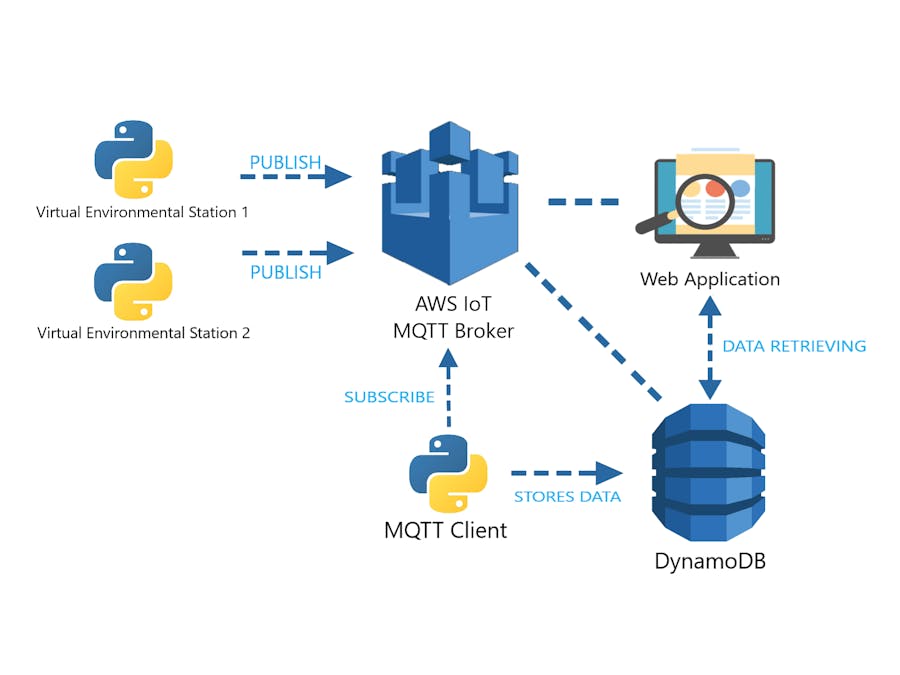
This project is the first part of an assignment for the course of Internet of Things at the Sapienza University of Rome. The aim is to build a Virtual Environmental Station based on Amazon Web Services (AWS) that simulates some sensors (Temperature, Humidity, Rain Height, Wind Direction and Wind Intensity) generating random values from two different stations from a Python script and sending them to a database (DynamoDB) with an MQTT broker. Then these data will be shown on a simple web application (running in localhost for this project). In the section Useful links, you can find the links to the second part, to my GitHub repository and to a YouTube presentation.
AWS IoT CoreAmazon Web Services is a cloud-computing platform that provides a huge amount of services. First of all, you have to create an account, keeping in mind that if you are a student you will have some advantages. Then you can access to the AWS Management Console, which allows you to find every service you need, and search IoT Core.
Follow these steps to create a new Thing:
- when you are in the IoT Core service, click on Manage
- in the Things sub-tab look for Create button, then choose Create a single thing
- give a name to your Thing, ignore other fields and click on Next
- choose One-click certificate creation and click on Create Certificate
Now you have to pay attention to this step because you need to save in a folder the certificates that the system provides to you, they will be very important for setting up the connection with your Thing. You have to download A certificate fort this thing and A private key.
Then near to A root CA for AWS click on Download: you will be redirected to the page CA Certificates for Server Authentication. You have to choose Amazon Root CA 1 and save the certificate that will be displayed in a file with .pem extension. Finally, click on Activate and Done.
Now you can go back to AWS IoT Core home and select Secure tab, then Policies: now you have to create a policy to attach to your certificates.
- in the Policies sub-tab, click on Create
- give a name to your policy, fill Action and Resource Arn fields with " * ", then check Allow box
- click on Create
Once that the policy has been successfully created, go back to Certificates sub-tab, find your certificates and click on the three dots; choose Attach a policy and select the policy you have just created. Well done! The Thing has been properly created on IoT Core. You can find the full AWS IoT Core's documentation here.
DynamoDBNow you need a database to store your data, so go back to the AWS Management Console and search for DynamoDB. Now click on Create table:
- choose a name for your table
- choose a primary key (in this case will be the ID)
- choose a sort key (in this case is suggested to be the datetime)
DynamoDB is versatile, you can create and get items in many ways, for example using a Rule or using AWS Lambda. In our case, everything is done using Python scripts. You can find the full DynamoDB's documentation here.
The codeFirst of all, you need to download the AWS SDK for Python (Terminal: pip install boto3. In the script: import boto3). Then you can set up the connection with you Thing:
You can find your endpoint (ARN) in the Information tab of the Thing you created before.Initialize the MQTT communication in the same function (remember to import AWSIoTMQTTClient):
Start the connection and subscribe to your topic:
It is also possible to check if the connection is correctly working. For doing that, you have to go back in the IoT Core service, choose Test tab and subscribe to a topic: obviously the topic has to be the same that you declare in the code; after that, if you run the simulation you should have the same results in the terminal and in IoT Core:
Then, you can choose a way to simulate the data detection with the virtual sensors. In my case, these data are simply randomly generated, within some ranges:
- Temperature (-50 | 50 Celsius)
- Humidity (0 | 100%)
- Wind direction (0 | 360 degrees)
- Wind intensity (0 | 100 m/s)
- Rain height (0 | 50 mm / h)
The data will be sent to DynamoDB in the same script:
Finally, a web application will display the data stored in the database. In my case it is a simple application running in localhost, created using Django. The web application provides:
- The last detection for each virtual station
- All the data of each station in the last hour
- For each sensor, the data from all stations in the last hour
The code is available in my Github repository and obviously if you want to use it you have to change some parameters like the endpoint and the path of the certificates. If everything has been done correctly, you can run the system in the following way:
- Run the localhost page typing in your terminal:
python3 manage.py runserverThe file is located in django_web folder - Open two other terminals ad run, one per terminal:
python3 environmental_station_simulator.py --clientid station1The script will start to generate and store values.
python3 environmental_station_simulator.py --clientid station2
The file is located in virtual_station folder - The values will be available on the localhost page
Amazon Web Services provides a countless amount of services for every need and you can create every project you want in several ways. I made a simple project in a simple way but if you want to experiment with other paths you can find a huge amount of works, guides, videos and documentation on the web that will help you to give life to everything you want.
Useful links


Comments