

Hardware components | ||||||
 |
| × | 1 | |||
 |
| × | 1 | |||
 |
| × | 1 | |||
 |
| × | 1 | |||
| × | 2 | ||||
Software apps and online services | ||||||
 |
| |||||
Hand tools and fabrication machines | ||||||
 |
| |||||
 |
| |||||
 |
| |||||
 |
| |||||
Mosquitoes lay their eggs in standing water. A farmer near me taught me a trick: if you let the eggs develop but flush the water before they hatch into adults, you wipe out the next generation. Repeat every 4 days for a few weeks and the local population drops to almost nothing.
I set up a small garden pool to attract them. The problem? You have to drain and refill the water every 4 days. Miss a cycle and you're actually breeding mosquitoes. My wife was not happy when I forgot twice.
So I automated it with an Arduino Nano. No chemicals. No citronella. No bug zappers. Just water and timing.
How It WorksThe system runs on a simple 4-day cycle:
- Timer triggers every 96 hours
- Relay 1 activates → 5V submersible pump drains the pool until the float switch reads LOW
- Short delay (30 seconds)
- Relay 2 activates → 12V solenoid valve opens, pool refills until float switch reads HIGH
- System sleeps until next cycle
The mosquitoes are attracted to the standing water and lay eggs. Before the larvae can mature into adults (~4 days), the water is flushed and replaced. After a few weeks, the breeding cycle is broken and the population crashes.
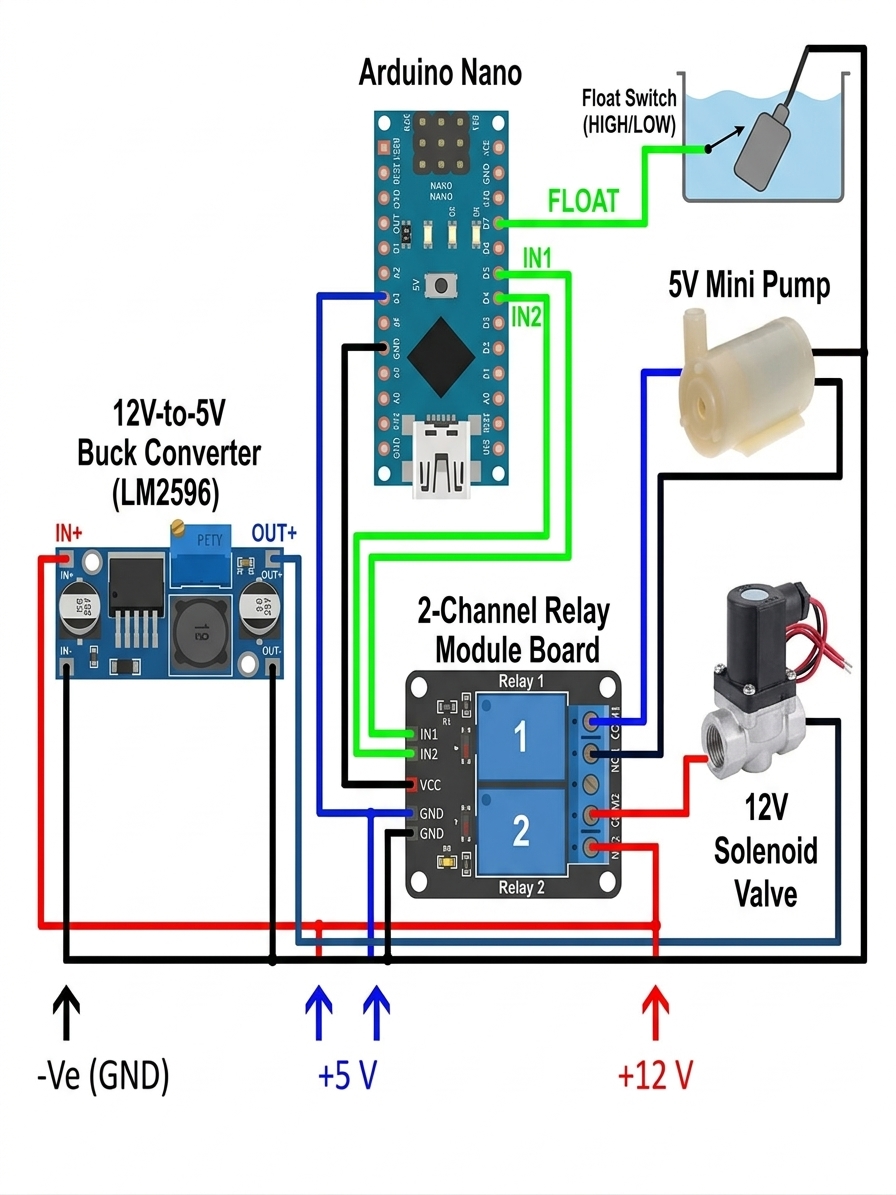
Circuit OverviewThis is a multi-voltage system running off a single 12V power supply:
12V rail: Powers the solenoid valve directly through Relay 2
5V rail (via LM2596 buck converter):
- Arduino Nano (5V pin)
- Relay module logic
- Submersible pump (through Relay 1)
Signal connections:
- Float switch → Arduino digital pin (with internal pull-up)
- Arduino digital pins → Relay module IN1 and IN2
Important: Adjust the buck converter potentiometer to output exactly 5V BEFORE connecting the Arduino. Sending 12V to the Nano will fry it. Learned that one the hard way.
Step-by-Step AssemblyStep 1: Prepare the power supplyConnect the 12V power supply to the DC barrel jack adapter. Wire the positive and negative outputs to two rails: one goes directly to the relay module's COM2 terminal (for the solenoid valve), the other goes to the LM2596 buck converter input.
Step 2: Set up the buck converterBefore connecting anything else, power on the 12V supply and adjust the LM2596 potentiometer with a small screwdriver until the output reads 5.0V on a multimeter. This powers everything except the solenoid valve.
Step 3: Connect the Arduino NanoWire the 5V output from the buck converter to the Nano's 5V pin (not VIN). Connect GND to GND.
Step 4: Wire the relay module
- Connect 5V and GND from the buck converter to the relay module's VCC and GND
- Arduino digital pin → Relay IN1 (pump control)
- Arduino digital pin → Relay IN2 (valve control)
- Relay 1 COM → 5V, Relay 1 NO → pump positive wire
- Relay 2 COM → 12V, Relay 2 NO → solenoid valve positive wire
Step 5: Wire the float switchConnect one wire to an Arduino digital pin (enable internal pull-up in code), the other wire to GND. When water is high, the switch closes the circuit.
Step 6: Connect the pump and valve
- Pump negative wire → GND (5V rail)
- Solenoid valve negative wire → GND (12V rail)
- Position the pump at the bottom of the pool
- Connect the solenoid valve to your water supply line
Step 7: Upload and testUpload the code, open Serial Monitor, and manually trigger a test cycle. Verify the pump drains fully and the valve refills to the correct level.
Setting Up the Pool- Any small container works - a bucket, a plant pot saucer, an old basin
- Place it in a shaded area near where you spend time outdoors (mosquitoes prefer shade)
- If you have recycled house water, use that - mosquitoes aren't picky
- Keep it accessible for maintenance
- Waterproof your electronics. Put the Arduino and relay in a weatherproof enclosure. The pump and float switch can get wet, everything else should stay dry.
- Secure the float switch. If it shifts position, it'll read the wrong level and your cycle won't work properly.
- Test the timing first. Start with a shorter cycle (every few hours) to make sure the drain/fill works before setting it to 4 days.
- Don't forget to refill. If your water supply runs out or the valve fails, the pool stays empty and mosquitoes just go lay eggs somewhere else. The system only works if there's always fresh water to attract them.
After about 3 weeks of running, the mosquito situation in our yard went from unbearable to barely noticeable. We can sit outside in the evening without getting eaten alive. The system runs unattended - I just check it once a week to make sure everything looks right.
Total parts cost: ~$35-40.
I used Make-it to plan this project - it generated the initial parts list, wiring, and code which I then tweaked for my setup.


Comments