


Hardware components | ||||||
 |
| × | 1 | |||
 |
| × | 1 | |||
_ztBMuBhMHo.jpg?auto=compress%2Cformat&w=48&h=48&fit=fill&bg=ffffff) |
| × | 1 | |||
| × | 1 | ||||
 |
| × | 1 | |||
 |
| × | 1 | |||
 |
| × | 1 | |||
| × | 1 | ||||
| × | 1 | ||||
| × | 1 | ||||
| × | 1 | ||||
| × | 1 | ||||
| × | 1 | ||||
| × | 6 | ||||
| × | 1 | ||||
| × | 1 | ||||
| × | 1 | ||||
| × | 1 | ||||
| × | 1 | ||||
| × | 1 | ||||
 |
| × | 1 | |||
| × | 1 | ||||
| × | 1 | ||||
| × | 1 | ||||
Software apps and online services | ||||||
 |
| |||||
| ||||||
| ||||||
| ||||||
Hand tools and fabrication machines | ||||||
 |
| |||||
| ||||||
| ||||||
| ||||||
| ||||||
In Colombia, and the world at large, there is an urgent need to obtain renewable energy resources as ecosystems due to climate change have been affected.
Here is a clear example of the events that can occur due to a lack of renewable alternatives:
During the Cesar Gaviria governmental administration (1992), Colombia suffered energy rationing as the result of a drought. The reservoirs used for the generation of electricity depleted; the phenomenon affected us and left us in a position that, although it was believed that the system was prepared to support it, still the generation of energy was very affected. The constant cuts of the energy supply had affected productive sectors (commercial, industrial), educational and home. In some homes, performance is very restricted (lighting, ventilation, cooling) due to the lack of this fluid, affecting its inhabitants. The high temperatures of the town, make it mandatory to have at least in each house: two fans, a refrigerator, plus lighting during the night. The company providing this service does not provide enough energy as our society needs.
Also, a clear example that we must find more renewable alternatives for energy supply is the current crisis that occurs in my country due to an engineering error which is now in a critical state: Hidroituango, the largest hydroelectric project in Colombia, almost generated the second catastrophe due to the biggest engineering mistakes in history.
In the face of the examples shown above, and adding on the many more that occur in all parts of the world as well as populations that lack conventional electric fluid, there is a clear need to find a solution.
That is why I am entrusted with the task of investigating a little and finding environmentally friendly alternatives that offer infinite resources.
I was intrigued by the need to implement and update the farms, crops and livestock and work hand-in-hand to obtain energy. In other words, my goal was not only to find an alternative to the energy problems but also to implement programmable technologies, to generate and create learning campaigns and, above all, to raise awareness among the citizens of the locality.
The NeedThere is an urgent need to facilitate the work of the field!
It could be said that without technology agriculture would not have even emerged; today, no improvement in the agricultural economy can be expected if we are to turn our backs on precise modern technological systems.
Unfortunately, in some rural regions the backwardness is still secular, so that they could benefit even with seemingly outdated technologies. But let's see some general advantages of the implementation of technology in the field.
It is for all the above that I have been asked: How to design, build and implement the use of technology in agriculture and, in the same way, look for an alternative to generate renewable energy?The Research
After different sketches and designs, as well as a long investigation through the web and institutions of which I was acquiring knowledge on the subject, I came to an idea to achieve with this project.
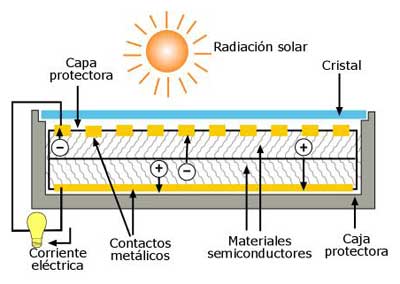
The earth receives 174 petawatts of incoming solar radiation (insolation) from the highest layer of the atmosphere. Approximately 30% returns to space, while clouds, oceans and landmasses absorb the rest. The electromagnetic spectrum of sunlight on the earth's surface is mainly occupied by visible light and infrared ranges with a small part of ultraviolet radiation.
The power of the radiation varies according to the time of day, the atmospheric conditions that dampen it and the latitude. Under acceptable radiation conditions, power equals approximately 1000 W/m² on the earth's surface. This power is called irradiance. Note that in global terms practically all the radiation received is re-emitted into space (otherwise abrupt heating would occur). However, there is a noticeable difference between the received and the emitted radiation. (Wikipedia)
On the one hand, on the subject of agriculture, agricultural productivity is nothing more than the relationship between what we spend to produce and what we obtain with the sales of what is produced.
It seems simple, but it is not so simple. However, something is very clear: the application of technology in the field is a key factor for the increase of agricultural productivity.
The mechanization and automation of processes, the use of certified seeds, the correct use of agrochemicals and the adequate irrigation of crops are the main modern technologies.
On the other hand, the ecological awareness recently operated has brought with it other technologies based on the use of phytochemicals, biofertilizers and natural protection and soil improvement mechanisms.
The field of agriculture needs to be monitored in real time, 24 hours a day. This 100% proved that it is possible to reduce crop losses and increase production if the farmer and the interested party have the correct information on the status of their crop.
It is essential to keep in mind the environmental temperature, the water level of the earth, the humidity, the intensity of the sun's rays, the presence of pests and insects.
A Potential SolutionArriving at the end of this search, a possible solution could be established to mitigate or greatly reduce these shortcomings:
It is planned to build an electrical system powered by solar energy, this captured solar energy is stored in batteries.
As it is evident that solar energy is not enough, it was decided to use the electric energy obtained by the sun to power an electric motor that will drive a neodymium magnet generator in order to greatly duplicate our energy reserve.
The energy obtained in this process is transformed through an inverter in optimal current for domestic and industrial use.
All this system will be stored in a metal box to make it more modular and portable.
In order to reduce noise, our compartment is lined with polyurethane foam.
This system that I have just mentioned is capable of supplying the basic energy needs of a home and likewise has the capacity to feed an entire agricultural system.
The PrototypeTo test the aforementioned idea, make a prototype on a smaller scale of production:
Initially it was started by testing: a 12-volt motor with a frequency of 12,000 rpm; a dry battery of 12 volts, 150 w and a neodymium generator of 24 v, 400 watts, when its frequency is 400 rpm. These tests were carried out in Bank. After some discussion, it was concluded that it was possible to enter the research of the first prototype of the speed variation system for the generation of energy.
After some sketches and models, some pine nut sets were obtained.
Theorizing and using the equation: r1f1 = r2f2 (1). We have:
- r1 = 1 cm Motor pinion
- F1 = engine frequency = 2500
- R2 = 2.2 cm
- F2 = frequency pinion 2
Using (1) you have that f2 = 2136.4 approximately. In pinion 2 we have f2 = 2136.3. This in turn engages in the pinion 3 of radius r3 = 3 cm, f3 =?
Again using (1), f3 = 1,566.6
It was possible to lower the engine revolution of 12000 rpm to 476 rpm, optimal data for the proposed objective, but at the time of assembling the prototype the data obtained did not match the theoretical data.
After several attempts, it was possible to get some sets of pinions and a motorcycle chain of r1 = 2.5 cm and r2 = 1.25 cm, when deciding not to place the set of gears meshed with each other, I went to try with chain as a band since the gears geared to not being functional, also generated a lot of noise. they were placed together with the chain as shown in photo 2 (see photo 2).
To put the prototype into operation, it was necessary to design a compartment to locate each necessary device and optimize the generation of energy from the rotation of the pinions, for which three stages were available:
STAGE 1: the location of the solar panel (95 w, 21 V) has been the device that generates the fuel for our system, the accumulator or battery which stores enough energy for the engine to operate, the load which will be accumulated in the batteries, will keep the engine on, there are indicators that measure the V and A, located on the prototype board designed, this energy is taken from the appropriate solar panels in the locality.
STAGE 2: We find the permanent magnet motor, it works with 12 v, su and the generator, driven by the speed variation system, transforms the mechanical energy into electrical energy using neodymium magnets for the use of the repulsion force generating energy electric This is designed to generate 24 V, 400 watts at a frequency of 420 rpm.
STAGE 3: The electrical energy obtained by the generator is increased or decreased depending on its use by means of an inverter, which changes a DC input voltage to a symmetrical AC output voltage, with the desired magnitude and frequency.
With the help of our awareness group we managed to build the first prototype:
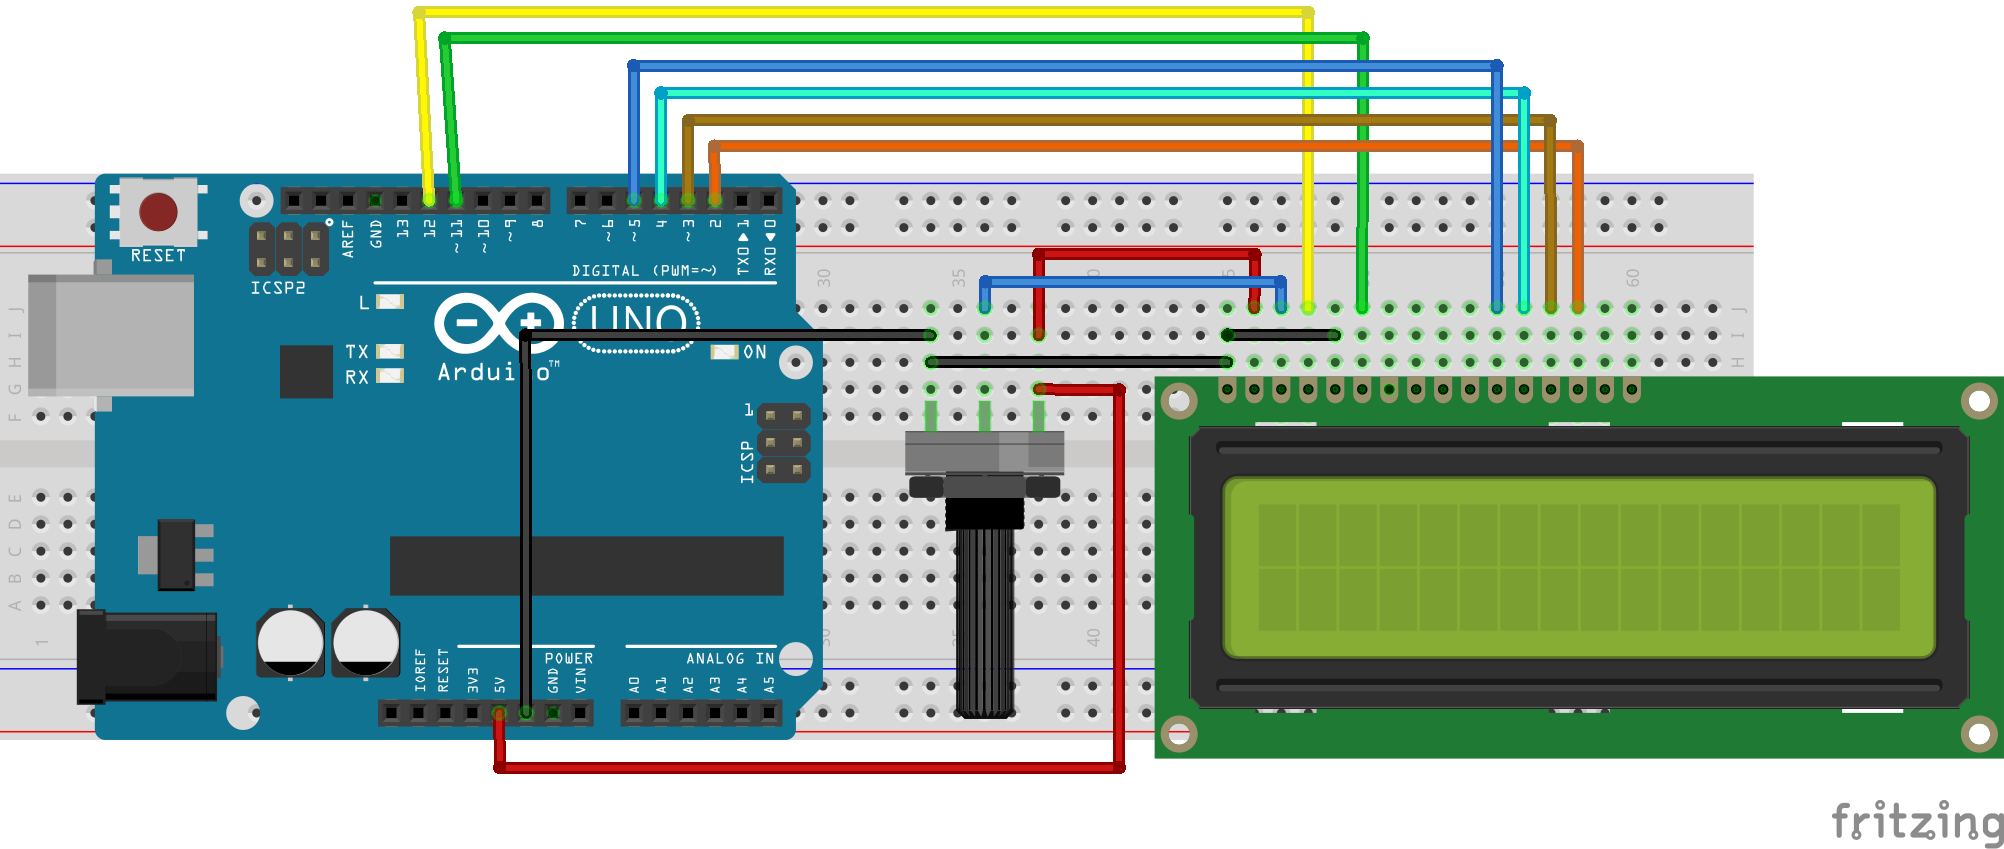
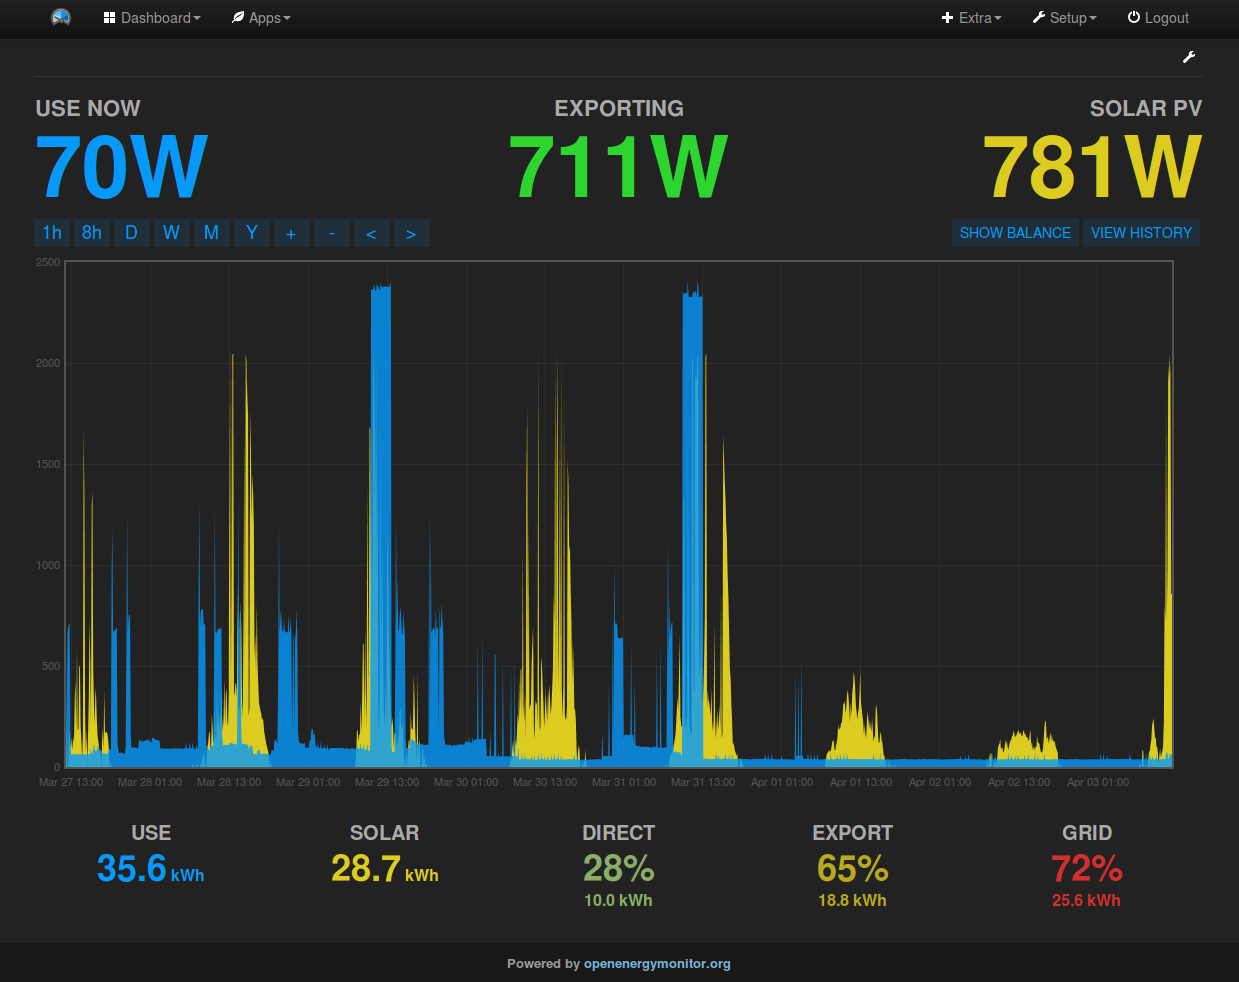
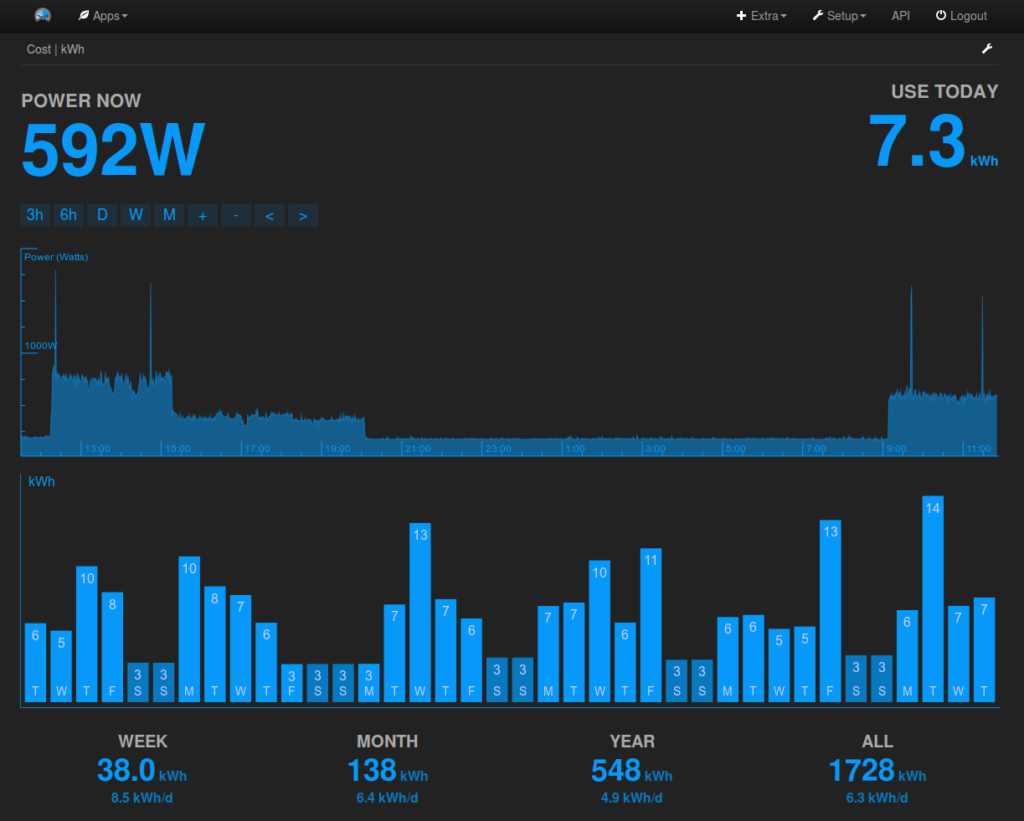
To be aware of the consumption of our electrical system, as well as the energy obtained, its intensity and its energy levels, a tactile LCD screen embedded in the metal box has been designed, which can provide all the basic information in the form of graphics.
Just as the goal is to implement the highest possible technology I am designing and programming an app for our mobile devices to have this information at our fingertips.
Once I have tested and proposed an alternative for the lack of energy, I went into the form of developing a solution for the field.
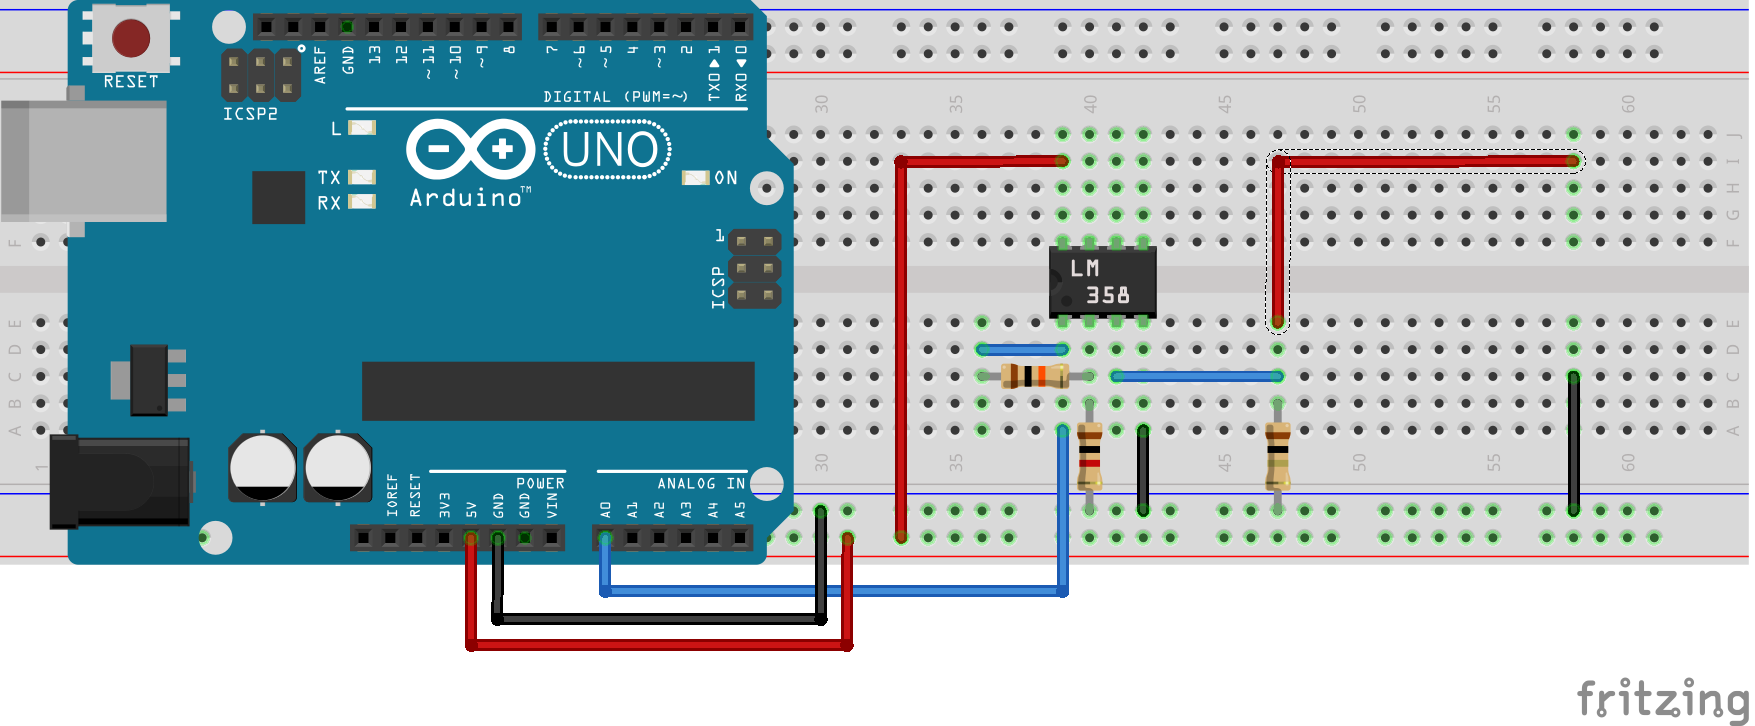
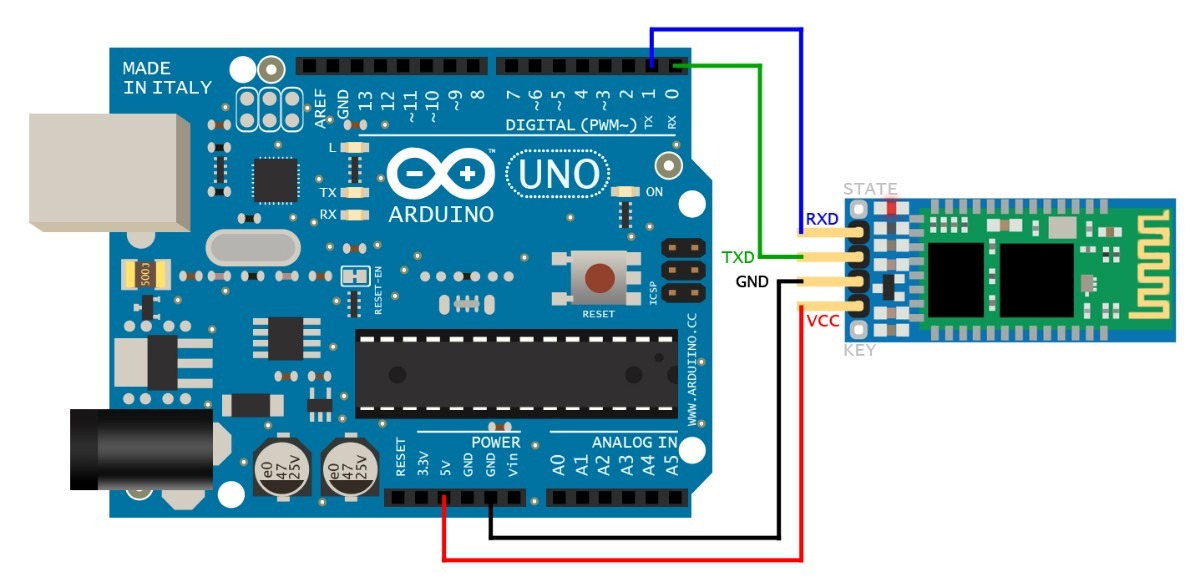
The idea is to use part of the energy of our system to feed a system of sensors and high-precision modules Arduino programmable for the study and data collection and information of our crops:
The basic sensors to use are:
- Temperature and humidity
- Water level
- Soil moisture
- PH
- UV
All these sensors will be connected in a strategic way representing a sector of the harvest, thus creating different zones to facilitate their study and observation.
So that the information reaches the hands of our farmers and those interested, it is necessary to use an Ethernet module to send the data to a station or observation base where a person will receive and visualize in a complete way all the information and in this way make decisions about the situation.
The person in charge of inspecting the received data will be able to give orders to activate automatically and in an electronic way irrigation valves or to execute another task.
The aforementioned energy generation system connected and working hand in hand with our crop system will allow us to automate the field and meet our objectives.
The greatest advantages of this idea:
- Provides electrical power to remote populations that lack it.
- Decreases pollution to 0% in all aspects.
- Automates the work of the field.
- Provides the farmer with information about his work in the palm of his hand.
- Avoids loss of crops.
The development of ideas like these will help us in the following fields.
In education:
- Children and youth will have access to electricity day and night.
- For populations with high temperatures, our children will have the optimal conditioning conditions to study.
- Make the youth aware of the alternatives and new technologies that are currently available.
In the economy:
- It is a system that requires investment but in the long term presents proven profits.
- It avoids, to a large extent, the investment for disasters caused by greenhouses or pests or drought.
- It will greatly reduce the investment of capital to the energy field, since compared to other systems it is less expensive.
In daily life:
- Improves the quality of life of people.
- It will generate an ecological environment.
- Improves the living conditions of millions of people.
This initiative is still in process, you may find better methods, new designs and even many more ideas.
Because I do not have the right resources, I cannot say that it is possible to carry out this project individually.
Our society is in need of ideas and proposals as the one of each of the people that in this contest we are presenting today.
I see the need to transmit my ideas and to teach children, youth and adults each and every one of these didactic and practical teaching technologies.
I would be honored to develop this idea and carry out environmental campaigns at the international level, always carrying the ideal of a planet in recovery with the SEEED team.
I am proud to know that there is a company like yours that cares about our preservation and the care of our planet always hand in hand with technology.
I would like to carry out with SEEED the implementation of this idea and many more in vulnerable populations, bring them that hope that is hosted in the technology.
Again I say it and I will not tire of saying: thank you very much, SEEED, for all the support to humanity, for pushing us to carry out ideas for the good of our planet Earth.
- Gabriel Giraldo (A proud candidate to work hand-in-hand with technology. For a better world.)
My desire is to be an active voice and implement ecological and technological ideas around the world.


Comments