


Hardware components | ||||||
 |
| × | 1 | |||
| × | 1 | ||||
| × | 1 | ||||
| × | 1 | ||||
| × | 1 | ||||
Software apps and online services | ||||||
| ||||||
| ||||||
| ||||||
The AMD Kria KV260 came out April 20, 2021 and started shipping with an orange fan encasing. With it, AMD and its partners released tutorials to build cool projects with it, from facial recognition projects using its onboard custom AI logic modules to bare metal applications in the same year and 2022. It's 2026 and the software has been updated to the latest version, 2025.2, and even the KV260 has been refreshed with a black fan instead of its original orange color. This tutorial is meant as an update and a refresh, to consolidate gotchas, questions and answers from those earlier tutorials.
What are we building?In this tutorial we're building a bare metal application, and custom FPGA logic to take 4K, 30Hz video frames from the TPG, a Xilinx IP Core, and deliver them to the DP port on the KV260. The application implemented in C, will be running directly on one of the Quadcore ARM® Cortex™-A53 MPCore cores (PS layer), and it will orchestrate the TPG and additional IP modules to deliver a cool 4K video of 8 vertical bars with a little black square box bouncing around it. You will need:
Hardware- An AMD Kria KV260 board (the board itself doesn't include any peripherals or power adapters)
- 12V, 3A, 60Hz, 2.5mm AC Power Supply Adapter
- USB-A to Micro USB data cable
- DP Cable
- PC running windows
- A 4K monitor for testing
- Anti-static workstation (mat and wrist strap)
There's a good amount of preliminary set we need to do before we can start developing. Follow these steps!
Physical Set up
- Anti-statics: It's recommended that you set up your board on an anti-static mat (just a grounded mat) and that you ground yourself with a anti-static wrist strap whenever you're working with your KV260. Anti-static kits come with cables that connect to the ground on wall sockets, in the US.
- Connect KV260 Board to computer with Micro USB cable
- Connect KV260 Board to power with the AC Adapter
- Connect KV260 Board to the monitor with the DP Cable
Development environment
- Make sure you have your drivers set up to get serial output from the KV260, if you USB Serial Ports, you should be good
- When you connect the KV260 to your computer with USB, you will see 4 COM ports show up in your Device Manager in Windows
- 'm getting COM 8, 10, 11, 12. Some tutorials say you should get contiguous numbers and under different labels but this is what I get
- Your serial output will come through the lowest Serial Port that shows up for your KV260, in my case that's COM8
- Serial Port is the exact kind of port you want to see the serial output in Vitis, but we'll set that up later. There's some other drivers that are Xilinx or Digikey that I tried but they did not work for me on Windows 11 24H2
Vivado and Vitis
- Vitis and Vivado with the consolidated installed, here: https://www.xilinx.com/support/download/index.html/content/xilinx/en/downloadNav/vivado-design-tools.html
- Make sure you install and save all project and workspace folders in a folder without any spaces
- For example, if you have a user folder in Windows like:
C:\Users\Aldredo Valasco, your paths will be corrupt and vivado and vitis will not be able to run any files within that folder. - I recommend:
C:\, which would create the following folder in Windows:C:\AMDDesignTools - The paths for the applications with this set up would be:
C:\AMDDesignTools\2025.2\Vitis
Running the apps
- The installer didn't install application shortcuts for me so I access them with the command prompt
- It also didn't install the terminal commands system wide for me, but I found a decent workaround, if you have this same issue
- To set up Vitis: Open a command prompt -> Set up the
vitisapp terminal command by running:call C:\[PATH_TO_AMDDESIGNTOOLS_FOLDER]\2025.2\Vitis\settings64.bat - For our example install, it would be:
call C:\AMDDesignTools\2025.2\Vitis\settings64.bat - To open the app run:
vitis - To set up Vivado: Open a command prompt -> Set up the vivado app terminal command by running:
call C:\[PATH_TO_AMDDESIGNTOOLS_FOLDER]\2025.2\Vivado\settings64.bat - For our example install, it would be:
call C:\AMDDesignTools\2025.2\Vivado\settings64.bat - To open the app run:
vivado - Vivado is a very nice Java based app that behaves well in Windows
- Vitis is based on VSCode, and it's pretty unstable. When my computer goes to sleep, the vitis app goes dark and I can't close it. I have to use the Task Manager to end the Vitis task to close it
We're going to split up our development into 2 main parts: 1) designing and implementing our custom hardware/Logic, and 2) writing our software to drive that hardware
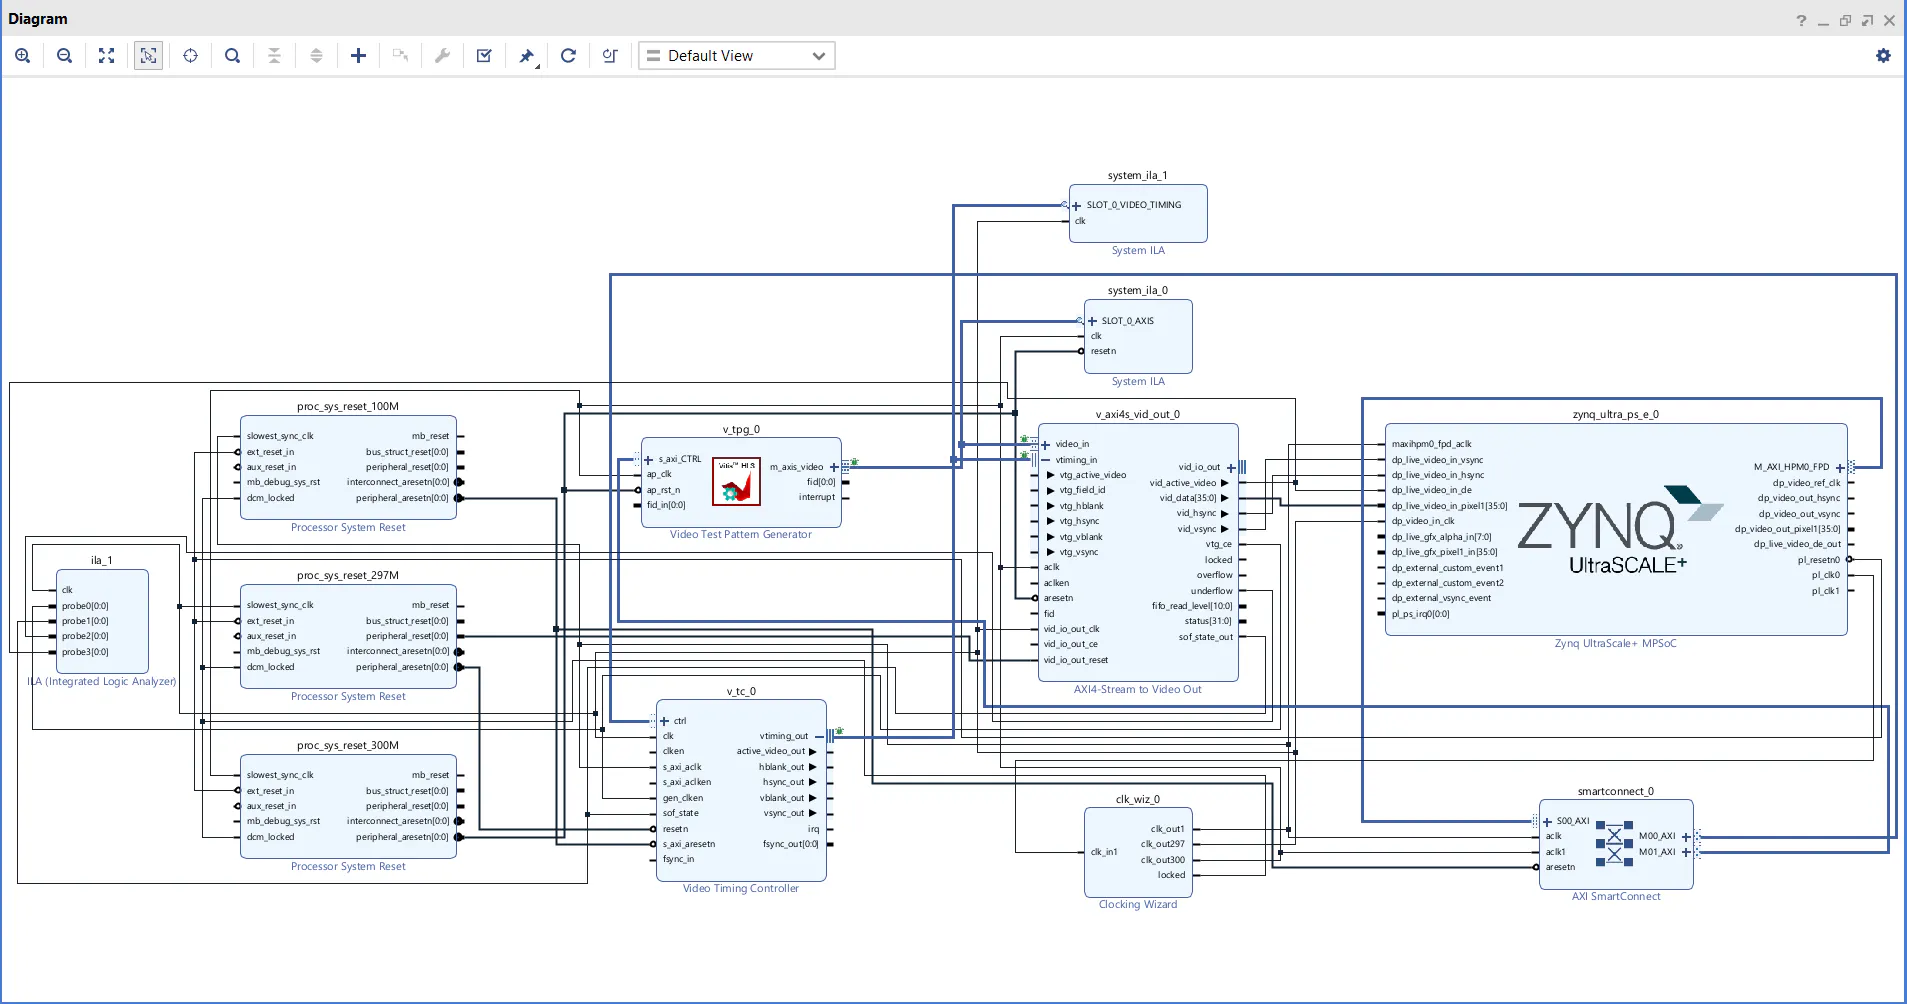
Hardware Design (Pt. 2)We're going to be using Vivado 2025.2 to create the design, synthesize it and export it as an.xsa and.bit files. The main hardware components we'll design with are:
- Zynq™ UltraScale+™ MPSoC Processing System IP - Core component that brings together the PS/PL parts of the KV26 - Exposes the DP connections to the other IP cores
- Video Timing Controller (VTC) - Provides timing signals for video transmission (vertical and horizontal sync and blank signals)
- Video Test Pattern Generator (TPG) - Generates the actual bits we're going to display
Additional components
- AXI4-Stream To Video Out - Consolidates the video signals from the TPG and timing signals from the VTC to deliver clean signals to the core
- AXI-SmartConnect (replaces the AXI Interconnect that can be seen in older tutorials) - Translates software control signals (from our C code) that the Zynq IP outputs for us, to control signals that make sense to the VTC AND TPG, which themselves run on different protocols and clocks
- Clocking Wizard - Will provide our different clocks to run the Zynq IP at one clock, the VTC at another and the TPG at yet another.
- Processor System Reset Module - We're going to have three of these, one per clock frequency. They will be helping us making sure the components at each clock frequency are reset, and started up at the right times when all the other components are ready. They are all connected to each other and to the Zynq IP for master reset, and then each one resets different logic depending on their clocks
- System ILA - Allows us to probe different signals to see them in action in Vivado's Hardware Manager
- We're going to take the Vivado output files and import them into Vitis 2025.2 to build a
platform. - The
platformis going to have all the libraries we need to call on the hardware we synthesized in Vivado and we're going to call on them from ourmain()function - We're going to import
psu_dpmasample code to get the bulk of the boiler plate, and set up from functions to call from ourmain()
This test application will walk you through all the steps you need to take to set up a bare metal application, no Linux/OS set up, only raw microsecond capable compute. From this simpler set up, you can build out different closed loop automations, involving other IPs, GPIO, data transfers, triggers and synchronization with other devices and operating systems.
Once we complete all these steps, you should have the following Test Pattern Generator's output on your screen!


Comments