When accomplishing your projects by using Arduino UNO, has it ever come to your mind that you want to build an Arduino UNO on your own? The idea hit me after designing several Arduino shields (e.g., LCD1602MkrUnoShield and IoT4Car(2)). I tried and it worked. It gives me a feeling of full control over my projects. And I want to share it with you.
Design ConsiderationsThanks to Arduino's open-source nature, we can find the schematics and design guide online easily. This enables hobbyists like me to learn, mock up, and even twist the design based on our own needs. Here are the main resources that I fount useful when studying Arduino UNO. I must acknowledge the developers and makers who shared their knowledge and experience generously.
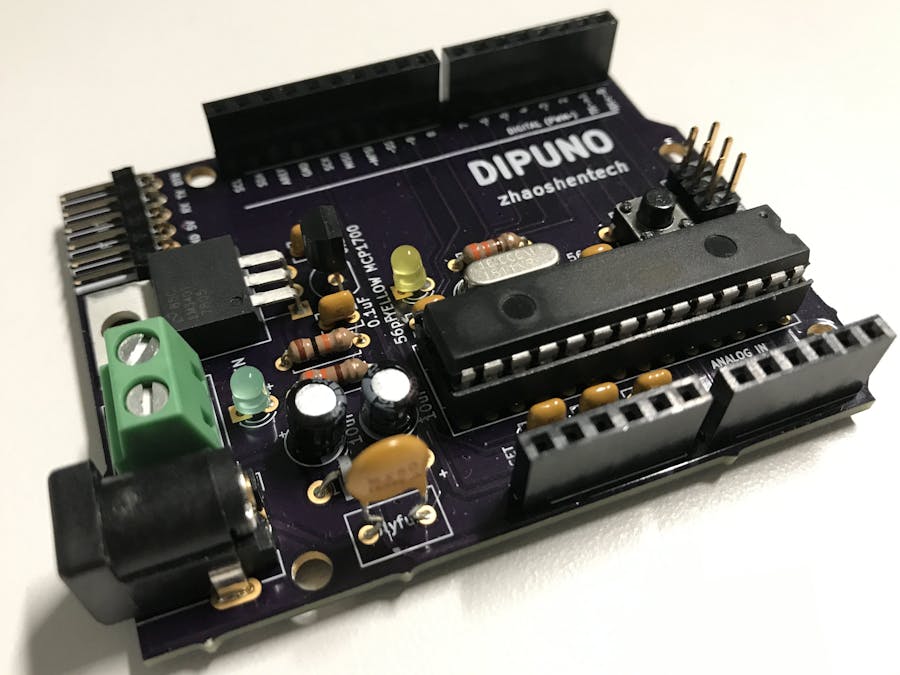
The ATMEGA328 chip has several packages. I limited myself to use the DIP version, so as the title called "DipUno." Other components are also chosen to be through-hole form factor, so that everything can be soldered by hand easily. For PCB veterans, surface-mounting devices are recommended.
However, I couldn't find the DIP version of ATMEGA16U2 that is employed to communicate between USB port and ATMEGA328P. Nor could I find an equivalent FT232RL chip in DIP package. So I gave up and decided to use a separate FTDI module made by SparkFun.
When choosing a crystal oscillator, there will be many options as each of them will have different cap loading. The cap loading of the crystal directly determines the capacitors to be connected in series with the crystal. Adafruit has a good tutorial of how to calculate the value of the capacitors that attach to the crystal. A general rule of thumb is C1, C2 = 2*CL - 2*Cstray, where CL is the crystal's load capacitance, Cstray is the parasitic capacitance and is approximately 2-5 pF. For example, I use a crystal with 16 MHz oscillation frequency and 30 pF cap loading. Assuming the trace has 2 pF parasitic capacitance, the capacitors needed will be 2*30 -2*2 = 56 pF.
The 0.1 μF decaps are used to filter out noises on the power rail. Put them close to the regular and ATMEGA328P VDD pin.
LayoutPCB design is implemented in KiCad.
Screenshot of the PCB Layout in KiCad
The 3D model is rendered by raytracing engine in KiCad. Due to the lack of 3D models of a few components, some parts are missing in the 3D view.
Screenshot of the 3D rendering in KiCad
The PCB was fabricated by OSH Park. It usually takes 10 days to fab, and a few more days for shipping. After get the boards back, and purchasing the required components, the device is ready to be assembled.
Fabricated PCB before assembly
The final assembled board is shown on the top of the post.
Burning the BootloaderTo use ATMEGA328 chip with Arduino IDE, a special program called bootloader needs to be burned inside the chip. There are several ways to burn the bootloader into a chip, many of which require an AVR programmer. However, an existing Arduino UNO board can also be used as a programmer. I followed the tutorial of using Arduino as ISP, and it works well. I borrowed a picture and recap the main points here.
Using an Arduino UNO to burn the bootloader into another Arduino UNO, (source:https://www.arduino.cc/en/uploads/Tutorial/ArduinoUNOtoUNO_ISP2.jpg)
- Open the ArduinoISP firmware to your Arduino board.
- Select the items in the Tools > Board and Serial Port menus that correspond to the board you are using as the programmer (not the board being programmed).
- Upload the ArduinoISP sketch.
- Wire your Arduino boards..
- Select the item in the Tools > Board menu that corresponds to the board on which you want to burn the bootloader (not the board that you're using as the programmer). See the board descriptions on the environment page for details.
- Select the Arduino as ISP in the Tools>Programmer menu.
- Use the Burn Bootloader command.
Upload SketchNow the board is ready to be used in Arduino IDE. Let's upload sketches.
To upload sketch, a FTDI breakout board is mated with the 6 pin headers in our DipUno board. The pin sequence aligns with breakout board pins.
Uploading a sketch to DipUno using USB cable and FTDI breakout board
So far, the DipUno works well, it is the same as an Arduino UNO.
ConclusionThe objective of the project is to learn Arduino UNO more deeply. In terms of fabrication cost, making such a board is not necessarily economical. Buying an Arduino UNO cloned board on eBay is much cheaper. To reduce the cost, you can try to use surface-mount devices, or use perfboard or protoboard instead of a customized PCB.


_ztBMuBhMHo.jpg?auto=compress%2Cformat&w=48&h=48&fit=fill&bg=ffffff)


_4YUDWziWQ8.png?auto=compress%2Cformat&w=48&h=48&fit=fill&bg=ffffff)


_Ujn5WoVOOu.png?auto=compress%2Cformat&w=40&h=40&fit=fillmax&bg=fff&dpr=2)


_3u05Tpwasz.png?auto=compress%2Cformat&w=40&h=40&fit=fillmax&bg=fff&dpr=2)
Comments