

Hardware components | ||||||
| × | 1 | ||||
| × | 1 | ||||
| × | 1 | ||||
| × | 1 | ||||
 |
| × | 1 | |||
| × | 1 | ||||
| × | 1 | ||||
| × | 1 | ||||
| × | 1 | ||||
Software apps and online services | ||||||
 |
| |||||
Hand tools and fabrication machines | ||||||
 |
| |||||
 |
| |||||
The Compost Professor is a smart composting system that helps users create compost. It measures the temperature and moisture of your compost to give you customized readings/analysis. The Compost Professor can tell you:
- What to add ("green" or "brown" materials)
- When to add it
- When to hydrate or turn your composts
- When your compost will be ready for use.
I've made multiple versions of the Compost Professor (this being the 4th). I wanted to improved on use and reduce costs - so I integrated the solution with Alexa. This means that a user only needs to build the hardware to automatically record the moisture and temperature.
I also wanted to decrease the complexity to build the solution, so I created an Adafruit-inspired Featherwing to ease the build process.
Enable the Compost Professor SkillThe first step is to enable the Alexa Compost Professor skill. Follow the prompts to select instructions for a "Do It Yourself" build. You'll get an email with an API Key (which you'll need later on).
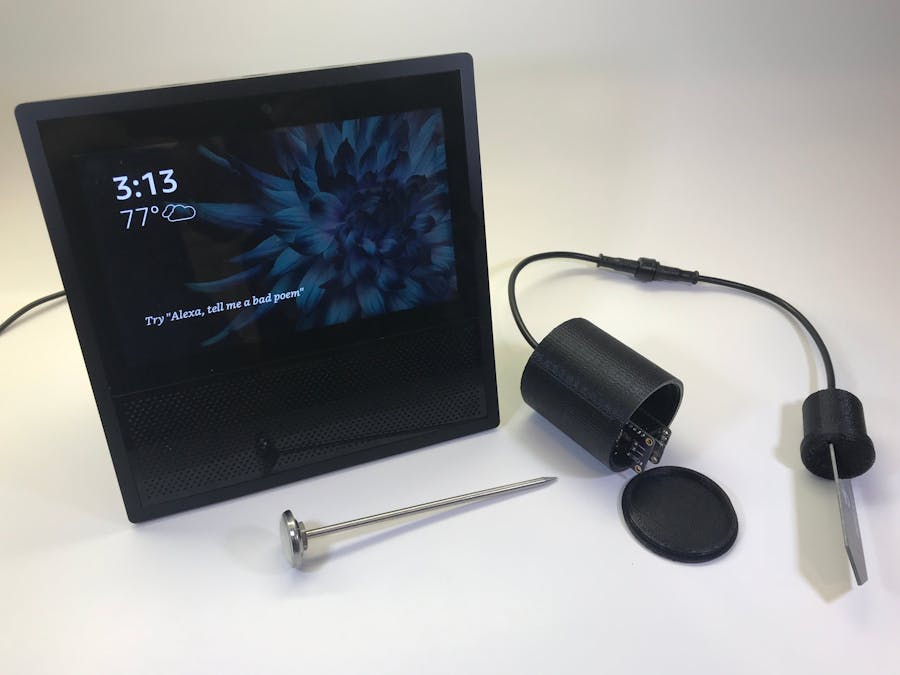
Enclosure/3D PrintingYou should first decide on your enclosure, at this will impact how you solder the sensors to the board. You have a few options:
Cheap Option - Buy a Weatherproof Container
This option is cheaper; however, you'll be limited in how "deep" you'll be able to probe.
Upgrade Option - 3D-Printed Container and Probe with Weatherproof Connector
This option allows you to get better readings as the probe can be inserted into the ground. You can also easily switch connectors if the moisture sensor becomes corroded.
Note - this needs to be printed using ASA filament - which will hold up well to the compost, water, and light. PLA will degrade, so don't use it.
Solder and Assemble
The assembly is straight forward. The Featherwing has indicators to where each component goes, with a few extras.
- I've added a holder for an LED if you wish to add one for status. This isn't required for use
- I added a holder for a photoresistor (if you wish to record the amount of sunlight).
I attempted to make this easy to solder; the only change you may have is with the TPL5111 timer. I found that using flux and a solder wick to clean up bridges helped.
You'll need to solder the thermistor and moisture sensor as appropriate for your container. You should use a hot glue gun to seal the openings around the thermistor and the temperature probe.
Notes:
- The DFRobot moisture sensor comes with a connector, which you'll need to strip in order to solder to the board or the 5 pin connector.
- You can use multiple battery options for the solution. I used LIPO batteries (as I had a few lying around). You can use just about any size if you go with a tupperware container. The 3D printed container will only hold small LIPO batteries (https://www.adafruit.com/product/1578)
The code is straightforward, though you will need a few things to get started
- API Key - you can get this via the Compost Professor Alexa skill. Prompting for instructions will have a key sent to you
- ZIP Code - this is used to determine if rain is in the forecast
- Open/Close option - this is used to determine if weather should be factored into analysis (e.g. - if you're compost is dry, but rain is in the forecast, then no action is needed for an open bin as the rain will hydrate the compost)
- Dimensions - used to track how much compost you are creating (future enhancement)
When you're done, inset the probe (or the container) into your compost. It will take readings every 30-45 mins. After a few hours, go back to the Compost Professor skill in Alexa and you should have readings available for review.
The Compost Professor needs about 4 days of data before it starts to make recommendations, so check back after a week to get custom recommendations for your compost.


Comments