


Hardware components | ||||||
 |
| × | 1 | |||
 |
| × | 1 | |||
 |
| × | 1 | |||
 |
| × | 1 | |||
 |
| × | 1 | |||
| × | 9 | ||||
Software apps and online services | ||||||
 |
| |||||
We all wish (once we turn 21) we could have Daniel (one of our wonderful lab assistants) to shadow us during our night out, counting each of our drinks to make sure that we don’t drink too much. Unfortunately, Daniel is a busy electrical engineering student with many problem sets and textbook chapters to get through, so he isn’t always available to be our drink wingman. Well, if you’re feeling just as sad as we were about not having Daniel at your beck and call, have no fear! Team Y.tu4pm has a solution for you! We have created Daniel™, a device that counts drinks for you as diligently as Daniel would!
How to BuildStart by getting all of the hardware you see in the hardware section. You won’t need everything from the booster pack, but if you get it you will have everything you need.
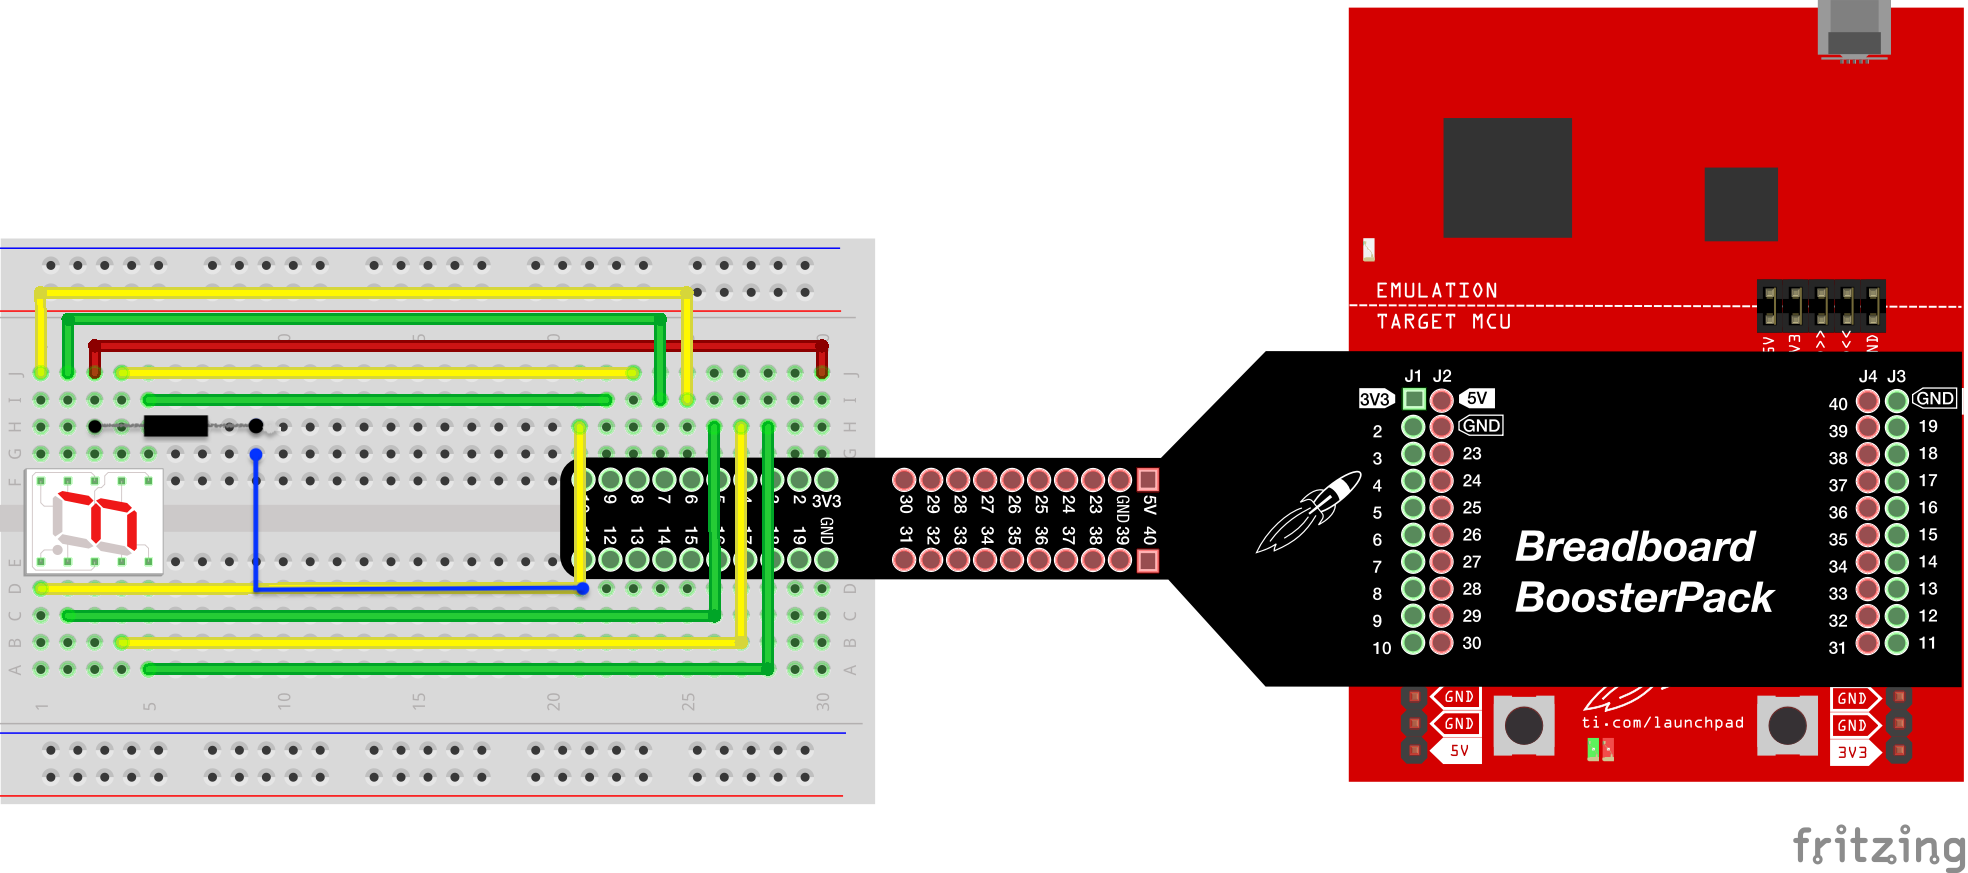
To start, follow the schematic (pictured if you scroll down a bit) and wire up your breadboard! Make sure the long leg of the tilt switch is connected to 3.3V, and the short leg connects to pin 11.
Next, read through the code (also pictured if you scroll down a bit) and make sure you understand it.
Then, open up your friendly C compiler and paste the code in. Compile it, verify it, upload it to your board, and you are good to go! Follow the “How to Use” directions carefully so that you know exactly how to use your beautiful new drink counter, Daniel.
How to UseStart by setting your drink limit on the device. Lay it flat on the table, and check that the blue LED is lit up -- this signals you are in "Limit Entering Mode." Enter your limit into the device by pushing its button until the seven-segment display shows your desired limit. Note: Both the counter and limit have a maximum value of 9!
When you are ready to start counting your drinks, hold the device vertically off the table. The blue LED should turn off and the green LED should light up if you have correctly chosen a limit, signaling that you are in "Drinking Mode." For each drink you have, press the button once. The display will update with your current number of drinks, and the LED may change state depending on how close you are to your limit according to the following rules:
- Solid Green LED -- You are below your limit and are good to keep going.
- Rapidly Blinking Yellow LED -- You are one drink away from your limit. Be careful!
- Slowly Blinking Red LED -- You are at your limit or have surpassed it and should stop drinking.
- Blue LED - You are back in Limit Entering Mode, and can change your limit if necessary.
As noted above, you can change your limit midway through by laying the device flat on the table again. The blue LED will light up and show you are in Limit Entering Mode, and you can press the button to increase your limit (up to 9) or, if you want to lower your limit, you can increase the counter past 9 and it will drop back down to 0 on the display.
For example, if you know that you should stop drinking after 3 drinks, you would place it on the table and press the button until the display says 3. Now, the device is ready to be used on your night out. Every time you finish a drink, you hold it vertically and press the button and the 7-segment display will display the number of drinks you are at. When you are at two drinks, the LED will rapidly flash yellow, warning you that you are close to your limit. When have had 3 drinks, the red LED will light up and blink slowly, telling you that you should definitely, without a doubt, stop drinking. If you realize you want more than three drinks, you can lay the device back on the table and increase the limit to a new value (five, for example). When you pick it back up, the LED will change based on the table above. It is only intended for users who are 21 years of age and older, of course. In essence, our project emphasizes safe and responsible drinking.
Daniel In ActionNow you are fully capable of counting your own drinks, without Daniel's help. However, if you are ever lucky enough to get Daniel to take a study break and go out with you, you may catch a glimpse of him looking like this!


Comments