

Hardware components | ||||||
 |
| × | 1 | |||
 |
| × | 1 | |||
| × | 1 | ||||
| × | 1 | ||||
| × | 2 | ||||
Software apps and online services | ||||||
 |
| |||||
| ||||||
 |
| |||||
Hand tools and fabrication machines | ||||||
 |
| |||||
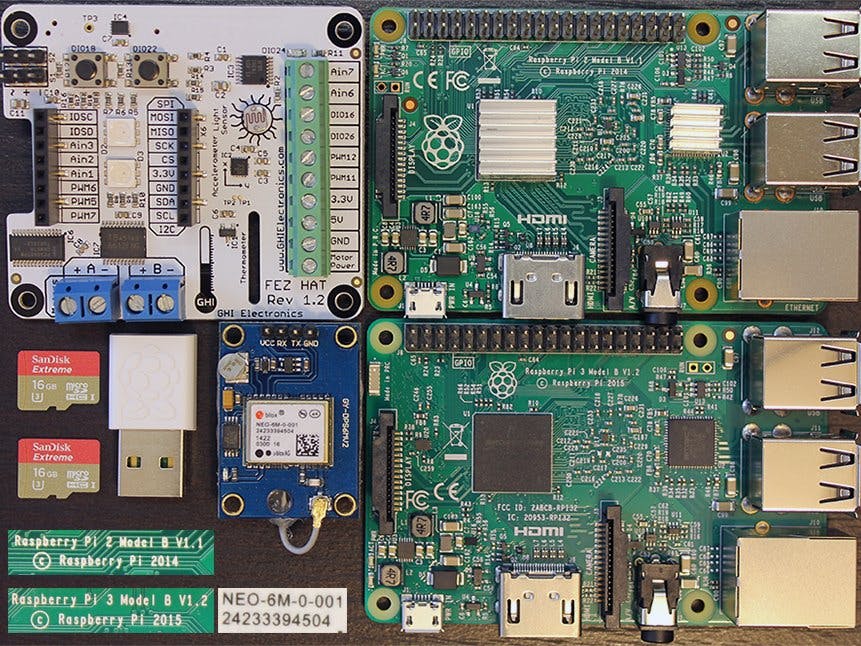
Please note that we prepared this tutorial with Raspberry Pi 2B and Raspberry Pi 3B as the Windows IoT devices. Even though we haven't tested it in other boards, we assume that the same procedure should work with other boards that support Windows IoT.
Another piece of hardware we use in this tutorial is FezHat. Fezhat is a very well made board that fits on top of the Raspberry Pi (like a hat). One very important thing to notice about plugging in the FezHat is that, it's important to secure the other end of the hat, so that it doesn't sag and touch the HDMI port from the top. You'll know what we're talking about once you plug in the hat. If in case you don't have the FezHat, that should definitely not stop you from continuing with this tutorial. The main point of this tutorial is to upload streaming data to the Azure IoT hub that the device collects. So any kind of sensor data that could be collected in a timely manner would work just fine. For us, FezHat provided temperature, light level, accelerometer, analog ins and PWM outs with ease. We chose to connect the FezHat to the Raspberry Pi 2B, your choice might vary. Since the Raspberry Pi 2B doesn't have a built-in WiFi we connected USB WiFi module to it.
Let's begin by gathering all our hardware. We recommend setting everything up within arms reach, as shown on the cover picture of this tutorial.
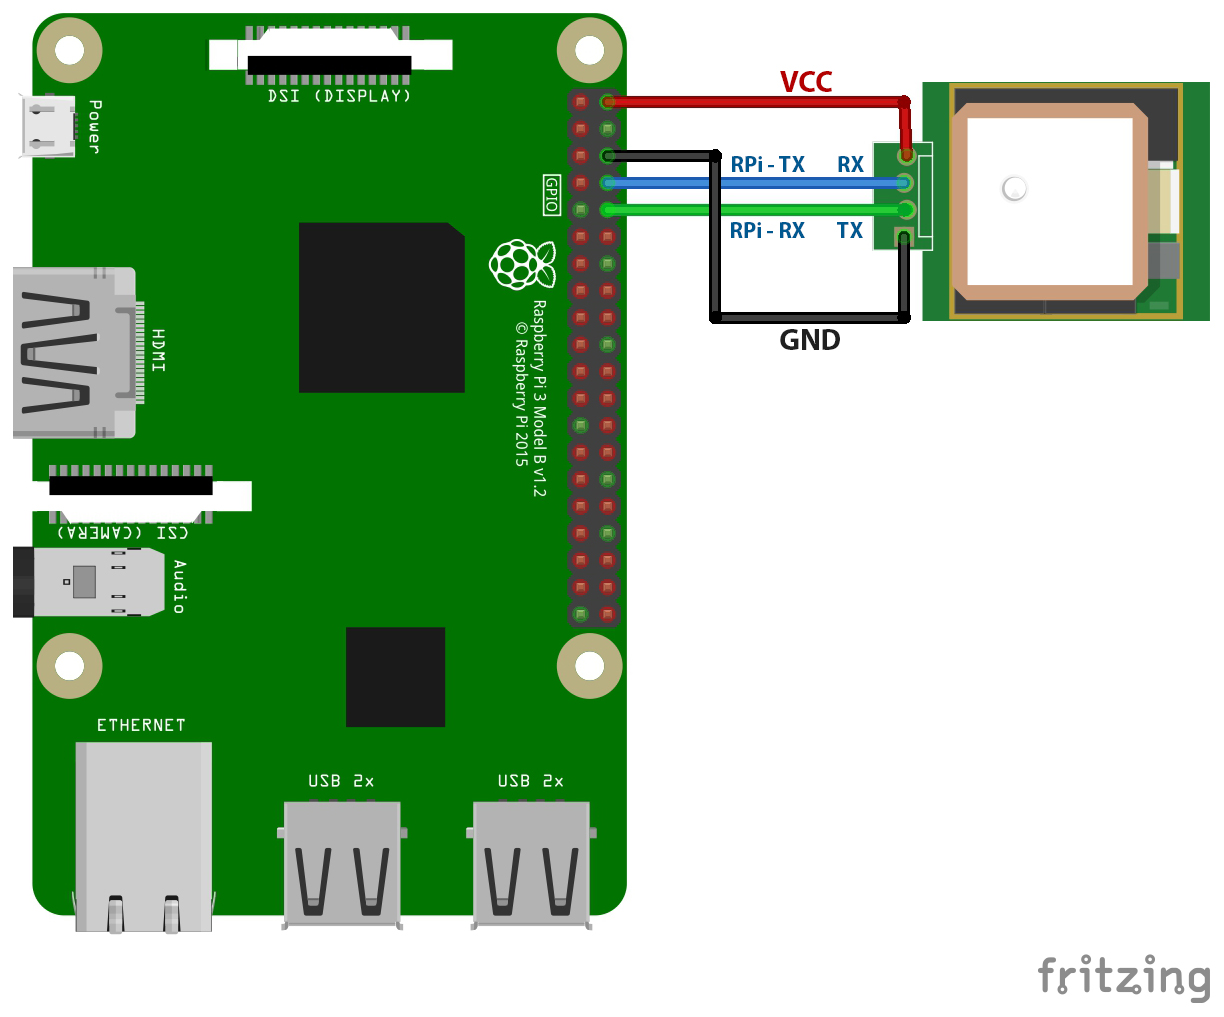
Now let's go over the Raspberry Pi (3B) and the GPS module. The u-blox Neo-6M breakout board has UART serial output pins. In our opinion, these are the easiest pins to work with. But don't forget to connect TX of GPS module to RX of Raspberry Pi (pin number 10) and RX of GPS module to TX of Raspberry Pi (pin number 8). Check out the schematics below to clear any confusion.
Step 1Next let's prep the SD cards for Windows IoT operating system installation. We highly recommend SanDisk Extreme micro SD 16 GB HC 1 card. We actually tried this particular step with five different cards of different brands and timed it. The results were hilarious. Some other cards (even SanDisk regular one) took several hours ranging from 3 to 9 hours for the OS to be installed and updated. This one takes around 35 minutes. No kidding! Try it out! Sadly enough, all those times it took longer we were cursing Raspberry Pi for being so sloooow. Sorry Pi! Our bad!
Microsoft has made it super easy to install their new Windows IoT core OS in an SD card. Just download their new Windows IoT Core Dashboard from https://developer.microsoft.com/en-us/windows/iot/downloads and install it in your main PC.
Once installed successfully, navigate to the 'Set up a new device' link on the left panel. Here you'll give your device a name. This name will be used to identify your device in the network.
When you press the 'Download and install' button, you'll see a progress bar for the OS being downloaded. In our case it was 649MB at 99%, as shown below.
After the download completes, the flashing process begins. This is where you can test your SD card performance, because this process is pure write. In our case it literally took 25 seconds. Which compared to others is blazing fast. Wow!
If somehow your installation doesn't work or crashes, you might have to re-image or reinstall the OS. In those scenarios don't forget to format the SD card first. Once again, we recommend SDFormatter V4.0, with the setting shown below:
After the SD card has been formatted, repeat the process of installing the OS using Windows IoT Core Dashboard.
You're going to want to have two 5V 2Amp power sources ready to power the Raspberry Pies (What do you call more than one Raspbery Pi? Pis? Pies?). For the first boot we also recommend having an HDMI monitor, keyboard and mouse, and an ethernet connection. Although you can totally run Raspberry Pi with Windows IoT completely headless, trust us when we say having a monitor and ethernet connectivity speeds up the process.
Step 4Now its time to insert our finely prepped SD cards into their respective hosts. You might notice subtle differences between the loading mechanism in the two different Pies at this time. Raspberry Pi 2B has a spring-loaded loading mechanism, whereas Raspberry Pi 3B does not. (To be honest, at first we thought our Raspberry Pi 3B was broken. But later we realized that that's how the latest RPis were designed. Trust us, we don't even notice these differences anymore.) Ok! Now let's move on to powering up our Raspberry Pies. Let's start by powering up the Raspberry Pi 3B first.
Step 4The first thing you'll notice on the HDMI monitor is the metro skewed windows logo with a loading ball/ring, which in a strange way provides gratifaction. Just imagine a scenario where you had to stare at that static logo without any feedback.
After that screen you'll receive a welcome message from the Windows IoT team, which we like a lot. Thanks guys!
After a few seconds you'll be taken to the language selection page. You'll notice something strange here. The name of the device shown at the right panel is "minwinpc". "Oh gee, whatever happened to the name I gave to the device through the dashboard while imaging", you might think.
Don't worry, just be patient and wait at this window for a while (in our case it was 11 seconds). Suddenly, your Raspberry Pi will reboot again without any warning. At this point, it's best to just let your Pi do it's thing. Windows IoT Core is in active development, so who knows by the time you try this out it might just start with the name you provided at the dashboard.
There you go! This time windows booted with the device name properly setup. Now just choose the language and click 'Next'. In the next screen you will be prompted to enter the WiFi security credentials. If for some reason you fail to set the WiFi password now, you will be able to reset it through the Device Portal later.
After setting up the WiFi/Network you'll be taken to the device's Main Page.
There are two very important things to take note of on this page: the Device name and the IP address. This IP address is what you'll use later to connect to the device either through the device portal, through remote client access, or through the Power Shell client.
If you haven't been simultaneously setting up your other Raspberry Pi, then now is the time to repeat the same steps with that device. Return to this point in the tutorial once the Main Page comes up.
Now move your attention to your main PC and launch the Windows IoT Core Dashboard. If you installed your Raspberry Pies into the same network that you have your main PC in, you'll see your devices listed in your My Devices page. (You can navigate to this page by clicking on "My devices' on the left panel).
Right-click one of the devices and choose 'Open' in the Device Portal. This will launch your favourite browser window with Windows Security alert. Enter 'Administrator' as your user name, and the password you used to setup your device in the Device Dashboard earlier.
Once you enter your credentials, you'll be able to access your Device Portal. From here you can change all the settings for your device. This feature is super cool. Hats off to you Microsoft IoT team.
Now lets change some settings, shall we? First change the Time zone settings to your current time zone. After that, change the Device Resolution to your choice. This might prompt a restart. Comply.
Now, enable the Windows IoT Remote Server. This feature will come in handy later, we promise!
We're almost done setting up our Windows IoT Core OS. At this point sit back, relax, and let your device update by clicking 'Check for updates'.
Once the updates are downloaded, they will automatically be installed.
Once the updates are successfully installed, your device will prompt you to restart. Click 'Restart' now, and be patient. Warning!! This is where having a headless device and not knowing what's happening in the background can cause some panic. We lost our patience several times and unplugged the device before we figured out what was going on in the background, and had to repeat this whole process over and over again (that was when we were working with other slower SD cards). Thankfully, we figured out what was going on. We made those mistakes so you won't have to. You're welcome!
So trust us when we say that the gears are spinning in the background, which is hard to see when you're running a headless device. This is when the updates are being reconfigured and actually being installed, which can take from 15 minutes to several hours. This is when you'll really be thankful if you upgraded your SD card to SanDisk Extreme. (No, they're not paying us to say that.)
After all the updates are successfully installed your Device Portal will miraculously spring back to life and show this immensely satisfying message.
Don't forget to update all your devices. At this point, we recommend you shutdown all your devices and unplug your HDMI plugs, keyboards and monitors. You won't be needing them for a while. We also recommend getting a pair of USB Battery packs and going mobile.
That's it! We've completed half of the journey. *Fist bump*
Step 10Now let's move our attention to the Azure Portal and Visual Studio side of things. First, open up portal.azure.com and navigate into the IoT Hub from the left panel. This is where we left off the Azure Portal in Tutorial 001 - Setting up Azure for IoT. At this point, you'll want to click on 'Shared access policies'. From the list of policies, choose 'iothubowner' and copy the Connection string-primary key as shown on the picture below.
You are now ready to start coding. Yes! If you do not already have Visual Studio installed, go to www.visualstudio.com to download and install it. We recommend Visual Studio Community to start with. It is free for non-commercial use, so make use of this free service until you get the hang of it and/or start selling your products/services.
So, now you have a fresh copy of Visual Studio installed into your computer. Or you might have it already installed. Either way, it's time to launch it and create a New Project. For this particular application we are going to create a Console Application.
Create a blank Console Application and save it in your preferred location.
At this point, your code window should look like this:
Right click on the project file at the Solution Explorer on the right panel and select 'Manage NuGet Packages' from the drop down menu.
In the NuGet Package manager window, go to Browse and search for Microsoft.Azure.Devices. Click 'install'.
NuGet package manager might prompt you to review changes and ask for your permissions. Accept all changes and install the package. Once the package is installed you might be offered some updates based on the package that you just installed. We recommend you keep everything up to date. It's just a one time thing and it keeps your applications up to date and secure. Consider it good housekeeping.
Just in case you didn't know, we installed those packages into our application to make use of the Namespaces packed into them. We'll use these Namespaces to import the classes through using statements.
After installing the NuGet packages, the console application that we just created is ready to make use of the RegistryManager class. This class is used to add/remove the devices to/from the Azure IoT Hub device registry. In the code section of this tutorial we have provided a code sample that we used to develop an application that can access the device registry and make changes to it.
At this point we suggest you to look into the code and try to build something similar so that you can access and make changes to the Azure IoT Hub Device Registry.
With the help of this application, you can give some well thought out Device IDs to the Raspberry Pies.
ConclusionsHooray! We finally reached the end of this tutorial. By the end of this, your Azure Dashboard should look similar to this:
Take note of the number of devices in the IoT Hub section.
That's all for now! In the next tutorial, we'll show you how to make use of your Device ID and generated Keys to collect data from your devices and stream it into Azure IoT Hub.
See you soon!


Comments