

Hardware components | ||||||
 |
| × | 1 | |||
 |
| × | 1 | |||
| × | 1 | ||||
| × | 1 | ||||
| × | 2 | ||||
Software apps and online services | ||||||
 |
| |||||
| ||||||
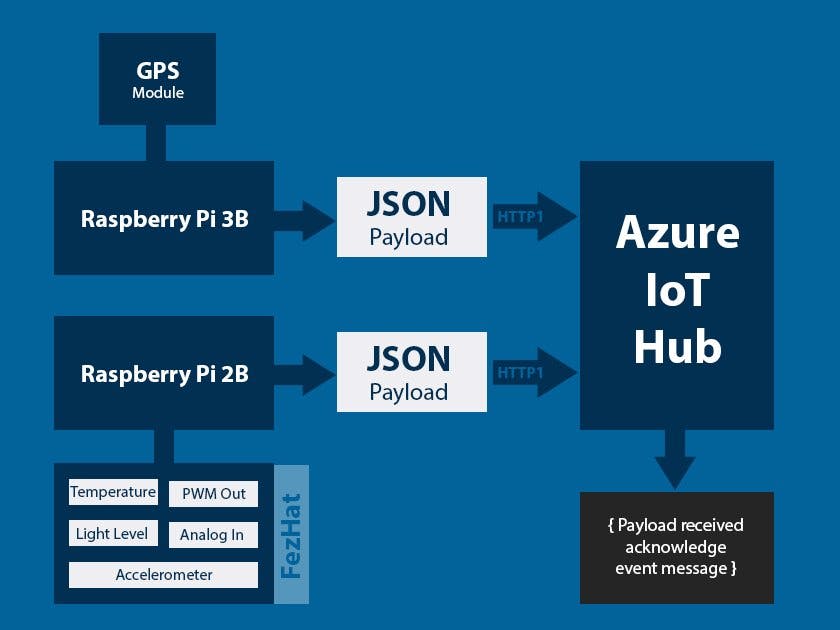
Welcome to the third part of our tutorial series. In this section we are going to show you how to stream your device data to the IoT Hub. Later in this series we'll also show you how to store that data, run some stream analytics on it, and control your other devices with commands received through the Event Hub in the form of messages.
Preface:To be able to follow along with this particular tutorial you will need a certain level of programming proficiency. Specifically, you should be comfortable with looking up resources and overcoming issues as they arise. If you're uncertain about either of these, don't worry. The internet is absolutely flooded with free learning resources. One such fantastic free resource is the Microsoft Virtual Academy. Many people (including us) have benefited from the MVA. They have really amazing courses on C# and Universal Windows Platform (UWP) applications. The programs that we'll be running on the Raspberry Pi are generally UWP applications, so you'll also want to be comfortable with those. Learning to design an interface with the help of XAML and to control the program in the back with C#.Net is going to take you a long way. Trust us on this one. With all that said, get ready to plug in and play with some really cool .Net constructs using the beautiful and ever useful programming language C# and the IDE that makes it all humanly possible, Visual Studio Community 2015.
Getting startedIf you've been following along with the previous tutorials then you have almost everything you need setup to move ahead. Let's start by doing something that we haven't done before: create a blank Universal Windows application and give it a name that reminds you of the Raspberry Pi you'll be running it on. For this tutorial let's start with the app for Raspberry Pi 3B, the one which has the GPS module hooked up to it. We'll be streaming GPS data to our IoT Hub first.
Choose the version of UWP that you'll be running your app in. Your preference at this point might vary depending on the version of Windows you have.
After you click 'OK' your new blank application will load in the Visual Studio editor. This is the design interface you'll be putting your design elements into (buttons, images, maps, text boxes, etc). You might want to browse the MainPage.xaml file from the Solution Explorer in the right panel. And don't forget to change the resolution setting. In our case, we set it to 1024x768 landscape because of the monitor we have hooked up into it.
Next thing you'll want to do is to enable this application to have IoT capabilities. We do this by right clicking on the References and choosing 'Add Reference', then specifically adding Windows IoT reference.
After you're done enabling IoT capabalities you'll want to setup a Deployment Target. This is the device on which you want Visual Studio to debug your application.
Now lets take a look into the code behind. The code behind is the C# code that controls the program flow and interacts with the visual elements from the interface. The code behind file for MainPage.xaml is MainPage.xaml.cs. Keep an eye on the MainPage default constructor. This is where the UWP application that we just created enters execution (kind of like Main() method in the console application). This is where the visual interface is being initialized.
As the deployment target has now been set, we recommend you run the program by pressing the green forward arrow. We're testing to make sure everything is working at this point. There are a few places where things might go awry, but if you have been following along precisely we can confidently say that the program will successfully execute on your Raspberry Pi 3B. Take a look at your HDMI monitor (if you have your monitor connected to the RPi). If you do not, then remote into the RPi using Windows IoT Remote Client. (What's that you say? We haven't explained how to do that yet? Ok! Lets divert our attention for a minute here and show you how to install and run Windows IoT Remote Client).
Go to the Microsoft Store and search for 'Windows IoT Remote Client':
Install the app and run it. Then select one of the discovered devices through the drop down menu and connect. If the device doesn't show up just enter its IP address in the text box below.
When the Remote Client opens you'll be able to see the Raspberry Pi 3B's desktop. (Cue little Ana from the Frozen movie: "This is amazing!")
Now let's get back to running our UWP application on Visual Studio. Once you run the application you'll see a blank window on your Remote Client window. This is because we haven't added any visual elements to our application yet. Here is yet another point where having patience comes in handy. Just so you know, running the program in a remote machine might take a little bit longer than running it locally. So channel your inner zen and let Visual Studio do its thing. It will get it done eventually, we promise.
This is how Visual Studio looks when the program is running remotely. You can press the Stop button anytime to stop the application from running.
Now let's install some NuGet packages into our Application. If you have been following along, by now you should be able to install NuGet packages. You need to install these NuGet packages: Microsoft.Azure.Devices.Client, Newtonsoft.Json, and Microsoft.NETCore.UniversalWindowsPlatform.
Run the blank application once again just to make sure everything is working after all these updates. Just checking! Better safe than sorry.
Now is the time we recommend you stop and repeat all of these steps with the other Raspberry Pi; i.e., Raspberry Pi 2B with FezHat attached to it. Run the blank app in it and remote into its display through the Windows IoT Client. It's important to make sure everything is working with both the Raspberry Pies before you continue.
At this point let's move on to the next level of working with the code. This is the code that will collect the sensor data, package it into JSON formatted payload, and deploy that payload to the Azure IoT Hub. Since we have two different devices and two distinct code bases we've decided to divide this tutorial into two sub tutorials:
We recommend you check those out now. After you're finished setting up your devices for streaming data, you can come back to this point and complete this tutorial. We'll be finishing up by developing a Console Application that will be used to monitor all the IoT Hub's incoming messages.
Developing a Console ApplicationReady? Ok. Let's start by creating a blank console application in Visual Studio.
Install WindowsAzure.ServiceBus NuGet package into this console application.
Now you're ready to import the Microsoft.ServiceBus.Messaging namespace into your application, making use of the using statement. This namespace contains classes like EventHubClient which is used to receive messages from the Azure EventHub.
With this done, you're now ready to start writing code. The code for this particular application is provided in the code section of this tutorial. The code is well commented so we hope you won't find it difficult to embed it into your own application.
After you're done writing the code you should run it in your main PC so that it will constantly monitor your IoT Hub transactions. This is how the console should look like once it starts receiving the messages.
To be clear, the messages that you intercept/monitor using this particular application are actually acknowledgement messages. Azure IoT Hub, when it receives any kind of telemetry data from any device that's registered into its registry, sends out this acknowledgement message.
With successful execution of this application you'll see messages sent from both of the Raspberry Pies being monitored at this one central location. At this point, since both of our Raspberry Pies are already streaming data, we thought we'd include screenshots of the final working systems. Enjoy!
We hope you find this application useful. Seriously, don't hesitate to send us a message if you get stuck. We'd be pretty psyched to hear from you.
In the next tutorial, we'll run some stream analytics on our data stream and store it in a blob storage.
Bye for now!


Comments