

Hardware components | ||||||
 |
| × | 1 | |||
| × | 1 | ||||
| × | 1 | ||||
| × | 1 | ||||
Software apps and online services | ||||||
 |
| |||||
Summer is all about extreme weather. There are storms, extreme ultraviolet radiation and other interesting weather related phenomena.
A couple of months ago DigitSpace offered me a voucher to use it for components in open source projects
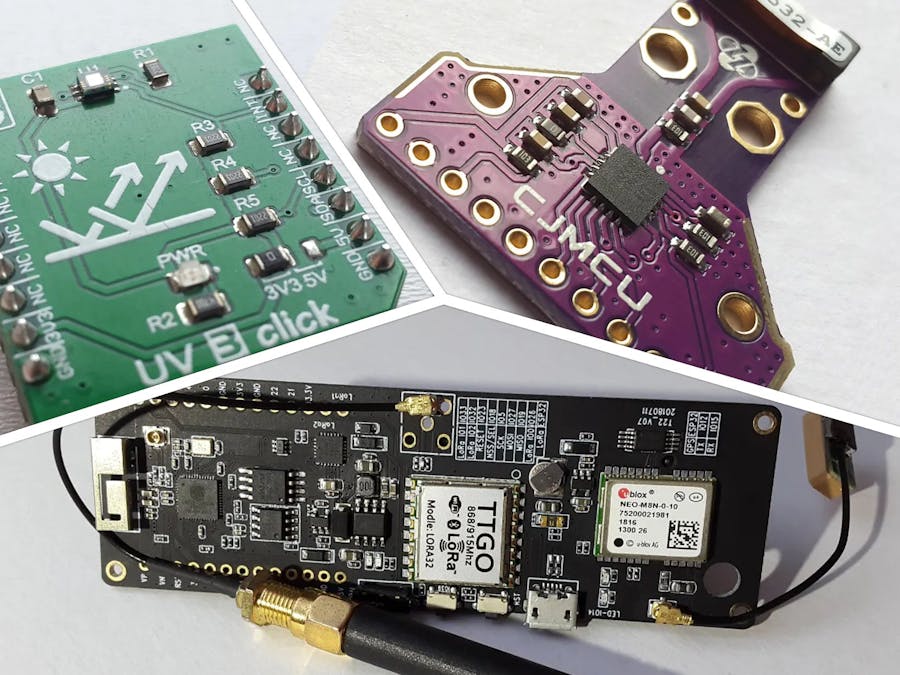
As I already had a UV 3 Click Ultraviolet Light Sensor laying around at home, and I have also seen the interesting looking AS3935 lightning sensor module on their site, I thought it would be an idea to build some weather related project.
After more browsing on their site, I also found the TTGO T-Beam board, which is a feature rich ESP32 based board with WiFi, BLE and LoRa connectivity.
So, I ended up ordering this two products. The plan was to build a device that detect extreme weather phenomena at summer, it is powered from a battery and transmits its data wirelessly.
TTGO T-Beam ESP32The TTGO T-Beam ESP32 is a ESP32 based "tracker" board made by LILYGO®.
It features:
- an ESP32 SoC with WiFi and Bluetooth support
- a one channel LoRa module for 868 / 915 MHz operation (Semtech SX127x based)
- a GPS module(u-blox NEO-8M)
- an onboard "3D" WiFi / Bluetooth antenna, a GPS antenna and a LoRA antenna
- a 18650 battery holder and charging circuit
- 26 I/O and power pins
The board can be programmed from Arduino IDE using the standard ESP32 Board Packages. This also provides WiFi and Bluetooth Low Energy (BLE) functionality.
To connect to a LoRaWAN network the mcci-catena/arduino-lmic library can be used. More details about this here.
The GPS sensor can be accessed through a library like the bolderflight/UBLOX one.
AS3935 Lightning SensorThe AS3935 Franklin Lightning Sensor™ IC is a sensor IC capable of detecting lightnings based on the characteristic RF pattern generated by lightnings. It calculates the energy of lightning events and it is capable to estimates the distance to the head of the approaching storm.
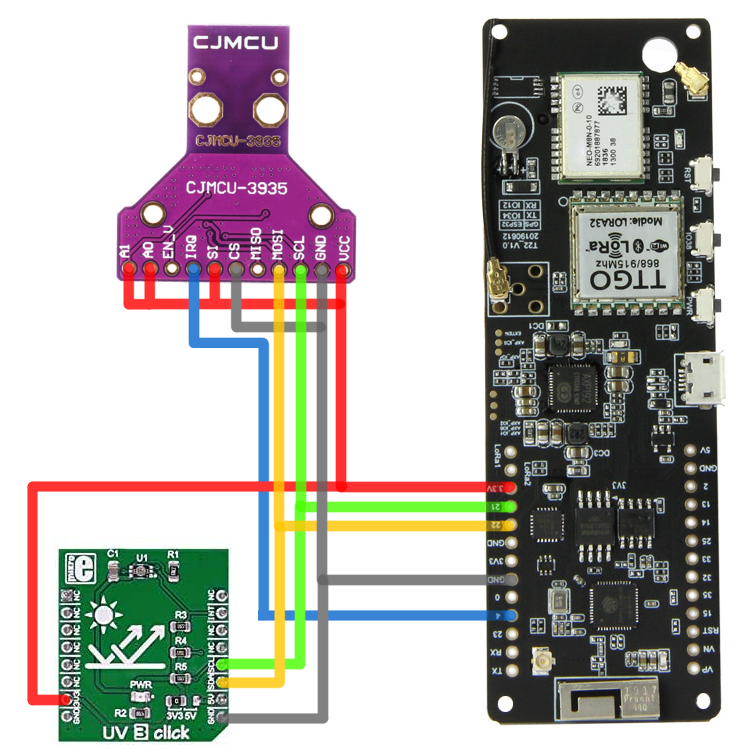
The sensor is powered from 3.3V, works with a 500kHz coil antenna, and supports communication over I2C and SPI.
The CJMCU-3935 is a sensor module featuring the AS3935 sensor, and 500kHz coil antenna and some passive electronics.
Do you remember I said the AS3935 support both I2C and SPI communication? Now, as the SPI requires 4 wires, while the I2C just two, I decided to go with I2C. I was a bad decision!
The AS3935 supports 3 different I2C addresses, that can be selected by the A0 and A1 pins. Now, some genius thought it was a good idea to make 0x01, 0x02 and 0x03 the choosable I2C addresses. The problem is that all three values are either invalid or reserved for special use cases in the I2C protocol:
The result is that some devices will not work properly with these I2C addresses. Behaviors like the sensors not being detected, or being detected on multiple addresses and erroneous reads (all ones) can be observed.(Note: first I though this was also the case with the TTGO T-Beam. Later it turned out the Wire interface was just started on the wrong pins)
After trying with a couple of different Arduino compatible boards, I finally got the sensor working an Arduino MKRFOX 1200. The library used was the SparkFun AS3935 Lightning Detector Arduino Library.
Luckily the weather was also "promising":
So, I turned on the sensor and waited for the storm. This was the output of the sensor during a storm.
AS3935 Franklin Lightning Detector
Schmow-ZoW, Lightning Detector Ready!
Lightning Strike Detected!
Approximately: 10km away!
Disturber.
Disturber.
...
Disturber.
Lightning Strike Detected!
Approximately: 10km away!
Disturber.
Disturber.
...
Disturber.
Lightning Strike Detected!
Approximately: 5km away!
Disturber.
Disturber.
...
Disturber.
Lightning Strike Detected!
Approximately: 1km away!
Disturber.
Disturber.
...
Note: the example Sketch used it attached to the project
UV 3 Click Ultraviolet Light SensorThe MicroE UV 3 Click Ultraviolet Light Sensor is a Click sensor board capable of measuring UVA radiation. It features a Vishay VEML6070 sensor with I2C interface.
Working with the UV Click 3 is pretty straight forward. With just need to install the Adafruit VEML6070 Library and run the provided example sketch (see attached).
The output will show the UVA Light Intensity (expressed in mW/cm2):
Now, as we get all the pieces working we can build a simple application that will broadcast the data from the two sensors over MQTT.
The application is a simple Arduino sketch that does the following:
- connect to local WiFi network
- connect to local MQTT broker
- initialize the sensors
- read sensor data & send it over MQTT (continuously)
The sketch is structured as follows:
void wifi_setup() {
  ...
}

void as3935_setup() {
  ...
}

void veml6070_setup() {
  ...
}

void setup()
{
  Serial.begin ...
  Wire.begin ...

  wifi_setup();
  as3935_setup();
  veml6070_setup();
}

void wifi_loop() {
  ...
}

void as3935_loop() {
  ...
}

void veml6070_loop() {
  ...
}

void loop()
{
  wifi_loop();
  as3935_loop();
  veml6070_loop();
}
The sensor data is published on the following topics:
- ttgo/lighthing
- ttgo/uva
We can check the broadcasted data like:
$ mosquitto_sub -t ttgo/lighthing
...

$ mosquitto_sub -t ttgo/uva
...Now the project, as most of DIY project, is far for complete. We can always find ideas to improve.
Here are some of my ideas for this project
- Battery Powering with Solar Panel Charging
- LoRaWAN / TTN connectivity
- Web Interface
- If This That That support
- Weather Proof Encousure
AS3935 Franklin Lightning Sensor™ IC (ScioSense.com)
AS3935 lightning sensor Module (DigitSpace.com)
TTGO T-Beam ESP32 WiFi Wireless BLE Module GPS NEO-M8N 868MHz (DigitSpace.com)


Comments