

Hardware components | ||||||
 |
| × | 1 | |||
 |
| × | 1 | |||
| × | 1 | ||||
| × | 1 | ||||
 |
| × | 1 | |||
 |
| × | 1 | |||
Software apps and online services | ||||||
| ||||||
 |
| |||||
Hand tools and fabrication machines | ||||||
 |
| |||||
Anyone who keeps track of how many material items they toss in the garbage can on a daily basis is somewhat aware of how much waste they generate. This isn’t a fun activity to engage in, and let’s face it—other than the supremely environmentally conscious—most people do not measure their waste, nor do they manage it. In India, this is propagating a garbage crisis, which is the cause of a number of environmental problems and public health issues. India’s rapid economic growth has resulted in a substantial increase in solid waste generation in urban centres. Urban areas in India alone generate more than 100,000 metric tonnes of solid waste per day, which is higher than many countries’ total daily waste generation.
Traditionally, municipalities operate on weekly routes to pick up trash and recyclables on designated days, regardless of whether the containers are full or not. This increases further pollution due to the increase fuel consumption.
There are currently over 31,000 public Wi-Fi hotspots installed in India, according to industry estimates, and the number is expected to grow beyond 202,000 by 2018. India suffers from both inefficient waste infrastructure and increasing rates of solid waste generation per capita, due in part to the country’s service sector driven economic growth. This presents a case where both issues of service quality and waste quantity need to be handled together. This is a unique situation that developing Asian countries like India are being confronted with and as such its solutions must also be unique and smart. So why not use those public Wi-Fi hotspots for better waste management based on Internet of Things (IoT). Another national level initiative aimed at improved waste management is the Smart Cities mission under which 100 cities will be provided with significant funding to improve civic services infrastructure.
{By the way as I was making this documentation I got to knew that: In 2014, the Bihar government launched a free WiFi zone between NIT-Patna on Ashok Rajpath to Danapur. This 20-km stretch of free WiFi is the world’s longest corridor of free WiFi connectivity.}
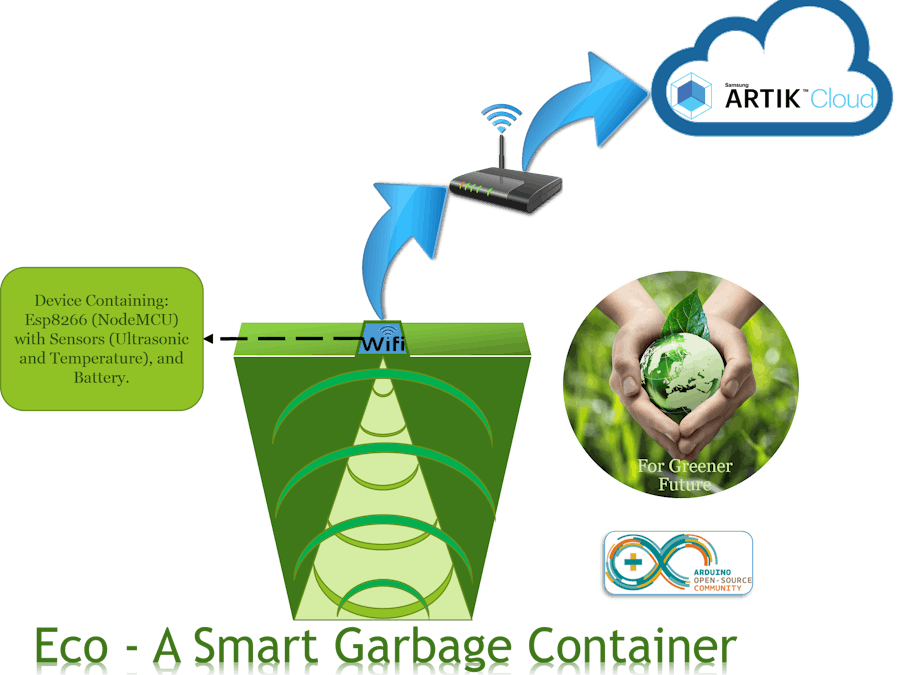
My project aims to optimize waste collection and ultimately reduce fuel consumption. This project will be useful where Wi-Fi hotspots are readily available like hotels and shopping malls, restaurants, coffee shops, and retail outlet, college/institution premises, airports, railway stations, etc. This will help to route optimization which will reduce the number of trips of the garbage trucks hence less traffic will be generated and less pollutant emissions will be released into the air. Also it will help to keep those places free of overflowing garbage containers and this will have a positive impact on tourism.
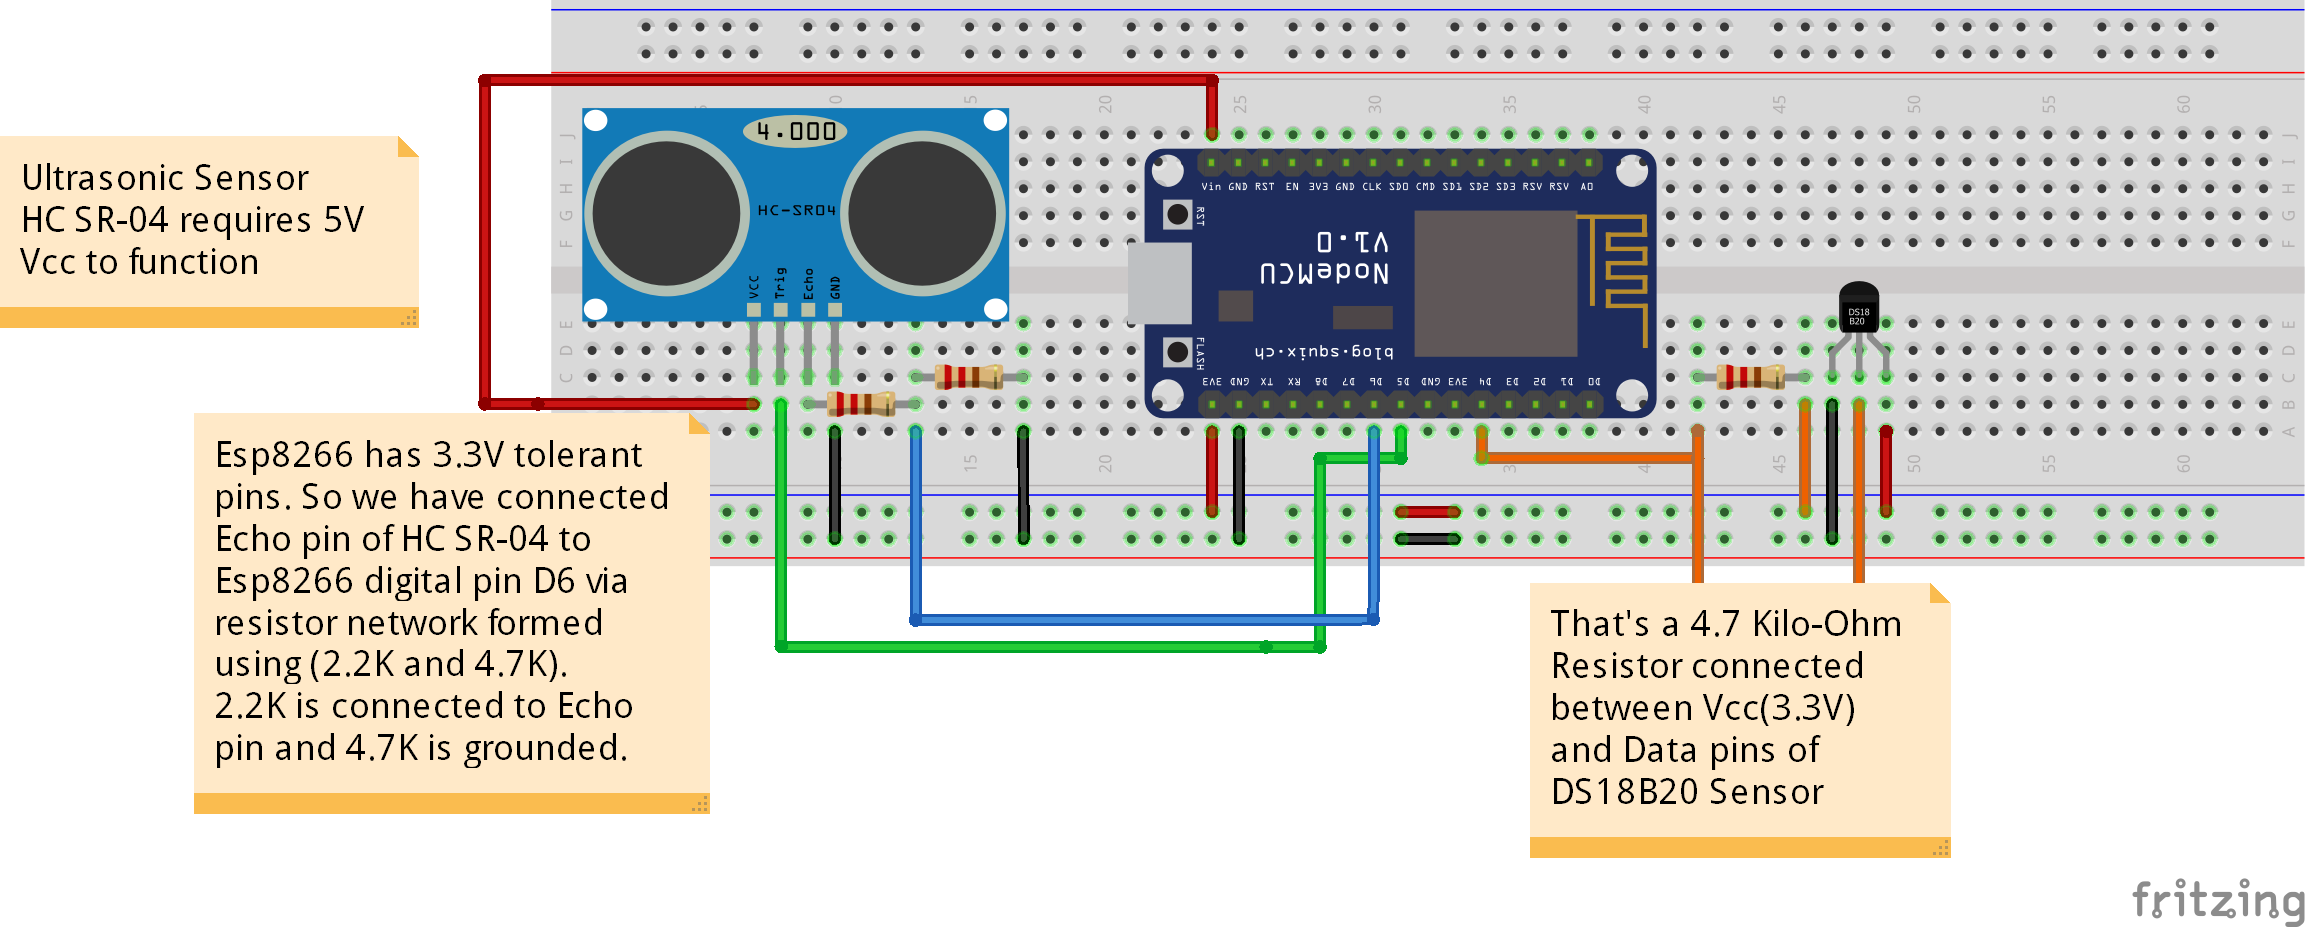
The project consists of a Wi-Fi based sensors installed in the container lid. Each device will have a unique ID so as to know to which area the container belongs. The sensor measures the container filling level using ultrasonic technology, temperature using temperature sensor and periodically transmits all captured information to the Artik. The device can “talk” to the waste management company and thus can tell them whether the container is at full capacity, when it needs to be emptied, what temperature the container is at, and more, allowing the sanitation specialists to work more efficiently and cut unnecessary costs. Additionally, the sensors can help the company forecast when a dumpster will be full, allowing them to plan ahead future routes.
Block Diagram:We will create Device Type for our project and then create device based on that device type.
Setting Up Rules on Artik Cloud (To send mail):We will create rules for our project in Artik cloud in which if data arrives from Esp8266 we will mail all the sensor data to our mail ID. Also another rule will be created in which if the garbage level is higher than a particular value it will a send a mail with threshold crossed subject.
Project Images:-Changes to be done in the Arduino Code provided below in the Code section {Eco Smart Trash Can Code v2.0}:
First of all you need Device ID and Device Token so that Esp8266 can publish data successfully to Artik cloud using MQTT.
1) After login (Artik Cloud) click on Devices as shown in the image below:
Then click on the gear icon as shown in the image below:
After clicking on the Gear icon you will get the Device ID and Device Token, copy it you will need those in your Arduino code {See the Eco Smart Trash Can Code v2.0 in the code section}.
In the code section first of all enter your SSID and Password:
/********************************************WiFi Access**************************************************************
Enter the SSID and PASSWORD of your Wi-Fi Router
*********************************************************************************************************************/
const char* _SSID     = "Your_Router's_SSID";           //Wi-Fi SSID
const char* _PASSWORD = "Your_Router's_PASSWORD";     // Wi-Fi Password
Then enter the Device ID and Device TOKEN of your device (you copied in earlier step)
/********************************************Artik cloud Aceess*******************************************************
MQTT - Artik Cloud Server params
Requires Device ID and Device Token which are created when you make your device in Artik Cloud!!
*********************************************************************************************************************/
char Artik_Cloud_Server[]     = "api.artik.cloud";     // Server
int  Artik_Cloud_Port         = 8883;                  // MQTT Port
char Client_Name[] = "ARTIK-IoT";                      // Any Name
char Device_ID[]   = "822a647ea36b4fa39f1b6c41f0606c52";  // DEVICE ID
char Device_TOKEN[]   = "8b2e3dd50b594d01a42a12a25513551a";  // DEVICE TOKEN
char MQTT_Publish[]      = "/v1.1/messages/822a647ea36b4fa39f1b6c41f0606c52";
// (/v1.1/messages/"DEVICE ID")
"For Full Code Explanation see the comments in the Eco Smart Trash Can Code v2.0 below (I think i have explained most of the things)."
Eco Smart Trash Can Code v2.0 is just for understanding how to send data to Artik cloud using NodeMCU/ESP8266 and MQTT.
Further Code Improvements:-To improve our product features we need to make certain changes in our code and we will save it with a different name:- "Eco Smart Trash Can Code v2.1".
To recognise which garbage bin is placed where we need to give our ECO a unique ID so that just by looking the number we can know the where the bin is placed. Instead of creating a unique ID ourself why not use the ESP8266 chip ID which is a unique 32-bit integer.
To get ESP8266 chip ID you have to use following function:
ESP.getChipId();
We will update our code so that now it will sent not only the sensor data (GarbageLevel and Temperature) but also the unique ID.
Also we need to read the battery level, so for better precision we are going to use ADC ADS1115 - a higher-precision ADC, which provides 16-bit precision over I2C. The chip can be configured as 4 single-ended input channels, or two differential channels. The address can be changed to one of four options so you can have up to 4 ADS1115's connected on a single 2-wire I2C bus for 16 single ended inputs. And a plus point it has Wide Supply Range: 2.0V to 5.5V.
For Reading ADC over I2C using ADS1115, we will use Adafruit_ADS1015.h library. We need to include first of Wire.h library as we are using I2C communication.
#include <Wire.h>
#include <Adafruit_ADS1015.h>
Adafruit_ADS1115 ads;  /* Use this for the 16-bit version */
Then we have to set gain of ADS1115, we have set gain (+/- 2.048V) such that it must be lower than the supply voltage (3.3V). Now the precision is 0.0625mV. Then we need to call ads.begin(). This all things are done in setup function.
 ads.setGain(GAIN_TWO);        // 2x gain   +/- 2.048V  1 bit = 1mV      0.0625mV
 ads.begin();
Then declare a 16-bit integer variable to store the adc reading of analog channel 0 of ADS1115 and then convert the sampled digital value to millivolts. This things are done in loop function (but can be done in setup function as required) before transmitting the data to Artik cloud.
int16_t adc0;
adc0 = ads.readADC_SingleEnded(0);
float millivolts= (adc0/32767.0) * 2048;
After adding this much changes, why not think about the power as our project is finally going to work on battery it is very important that it must atleast stay active for 6 months without charging. Since For this case, we don’t want to be changing the batteries constantly or charging it constantly.
Unfortunately, the ESP8266 is still a pretty power hungry device. If you want your project to run off a battery for more than a few hours, you have two options: get a huge battery or cleverly put the chip to sleep. So we need to significantly reduce the power consumption of our ESP8266 board using the deep sleep mode of the chip. For using deep sleep mode, GPIO 16 needs to be used to wake up out of deep-sleep mode, you'll need to connect it to the RESET pin.
Also note that: The ESP8266 can't be programmed while the GPIO 16 pin is connected to RESET pin. Make sure you disconnect the two pins before trying to upload a sketch.
In deep sleep mode, the ESP8266 maintains its RTC but shuts everything else off to hit about 60-80 µA. It can pull upwards of 200mA while it’s transmitting, and I usually measure an average of about 80mA in normal operation.
The ESP.deepSleep() function accepts microseconds as its parameter (1,000,000 microseconds = 1 second). For putting ESP8266 in deep sleep mode we need to call:
// Time to sleep (in seconds):
int sleepTimeS = 30;
ESP.deepSleep(sleepTimeS * 1000000);
The maximum value accepted is 4,294,967,295, which is about 71 minutes.


Comments