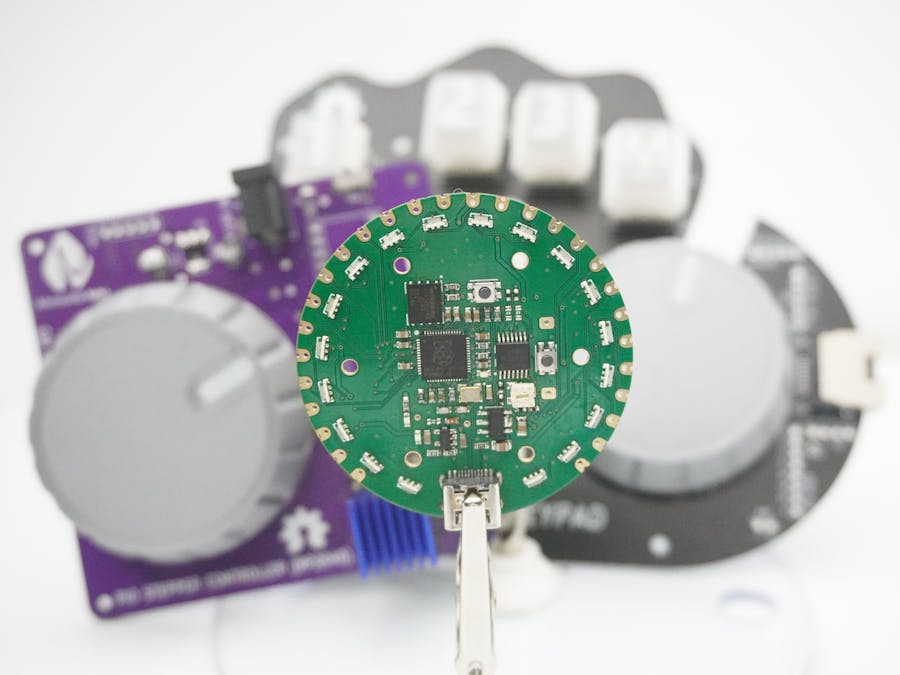
The Pico dev m3is a development board based on the RP2040 chip, the board has the same functions and capabilities as the raspberry pi pico board, only with a different shape and some useful improvements, the most significant being the fact that the board is also designed to be a super high resolution magnetic rotary encoder.
It's not difficult to imagine the potential of a board that can become a rotary encoder at will, but I figured I’d get the ball rolling with two example projects to demonstrate how the pico dev m3 can be integrated into PCB projects.
The sample projects shown here are open source and you can download all the KiCad design files from the pico dev m3’s repository, so feel free to modify them as needed.
The Pico Dev M3 KeypadThis is a 12-key macropod that uses the Pico dev m3 as its controller, asides from a few 5.1k pull-up resistors and 100nf decoupling capacitors, the PCB is basically a breakout for the Pico dev m3 board; 12 of its IO pins are used as inputs for the mechanical keys, pin 22 is used to control the SK6812-EC3210 addressable leds illuminating each key.
The rest of the pins are broken out and organized to allow for easy connections to other modules, for example, the header marked joystick will enable you to easily connect an off shelve dual axis joystick to the Pico dev m3, the I2C header allows you to connect other I2C devices and breakout boards, like an OLED screen, the SPI header allows easy connection to SPI modules like an SD card reader. The pico dev m3 keypad can be powered from the type c port on the pico dev m3 board or a Lipo battery connected to the BAT header, taking advantage of the Lipo charge controller built into the pico dev m3.
I also included a proprietary serial connector in the form of an ethernet port, this was done because I also plan on using the keypad to send custom gcode to my diy CNC build (Krivee CNC), hence the G and M keys. The pins that make up the ethernet connector are also broken out to a separate header so that you can connect and use them for other purposes, maybe even connect a second pico dev m3 keypad.
PIO Stepper ControllerI recently experimented with controlling stepper motors using the PIO interface built into the RP2040 chip, this turned out great and I wrote a little library that allows you to easily control multiple steppers using PIO, you can read about it here.
The pico dev m3 also features the RP2040 chip, so I thought I’ll design a breakout that allows you to use this PIO controller on the pico dev m3 to individually control 3 stepper motors. This board can be used to control any 3-axis motion system, robot, or custom mechanism. I currently use it to control a DIY turntable, and a similar setup is implemented in the upcoming Pick ‘N’ Place Wheel V2.
The board features a 3.3v linear voltage regulator, a 12v power jack to power the stepper motors, drivers, and the Pico dev m3 itself, a power switch, and three sets of headers for connecting stepper drivers and stepper motors, I also broke out a miscellaneous header, the same as with the keypad, and you can similarly connect a joystick module, or other motion control hardware and use it in conjunction with the pico dev m3’s built-in encoder.
I put these sample projects together based on some of my needs, you may have different ideas in mind for the Pico dev m3, so I’ve uploaded my design files to at least serve as a reference.
You can also order these boards as add-ons for the pico dev m3 when you order it from my tindie store.
Pico Dev M3- RP2040 chip, Dual-core Arm Cortex-M0+ processor at 133 MHz
- 264kB on-chip SRAM
- 128Mb on-board QSPI flash
- 19 multifunction GPIO pins, with 2 analog inputs
- 2 UARTs
- 2 SPI controllers
- 2 I2C controllers
- 16 PWM channels
- USB 1.1 controller with host and device support
- 8 PIO state machines
- USB type C
- Lipo charging
- onboard Button input
- Addressable Led ring (18 LEDs)
- The onboard encoder features a base resolution of 36 steps, extending up to 36000 steps per revolution.
- There’s also a ring of 18 individually addressable LEDs on board.
- Features a ball bearing which gives the encoder a significantly smoother feel compared to traditional rotary encoders.
- Customizable 3d printed encoder.
- Implementing the encoder is also really straightforward using the dedicated Libraries and Sample Codes
- Easy mounting options


Comments