


Hardware components | ||||||
 |
| × | 1 | |||
 |
| × | 1 | |||
Software apps and online services | ||||||
 |
| |||||
 |
| |||||
There are countless options to start a smart home nowadays: Temperature sensors, air quality sensors, motion detectors, and many more. What if I tell you, you can have all this in one board?
Ok, it might require some more programming compared to buying a sensor off shelf, but this is what you're here for, right? ;)
And I can tell you, with all the available libraries, for the XENSIV™ sensors and for smart home integration, you certainly don't have to be an expert in embedded programming to get this running!
What will we do today?
I will show how you can get the on-board sensors of the XENSIV™ Sensor Shield working with Arduino, how to set up Home Assistant with MQTT Auto Discovery and finally, how to integrate a set of sensors of the XENSIV™ Sensor Shield with Home Assistant to use the sensor values for your smart home.
Prerequisite: Arduino IDEPlease make sure to install the Arduino IDE from here before continuing.
Prerequisite: Home Assistant & MQTT BrokerThis article focuses on integration of sensors into an existing Home Assistant instance, you need to have the following ready to continue: A MQTT broker, a Home Assistant instance with the MQTT integration and of course a Wi-Fi network.
Here some useful links to get everything working:
- Home Assistant installation: https://www.home-assistant.io/installation/
- MQTT broker & integration: https://www.home-assistant.io/integrations/mqtt/
That's it! If you have Home Assistant, a MQTT broker and the MQTT integration running, you're ready to continue.
Getting the first Sensor ReadingsFrankly, when I received the XENSIV™ Sensor Shield I was overwhelmed first by the amount of sensors and wasn't sure where to start - Looking back now, the easiest option to start with is unexpectedly the radar sensor. As the board uses the BGT60LTR11AiP sensor it does the processing on the radar chip and does not need any complicated data processing. We only need to read out two GPIOs:
void setup() {
    pinMode(4, INPUT);
    pinMode(5, INPUT);

    Serial.begin(9600);
}

void loop() {
    if (!digitalRead(4)) {
        Serial.println("Motion Detected!")
    }
    if (!digitalRead(5)) {
        Serial.println("Motion Approaching!")
    }
}
Note that the readout of both pins is inverted as the output logic of the radar chip is inverse. The radar provides information on Target Detection and Target Direction on Arduino pins 4 and 5 respectively. Simple as that, give it a try!
Reading out the I2C SensorsLet's go one step further: We'll read out the protocol-based sensors now. The design of the shield is actually quite convenient, as all I2C-based sensors are on the same I2C bus, which requires only one bus initialization and allows compatibility with low-end microcontrollers. However, if you want to remove one sensor from the bus you can do this using the DIP switches on the back of the board.
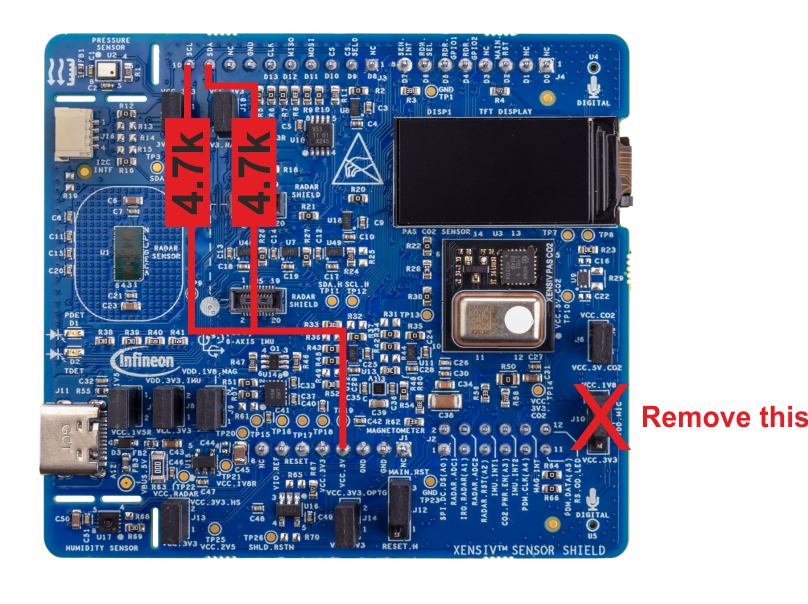
Important: Before we can continue reading out the I2C sensors we need to disable the PDM microphones as they are putting their signals on A4, A5 - which is interconnected to SDA and SCL on many Arduino boards.
Also, the I2C bus is level-shifted on this board and assumes that pull-ups are present on the Arduino board side of the circuit. However, the Arduino Uno comes without pull-up resistors on the I2C bus, so they need to be added as shown in the picture below.
This needs to be done before continuing!
Now let's scan the I2C bus to see what's expecting us:
0 1 2 3 4 5 6 7 8 9 A B C D E F
0 0 --  --  --  --  --  --  --  --  --  --  --  --  --  --  --
1 --  --  --  --  14 --  --  --  --  --  --  --  --  --  --  --
2 --  --  --  --  --  --  --  --  28 --  --  --  --  --  --  --
3 --  --  --  --  --  --  --  --  --  --  --  --  --  --  --  --
4 --  --  --  --  44 --  --  --  --  --  --  --  --  --  --  --
5 --  --  --  --  --  --  --  --  --  --  --  --  --  --  --  --
6 --  --  --  --  --  --  --  --  --  69 --  --  --  --  --  --
7 --  --  --  --  --  --  76 --  --  --  --  --  --  --  7E --
8 80 --  --  --  --  --  --  --  --  --  --  --  --  --  --  --
9 --  --  --  --  94 --  --  --  --  --  --  --  --  --  --  --
A --  --  --  --  --  --  --  --  A8 --  --  --  --  --  --  --
B --  --  --  --  --  --  --  --  --  --  --  --  --  --  --  --
C --  --  --  --  C4 --  --  --  --  --  --  --  --  --  --  --
D --  --  --  --  --  --  --  --  --  --  --  --  --  --  --  --
E --  --  --  --  --  --  --  --  --  E9 --  --  --  --  --  --
F --  --  --  --  --  --  F6 --  --  --  --  --  --  --  FE --
Great! We can see devices at addresses 0x14, 0x28, 0x44, 0x69, 0x76, 0x7E, 0x80, 0x94, 0xA8, 0xC4, 0xE9, 0xF6, 0xFE, wow! For this article, we are looking for these sensors:
- Digital Pressure Sensor (DPS368) on 0x76
- CO2 sensor on 0x28
- SHT35 Temperature and Humidity sensor on 0x44
As we do not want to deal with these sensors on register level, we need to install a few Arduino libraries to talk to the sensors:
- XENSIV Digital Pressure Sensor library for Arduino
- XENSIV PAS CO2 library for Arduino
- Sensirion I2C SHT3x library for Arduino
You can download all these libraries either from GitHub or install the latest version directly from the Arduino IDE by opening the library manager (Sketch -> Include Library -> Manage Libraries) and search for the library names listed above.
Now, with all libraries installed we can finally read out some sensor values:
#include <pas-co2-ino.hpp>
#include <SensirionI2cSht3x.h>
#include <Dps3xx.h>

SensirionI2cSht3x sht_sensor;
PASCO2Ino cotwo;
Dps3xx Dps3xxPressureSensor = Dps3xx();
#define PERIODIC_MEAS_INTERVAL_IN_SECONDS 60

void setup() {
    Serial.begin(9600);

    Wire.begin();

    sht_sensor.begin(Wire, SHT30_I2C_ADDR_44);
    sht_sensor.startPeriodicMeasurement(REPEATABILITY_MEDIUM,
        MPS_ONE_PER_SECOND);

    cotwo.begin();
    cotwo.startMeasure(PERIODIC_MEAS_INTERVAL_IN_SECONDS);

    Dps3xxPressureSensor.begin(Wire, 0x76);
}

void loop() {
    // CO2 sensor measurement
    int16_t co2_value;
    Error_t err;
    err = cotwo.getCO2(co2_value);
    if (!err) {
        Serial.print("CO2:\t\t");
        Serial.print(co2_value);
        Serial.println(" ppm");
    }

    // SHT humidity/temperature sensor measurement
    float temp_value;
    float hum_value;
    sht_sensor.blockingReadMeasurement(temp_value, hum_value);
    Serial.print("Temperature:\t");
    Serial.print(temp_value);
    Serial.println(" °C");
    Serial.print("Humidity:\t");
    Serial.print(hum_value);
    Serial.println(" %");

    // DPS atmospheric pressure measurement
    float pressure;
    Dps3xxPressureSensor.measurePressureOnce(pressure, 7);
    Serial.print("Pressure:\t");
    Serial.print(pressure);
    Serial.println(" Pa");
    delay(10000);
}
Ok, this became quite some code already. But it's easier than it looks: We're including the libraries we installed before, so we can access the functions in the libraries. Then we initialize the Serial bus using Serial.begin(9600) to write back the sensor values to Arduino's Serial Monitor and afterwards we call the Wire.begin() method to allow accessing the I2C (="Wire" in Arduino) from the sensor libraries.
After this, we initialize all sensors individually according to their respective library documentation and finally read out and print one sensor after another to the Serial Monitor of the Arduino IDE, and voila:
CO2:		589 ppm
Temperature:	25.72 °C
Humidity:	50.90 %
Pressure: 96563.05 PaWe have the hardware connections running, so the hard part is over already :) Now we only need to connect to our WiFi network and to the MQTT broker, which will allow using Home Assistant's MQTT Discovery feature to publish the sensor values and make them available to our smart home.
Connecting to WiFi and MQTT broker:
#include <WiFiS3.h>
#include <PubSubClient.h>

#define WIFI_SSID "your-wifi-name"
#define WIFI_PASSWORD "your-wifi-password"
#define MQTT_SERVER "192.168.x.y"
#define MQTT_PORT 1883 // Default MQTT port
#define MQTT_USER "your-broker-user"
#define MQTT_PASSWORD "your-broker-password"
WiFiClient wifi_client;
PubSubClient mqtt_client(wifi_client);

void setup() {
    mqtt_client.setServer(MQTT_SERVER, MQTT_PORT);
    WiFi.begin(WIFI_SSID, WIFI_PASSWORD);
}
Before we now start publishing our sensor entities to Home Assistant, a few words about the concept of devices and entities in Home Assistant:
A device in Home Assistant is usually a physical device, while an entity can be a sensor value, button, etc. of this physical device. Therefore, a device can have multiple entities. In this project, the device will be the XENSIV Sensor Shield, while entities will be the measurement values of the connected sensors. You can read up more about Home Assistant's device registry here.
Ok, let's move on! In the end, a MQTT discovery message for Home Assistant is just json-formatted payload with specific keys. We could program this from scratch, but to save time and lines of code, and to keep everything simpler and easier to overview we will also use a library for this: HaMqttEntities by paulino on GitHub.
Looking at his examples it was easily possible to derive the right commands to "discover" our sensor entities to Home Assistant:
#include <HaMqttEntities.h>

#define HA_DEVICE_ID "ifx-xensiv-shield"
#define HA_DEVICE_FRIENDLY_NAME "XENSIV Sensor Shield"
#define HA_DEVICE_FW "0.1.0"
#define HA_DEV_MANUFACTURER "Infineon"
#define HA_DEV_MODEL "XENSIV Sensor Shield"
#define ENTITIES_COUNT 4
#define HA_DEV_HARDWARE_VERSION "A"

HADevice ha_device = HADevice(HA_DEVICE_ID, HA_DEVICE_FRIENDLY_NAME,
    HA_DEVICE_FW, HA_DEV_MANUFACTURER, HA_DEV_MODEL, HA_DEV_HARDWARE_VERSION);

HASensorNumeric ha_sensor_co2 = HASensorNumeric(
    "ha-xensiv-co2", "CO2 Level", ha_device, "ppm", 0);
HASensorNumeric ha_sensor_temp = HASensorNumeric(
    "ha-sht-temp", "Temperature", ha_device, "°C", 1);
HASensorNumeric ha_sensor_hum = HASensorNumeric(
    "ha-sht-hum", "Humidity", ha_device, "%", 0);
HASensorNumeric ha_sensor_dps = HASensorNumeric(
    "ha-sht-dps", "Pressure", ha_device, "Pa", 0);
HASensorBinary ha_sensor_radar = HASensorBinary(
    "ha-radar", "Motion Detection", ha_device);

void setup() {
    HAMQTT.begin(mqtt_client, ENTITIES_COUNT);
    ha_sensor_radar.addFeature(HA_FEATURE_DEVICE_CLASS,"motion"); // Show the sensor as "motion detector".
    HAMQTT.addEntity(ha_sensor_co2);
    HAMQTT.addEntity(ha_sensor_temp);
    HAMQTT.addEntity(ha_sensor_hum);
    HAMQTT.addEntity(ha_sensor_dps);
    HAMQTT.addEntity(ha_sensor_radar);
}
Now, after running this command we can see all our entities in Home Assistant already 🎉
Ok, we're nearly through! One more step, we need to get the actual sensor values in Home Assistant. For this, we need to publish our sensor readings by calling setState() on our entities:
void loop() {
    uint32_t loop_start = millis();
    HAMQTT.loop();
    if (!HAMQTT.connected() && !HAMQTT.connect("examples", MQTT_USER, MQTT_PASSWORD))
        delay(1000);

    // CO2 sensor measurement
    int16_t co2_value;
    Error_t err;
    err = cotwo.getCO2(co2_value);
    if (!err) {
        ha_sensor_co2.setState(co2_value);
    }

    // SHT humidity/temperature sensor measurement
    float temp_value;
    float hum_value;
    sht_sensor.blockingReadMeasurement(temp_value, hum_value);
    ha_sensor_temp.setState(temp_value);
    ha_sensor_hum.setState(hum_value);

    // DPS atmospheric pressure measurement
    float pressure;
    Dps3xxPressureSensor.measurePressureOnce(pressure, 7);
    ha_sensor_dps.setState(pressure);
    while (millis() - loop_start < 10000) {
        ha_sensor_radar.setState(!digitalRead(RADAR_SENSOR_PIN));  // This is fine because it's only acting on updated state.
    delay(10);
    }
}
That's it! We can now see our sensor values in Home Assistant:
And of course also create a Home Assistant Dashboard for these sensors:
Here the source in case you'd like to re-create this dashboard:
type: grid
cards:
  - type: heading
    heading: XENSIV Sensor Shield
  - type: history-graph
    entities:
      - entity: binary_sensor.xensiv_sensor_shield_motion_detection
    hours_to_show: 3
    logarithmic_scale: false
    title: Motion Detection
    grid_options:
      columns: full
  - graph: line
    type: sensor
    detail: 1
    entity: sensor.xensiv_sensor_shield_co2_level
    grid_options:
      rows: 2
    name: CO2
    hours_to_show: 3
    limits:
      max: 2000
      min: 300
    icon: mdi:molecule-co2
  - graph: line
    type: sensor
    detail: 1
    grid_options:
      rows: 2
    name: Humidity
    limits: {}
    icon: mdi:water-percent
    entity: sensor.xensiv_sensor_shield_humidity
    hours_to_show: 3
  - graph: line
    type: sensor
    detail: 1
    entity: sensor.xensiv_sensor_shield_temperature
    name: Temperature
    icon: mdi:thermometer
    hours_to_show: 3
  - graph: line
    type: sensor
    detail: 1
    name: Pressure
    icon: mdi:speedometer-slow
    hours_to_show: 3
    entity: sensor.xensiv_sensor_shield_pressure
column_span: 1Thanks for making it until here! Now it's time for you to create your applications and ideas around the XENSIV Sensor Shield - let us know in the comments what you created!


Comments