

Hardware components | ||||||
| × | 1 | ||||
| × | 1 | ||||
| × | 1 | ||||
| × | 1 | ||||
| × | 1 | ||||
| × | 1 | ||||
| × | 1 | ||||
| × | 1 | ||||
| × | 1 | ||||
| × | 1 | ||||
| × | 1 | ||||
Software apps and online services | ||||||
| ||||||
| ||||||
Hand tools and fabrication machines | ||||||
 |
| |||||
 |
| |||||
 |
| |||||
Record audio and design pages for your favourite Christmas story, and let the book work its magic!
Today we're going to learn how to use Micropython, the PSOC™ 6 Wi-Fi BT Prototyping Kit, 4 servo motors and an audio module to design a book that turns pages and plays pre-recorded audio on its own.
Components and Their Functions- Book case: holds all of our electronics components.
- 4 Servo motors: attached to their respective page and responsible for turning it at the right time.
- PSOC™ 6: Manages the motors and audio module. It's responsible for turning the audio on and off, detecting when the audio has finished playing and telling the motors to turn the pages at the appropriate time.
- Audio module: Plays mp3s of our audio files that we saved on an SD card (plugged into the module). The PSOC™ 6 tells the audio module which audio to play, and the module sends the data to the speaker.
- Speaker: Plays our audio.
- Veroboard: used to connect our audio module and our motors to the microcontroller and power source in an efficient and manageable way.
- 5V Power supply(Capable of delivering sufficient current): Powers the PSOC™ 6, module and motors.
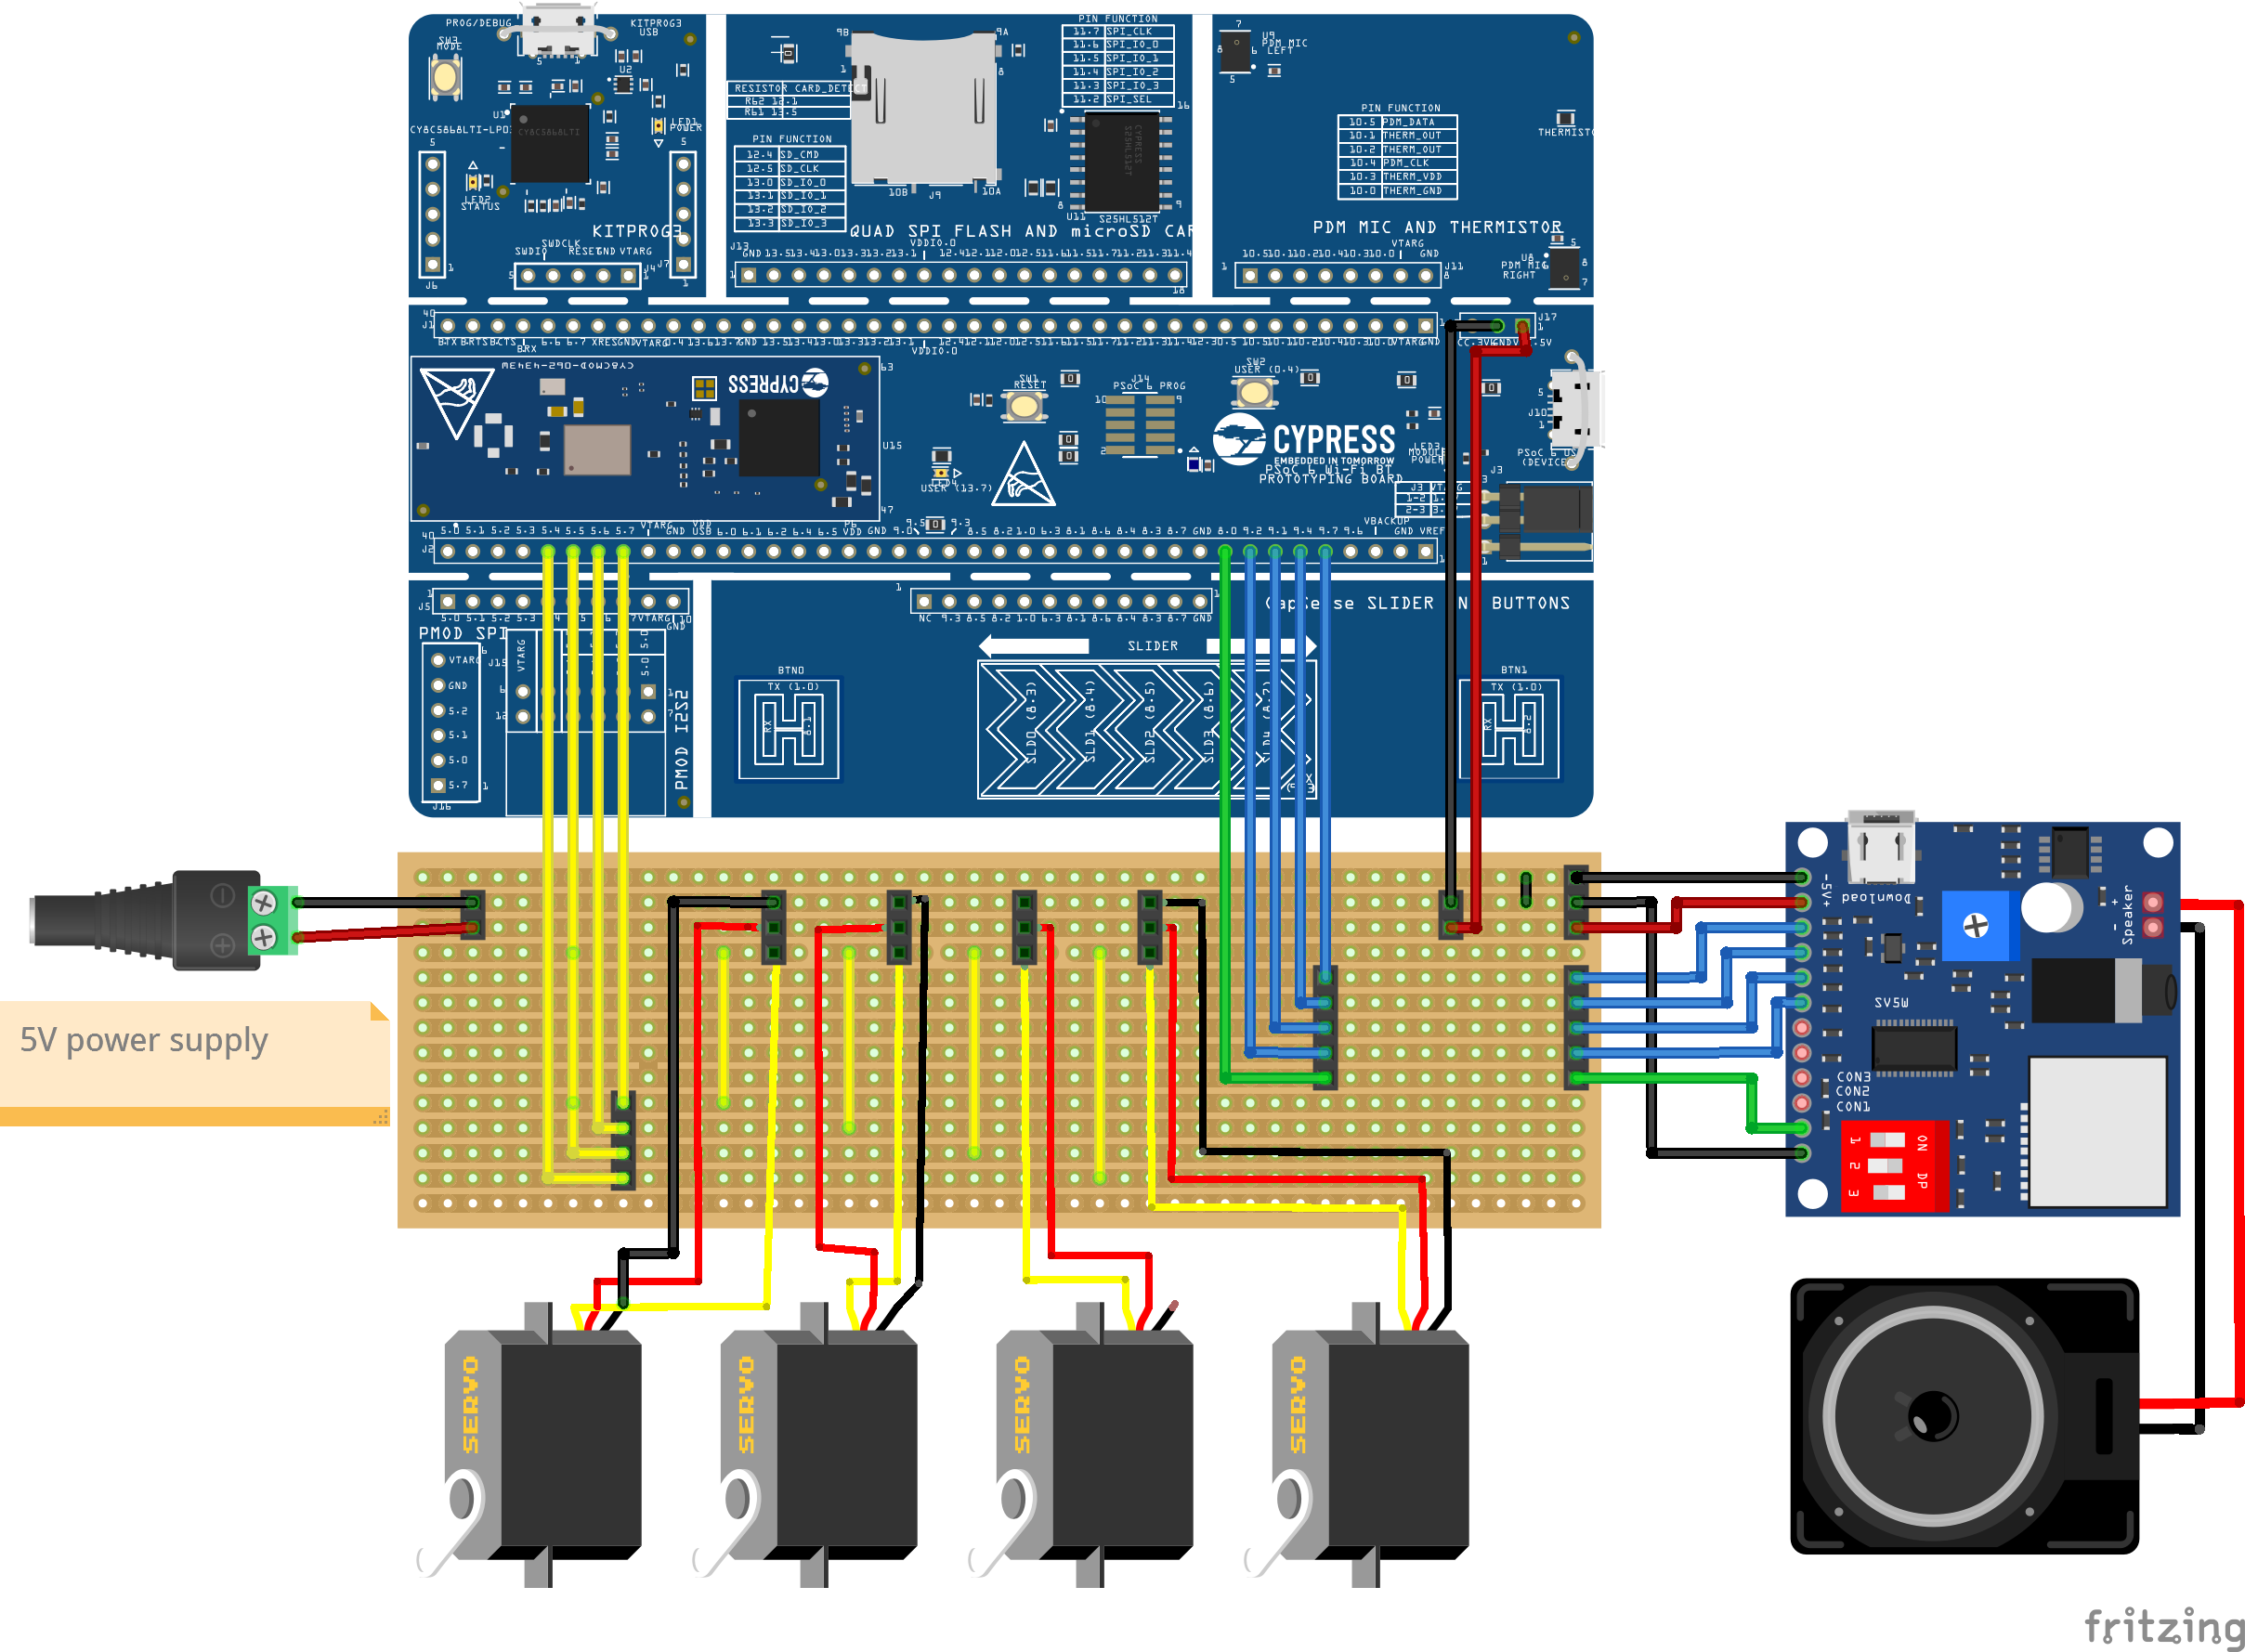
WARNING: Don't connect the power supply to the board and plug your laptop into the PSOC™ 6 at the same time. Your laptop and the power supply will try to power the board and this can be dangerous to both you and your hardware. You have a few options, such as: 1. Upload your code from your laptop, save it on the micro controller, unplug the laptop connection, and then plug in the power supply. 2. Connect the PSOC™ 6 and laptop via a cable without a VCC connection (just GND).Hardware: Schematics
Our goal is to build this connection:
1. Cut the Veroboard to Size
Cut the board so it's 14 holes long and 47 holes wide. This is important to ensure it fits into the hole we made for it in the case.
2. Scratch off copper for PWM signal isolation
What is this for?We're using a veroboard, or a stripboard, and it is made up of many parallel tracks. The tracks are isolated from each other, but have copper strips running down that act as a conductor for all the pins on the tracks. That means to connect multiple parts to a common VCC and GND, we just need to connect them to the same track. But: Sometimes we dont want all the connectors on the same track to be connected. We want to isolate the motors' PWM signals, since we want to be able to control them individually. To allow us to do so, we need to sever the connections on this part by scratching off the copper between the individual PWM connectors, as shown above!
3. Solder on Connectors and Wires
Solder the connectors (and wires) onto the breadboard, audio module and PSOC™ 6:
4. Connect Everything
Connect the wires to the male connectors, we use pre-crimped wires to make this easier. Then, connect the boards and motors together:
5. Attach the Power Supply
- Take the insulation off the VCC and GND wires:
- Clamp the wires to the power supply:
Just like that, your electronics are all set up!
Hardware: Book caseBook case: 1xBrown
Motor Mount:4xBrown
We used this design by imaicom and modified it in our slicer program to fit our requirements.
Page Holders:4xBeige/White
Each holder is different because of the hole placement, make sure to print one of each design!
Each of the pages has 3 holes to make space for the page holders
Front page: 1xBrown
The front page is bigger than the other ones because it has to cover the book frame, it also has a slot for the title of the story.
Book Title: 1xGold
Glue the gold title onto the first page,
Pages:3xBeige/White
Each page is different because of the hole placement, make sure to print one of each design!
Story Pages: 7xColour
Print out 7 one-sided pages in colour:
If you want to add your own story, make sure to stick to a 13cm x 17, 92cm page size and a 7 page limit!
PS: The art we used is by Jessie Willcox Smith and is from the 1912 Edition of T'was the Night Before Christmas by Houghton Mifflin Company. It is a Project Gutenberg Ebook, you can find information on the book and copyright license here.Hardware: Assembly
Screw the motors into the motor mounts (M2x8mm screws):
Screw the page holders into the motors (M1.5x8mm screws):
A little super glue never hurts either. ;)
Screw the motor holders onto the case (M3x20mm screws):
Screw the speaker into the case (M4x10mm screws):
Put the Electronics into the case and attach the power supply:
Glue the prints onto the pages and attach all the pages:
Now all that's left is the software!
Software: Motor controlProtip
Since we want to control the position of our pages and therefore of our motor arm, it's best to use a positional servo motor, in our project we'll be using the SG90, these motors can be controlled via PWM connection. If you're new to this, feel free to read our Protip on Servo Motor control that explains it all in more detail!
We can recycle most of the code used in our protip, we just need to make one change: When testing this, we realised that the motor turns too fast, especially when your page is quite light. We need a (ramp) function that gradually increases our angle, ideally with a configurable parameter to adjust to the page weight.
Code
1. Import libraries
# Import libraries needed for pin communication and time measurement
from machine import PWM
import time
2. Set parameters and initialise motor pins
# Set parameters
pw_min = 500000 #ns
pw_max = 2500000 #ns
angle_min = 0 #degrees
angle_max = 180 #degrees
frequency = 50 #Hz

# Initialize PWM for all motors, set intial angle to 0°
motor1 = PWM('P5_7', freq=frequency, duty_ns=pw_min)
motor2 = PWM('P5_6', freq=frequency, duty_ns=pw_min)
motor3 = PWM('P5_5', freq=frequency, duty_ns=pw_min)
motor4 = PWM('P5_4', freq=frequency, duty_ns=pw_min)
3. Define angle_to_ns():
'''Auxiliary function,
   Input: angle
   Output: pulse width'''
def angle_to_ns(angle):
    # Check if angle is in range
    if(angle_min <= angle and angle <= angle_max):
        # In range -> Calculate pulse width
        angle_percentage = (angle - angle_min)/(angle_max - angle_min)
        ns_percentage = angle_percentage
        ns = ns_percentage*(pw_max - pw_min) + pw_min
        # Print ns to help with troubleshooting later on
        return ns
    else:
        # Not in range -> Return error
        print("Error: Angle not in range!")
        return False
4. Define set_motor_to_angle():
'''Input: Angle and motor
   Calculates pulse width and sends signal to respective motor'''
def set_motor_to_angle(motor, angle):
    # Gets the pulse width from auxiliary function
    ns = angle_to_ns(angle)
    if (ns is False): return
    # Convert float to int
    ns = int(ns)
    # Check if the conversion has pushed the pulse width out of bounds
    #-> adjust accordingly
    if(ns > pw_max):
        ns = pw_max
    elif (ns < pw_min):
        ns = pw_min
    # Send signal to motor
    motor.duty_ns(ns)
5. Define page_right2left():
'''Input: motor and motor number
   Turn page right to left,
   Change angle in increments'''
def page_right2left(motor, number):
    increment = 1
    # Set angle counter to 0
    j = 0
    # Print user info
    print("turning motor number", number)
    while (j <= 180):
        time.sleep(0.03)
        set_motor_to_angle(motor,j)
        j = j+increment
Now we know how to control our motors and turn each page individually!
Software: Audio ControlGoal
We're using the DY-SV5W mini voice playback module. It has a power reciever, 8 GPIO inputs and a busy pin. It interprets the signal the PSOC™ 6 sends over the 8 inputs and sends the appropriate audio signal to the speaker.
Our goal is to play the track we've triggered with to the end using the I/O integrated mode, to do that we'll need to set the red thing to 000.
Communication and Naming Audio Files
- In the I/O integrated mode, the GPIOs are interpreted as bits, except inverted, as you can see here:
This also means that we need to name our audio files correctly (00001 for page 1, 00002 for page 2 etc.) to be able to use this mode.
This is what it's going to sound like in the end:
PS: The audio we used is a Librevox recording by Peter Yearsly and is in the public domain. Check out multiple recordings of T'was the Night Before Christmas here.
Code
Even though we can play up to 255 audio files, we only need 7, which is why connecting 4 pins to our PSOC™ 6 is more than enough (2^4 = 16 playable files). 3 pins would also suffice (2^3 = 8 playable files).
1. Import Libraries
#Import libraries
from machine import Pin
import time
2. Initialise pins and set parameters
'''Set all pins'''
# Busy pin,high when audio is playing, low when it isn't
busy = Pin('P8_0', Pin.IN)

# GPIO input pins, initialize with 1 (no audio)
pin_0 = Pin('P9_7', Pin.OUT, value = 1)
pin_1 = Pin('P9_4', Pin.OUT, value = 1)
pin_2 = Pin('P9_1', Pin.OUT, value = 1)
pin_3 = Pin('P9_2', Pin.OUT, value = 1)

# Make list of pins
pins = [pin_0, pin_1, pin_2, pin_3]

# Amount of pins (max 8!)
am_p = 4
# Amount of tracks
am_t = 2**am_p
3. Define play_track_once_000()
'''Input: String that represents a binary number (track number)
   Plays that track once'''
def play_track_once_000(bin_str):
    # Make copy of input
    bin_str_2 = bin_str

    # Sequentially go through each character in the String
    for i in range(len(bin_str)):
        # Get last character in string
        last_ch = bin_str_2[-1]
        # Invert number (As defined by I/O integrated mode 0 on the DY-SV5W audio module)
        # Set pin to that value
        if (last_ch == '0'):
            pins[i].value(1)
            # Print user info for error finding
            print("pin:",i,"value: 1")
        else:
            pins[i].value(0)
            # Print user info for error finding
            print("pin:",i,"value: 0")

        # Remove character we just checked (last character in string)
        bin_str_2 = bin_str_2[:-1] if i < len(bin_str_2) else bin_str_2

    # Wait for 20ms
    time.sleep_ms(20)

    # Wait until audio module starts playing (busy pin goes to HIGH)
    while (busy.value() == 0):
        time.sleep_ms(50)

    # Once audio is playing -> reset all pins to default HIGH state
    # This avoids the track being replayed after it finishes
    for i in range(am_p):
        print("Set pin", i,"back to 1")
        pins[i].value(1)

    # Wait until audio has finished playing (busy pin goes to LOW)
    while (busy.value() == 1):
        time.sleep_ms(50)
4. Define play_track_number()
'''Input: track number to play
   Convert track nr to binary number (bin function returns String)
   Call play_track_once'''
def play_track_number(number):
    # Check if number in range
    if (number < 0 or number > am_t-1):
        # Print error message
        print("Error: number not in range, only", am_t, "tracks")
        return
    # Convert track number to binary number
    binary_num = bin(number)
    print("After bin():", binary_num, "type:", type(binary_num))
    # Remove binary prefix
    binary_num = binary_num[2:]
    print("After removing prefix:", binary_num, "type:", type(binary_num))

    #Call function to set pins and play track
    play_track_once_000(binary_num)
Now we know how to play audio files!
Software: Combining Audio and Motor Control- Add both audio and motor code snippets from the top together + this line:
'''MAIN CODE:'''
page_right2left(motor1, 1)
play_track_number(1)
play_track_number(2)
page_right2left(motor2, 2)
play_track_number(3)
play_track_number(4)
page_right2left(motor3, 3)
play_track_number(5)
play_track_number(6)
page_right2left(motor4, 4)
play_track_number(7)
Running this code will make the book flip through and narrate the story all on its own, isn't that cool?
The Final ResultYour final result should look something like this:
We hope you enjoyed this project and we'd love to see what you make, maybe as a last minute gift or a nice decoration? Be sure to like, comment, and check out the other projects on our page. Happy Holidays!


Comments