
Hardware components | ||||||
| × | 1 | ||||
| × | 1 | ||||
| × | 1 | ||||
 |
| × | 1 | |||
| × | 1 | ||||
 |
| × | 1 | |||
| × | 1 | ||||
| × | 1 | ||||
| × | 1 | ||||
 |
| × | 1 | |||
Software apps and online services | ||||||
| ||||||
 |
| |||||
Hand tools and fabrication machines | ||||||
 |
| |||||
 |
| |||||
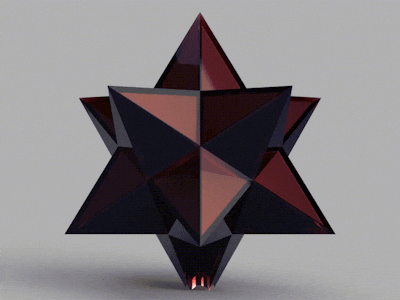
The shape of this ornament means that you will need heavy external supports for most printers. If you have dual extrusion, water soluble PVA works very well for this. Otherwise, make sure to use a software that creates supports that are not too hard to remove. This adapter and weight pieces should print rather straightforwardly with the exception of the hook on the adapter which will also need supports to print.
When scaling the star to use as an ornament, make sure to scale all parts equally. This may seem obvious, but can ruin your print if forgotten. The best way to this is to import all the parts into your printer's software and scale from there if possable.
AssemblyTopper
No assembly is required for using this top top your tree unless creating one of the below variants.
Ornament
After inserting any electronics and painting the ornament, push the hook into the opening. It may be necessary to use adhesive if the fit is too loose or the electronics are too heavy.
Mirrored (Shiny)
Spray mirrored spray paint into the star from the bottom to make it shine. I advise spraying close to the opening to reduce mess. An even coat is not at all necessary, but will reduce drying time. The nature of the cavity inside means that it will be hard to get some areas. For these areas spray until there is enough paint that it drips. This is normally something you try to avoid, but with the diffusion from the acrylic, it will be impossible to tell that the spray paint was runny from the outside. When the paint begins to run, just tip it into the area that is lacking paint. If you want you can tape a large straw onto the can as a way to aim where the paint goes. Wait for the paint to dry. A cue tip will allow you to tell if the paint has dried. Once this coat is dry, lightly apply black spray paint to improve the effect and protect the finish. Wait for it to dry and hang it on your tree.
LED (Glowy)
Use the attached Arduino sketch from Monica Houston's project, "Blynk Board - everything LED!" to control the Neopixels from your phone. This project will also guide you through setting up the LEDs if you so choose. One idea is to brighten it everyday as Christmas approaches. If you scale the star down for use as an ornament, the electronics may not fit. To solve this problem you can use the Adafruit trinket and a smaller battery.
Motors (Shaky) Ornament Only
Wire an AA battery to a 1.5-3.3V DC hobby motor. The motor must be small enough to fit inside the opening in the star. Table the wires to the battery so that it doesn't lose connection and stop turning. Glue the "weight" piece to the back of the motor. Insert the battery into the ornament through the opening. Glue the adapter onto the shaft of the motor by drilling a hole into the adapter and insert the assembly into the ornament. Add adhesive if necessary.
Combined (Shiny and Glowy)
Use a very light coating of paint so that some spots are not covered in addition to LEDs for an ornament that is both shiny and glowy.
Combined (Shakey and Shiny)
Just paint the star before adding motors.
Combined (Other)
Other combinations may be possible depending on the size of your star, how many LEDs you use, and if you opt for the trinket. Combining any of these elements is straightforward. Paint first, then lights, and add shaking last.
Questions?Comment any questions and I will answer them to the best of my ability. I know that the documentation has much to be desired. As I do not own a 3D printer, it was not possible for me to actually create this ornament yet and so there are very few visual aids. I know there are typos as spell check seems to be rather inconsistent. If you find any comment them so that I can try to fix them eventually.
Comments