


This straightforward and affordable setup, using an Arduino UNO and the TMC2209 stepper driver, lets you control a stepper motor with nothing more than three digital pins. No UART, no complexity, just motion control that's clean. This DIY electronics project is perfect for beginners as the setup takes under 45 minutes and will cost you around $10–15.
Why Use TMC2209 with Arduino?Compared to basic drivers like A4988 or DRV8825, the TMC2209 is whisper-quiet and more efficient. It's a go-to choice for projects where noise and precision actually matter. Even without UART configuration, it works beautifully with just STEP, DIR, and EN pins.
Key Features- It offers accurate control with up to 1/256 microstepping
- Quiet movement using StealthChop mode
- Basic 3-pin setup: STEP, DIR, and EN (no UART is needed)
- Offers expandability for future upgrades such as sensorless homing (StallGuard)
- Compatible with popular NEMA 17 stepper motors
- Speed and direction are both easily customizable
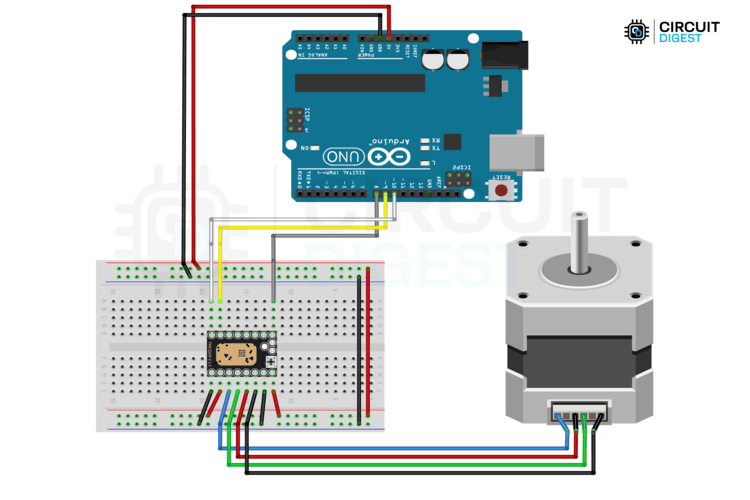
This project uses three Arduino digital pins:
- D8 for EN (Enable)
- D9 for STEP (Pulse input)
- D10 for DIR (Direction control)
The motor rotates in one direction, then reverses, repeating the cycle.
Circuit Connections- EN → D8 - This Enables or disables the driver (LOW means enabled)
- STEP → D9 - Sends step signal on rising edge
- DIR → D10 - To set direction of motor (HIGH/LOW)
- VIO → 5V - Logic power input for the driver (matches Arduino’s 5V signals)
- GND → GND - Common ground
- VM/VS → 12V-24V External Power Supply - Motor power input
Tip: Ensure all grounds (Arduino, driver, motor power) are connected together. This helps avoid erratic behaviour.
// Pin Definitions
#define EN_PIN 8    // LOW: Driver enabled, HIGH: Driver disabled
#define STEP_PIN 9  // Step on the rising edge
#define DIR_PIN 10  // Set stepping direction
int noOfSteps = 500;           // Number of steps to move in each direction
int microSecondsDelay = 1000;  // Delay in microseconds between each step
void setup() {
 // Configure pin modes
 pinMode(EN_PIN, OUTPUT);
 pinMode(STEP_PIN, OUTPUT);
 pinMode(DIR_PIN, OUTPUT);
 // Initialize pin states
 digitalWrite(EN_PIN, LOW);   // Enable the driver
 digitalWrite(DIR_PIN, LOW);  // Set initial direction
}
void loop() {
 // Move motor in one direction
 digitalWrite(DIR_PIN, LOW);  // Set direction to LOW
 moveSteps(noOfSteps);
 // Move motor in the opposite direction
 digitalWrite(DIR_PIN, HIGH); // Set direction to HIGH
 moveSteps(noOfSteps);
}
void moveSteps(int steps) {
 for (int i = 0; i < steps; i++) {
   digitalWrite(STEP_PIN, HIGH);
   delayMicroseconds(microSecondsDelay);
   digitalWrite(STEP_PIN, LOW);
   delayMicroseconds(microSecondsDelay);
 }
}- 3D Printers - Accurate and silent control of extruders or axes
- Camera Sliders - Smooth cinematic panning
- Robotics - Allows accurate joint movement or wheel rotation
- CNC Machines - Repeatable motion with clean control
- Automated Systems - Conveyor belts, sorters, and pick and place
Want to push it a step further? Try:
- UART Mode - Activate dynamic current control or diagnostics
- Add StallGuard - For sensorless homing without limit switches
- Speed Control - Control of motor speed using a potentiometer
- Push Button Input - Manual direction control using buttons
- Advanced Modes - Alternate between StealthChop and SpreadCycle for performance tuning
The TMC2209 is accurate and operates quietly, making it a solid investment choice for hobbyists and makers alike.
For a more comprehensive learning experience, visit: Interfacing TMC2209 with Arduino UNO
While you're at it with your Arduino, if you ever pick up an ESP32-CAM, help your future self save some time with this tech-commentary-style article: Program ESP32-CAM With Arduino UNO? Let’s Push Our Luck


Comments