

Hardware components | ||||||
 |
| × | 1 | |||
| × | 4 | ||||
| × | 4 | ||||
| × | 4 | ||||
| × | 4 | ||||
| × | 4 | ||||
| × | 32 | ||||
 |
| × | 1 | |||
Software apps and online services | ||||||
 |
| |||||
Hand tools and fabrication machines | ||||||
| ||||||
Foreword
Now this is a story all about how my life got flipped, turned- whoops, so sorry; wrong story. This is actually a story about a project I've been dreaming of working on since I first learned about Arduino and open source: a MIDI controller inspired by the MIDI Fighter by DJ Tech Tools, complete with light-up arcade buttons. It took a while for my skills to catch up to my project aspirations though, so finally, a few years later, I've built my version of a DIY MIDI Fighter. Now obviously this isn't an original concept to make. You can find quite a few different ones by different makers all over the internet, but what I think is awesome about this project is that no single MIDI Fighter is the same, whether it be hardware hook-up, final housing or code iteration. Even the microcontrollers vary. So with all of that, here is my humble version. I hope that my work helps you with your own open source MIDI explorations.
The Planning Stages
As I mentioned, I've been thinking about this project for a while, but had been putting it off for various reasons, so why now? Well, if you don't know, Adafruit is first of all an amazing open source hardware company and second of all, every week they feature new products in their Ask An Engineer live stream. During one of these super excellent live streams, they featured Mini LED Arcade buttons and I basically decided on the spot to order 16 of them and that they would have an immediate future in a MIDI Fighter build.
With the buttons received, I started doing basic hardware prototyping with the buttons by hooking them up to an Arduino to get the basic circuit right; essentially making sure that the LED turned on when the button was pressed, which although sounds simple there was no absolute schematic available for the buttons at the time of my prototyping so there was a lot of trial and error with the four pins on the buttons. This was such a process that I made a video documenting how to hook them up that is available here on my YouTube channel. For those that prefer a short and snappy diagram, I have you covered as well:
Once that was all set, I began researching the best microcontroller board for the project. In my initial research, I knew that I wanted to use the MIDIUSB library, so a 32u4 chip was a must, but I also needed 5V power for the LEDs in the buttons and I wanted that to come from the board. I also wanted a small board since it would be living out it's life inside the project's housing. I eventually settled on the Sparkfun Pro Micro 5V/16mHz board as it met all three of these requirements.
Testing
Once I had the Pro Micro board, I started doing testing with MIDI code. I tested a few different versions of code that utilized different techniques for getting MIDI into the computer over USB. I was even using a 4051 mux at one point because science. But, the main key here was getting it to work with one button and slowly adding each button one by one rather than hook everything up and then become forever frustrated by being unable to pinpoint the exact problem. I also did most of this testing using the Arduino IDE's serial monitor. This involved just opening up a 9600 serial port in the setup() portion of the code and sending the button's data to Serial.write in the loop. The serial monitor testing was really crucial to making sure I was sending a clean signal thru MIDI and even affected the resistor I was using for the button's data pin. I ended up upping the value to 100K to make sure there was zero noise. Without that serial monitor testing, I may not have known that the 10K wasn't quite enough. If you're interested in seeing the serial monitor testing in action, I did a quick live stream on my channel that can be seen here.
Final Testing and Assembly
I finally settled on basically sticking with the MIDIUSB library's example code and modifying it to fit my needs. I also went directly into the digital I/O available on the Sparkfun Pro Micro rather than multiplexing. You know what they say, keep it simple stupid. I had basically fallen into an infinite loop of over complication for a few evenings in a row and luckily was able to snap myself out of it just in the nick of time.
The goal for my MIDI controller was to emulate the Kong Drum Designer in Reason, which is my MIDI software of choice. Each button is programmed to coordinate with the notes that Reason has for the Kong, which are C2-D#3(or Eb3 depending on how you're feeling that day) chromatically. I called these in the code using the PitchToNote library, so they can be easily modified for your needs. Once I confirmed everything was working with Reason with the hardware on a breadboard, it was time to begin the final steps. You can see a video updating the project at this stage here.
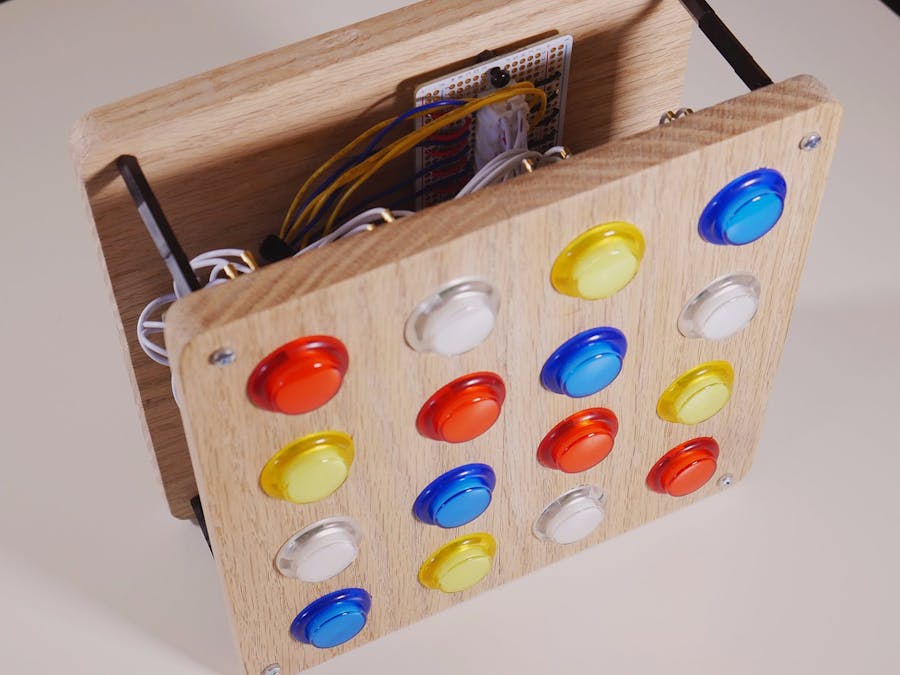
For the housing, I went with two pieces of wood (oak to be precise) with plastic stand-offs in between which would allow the hardware to live and breathe freely. I also have a thing about wanting to see the insides of electronics; I think it's a really cool aesthetic. My computer is even housed in a case that has a side window. Of course, I dream of a 3D printer or CNC machine access, but for now this style of housing will have to do.
One of the trickiest things was figuring out the spacing for the button holes on the top piece of wood. The wood pieces were cut into squares 7.5"x7.5", which was a random measurement I decided on before I even had the Sparkfun Pro Micro in hand. With the diameter of the buttons requiring a 24mm hole to mount (approx. 0.944 inches) but with an actual surface diameter of 27.6mm (approx. 1.08 inches), I had to approximate with 1/16" measurements to keep my sanity and also be able to use the tools I had, which was a very simple tape measurer. I decided on 7/16" around the outside edge of the top layer. I used 1 & 2/16" for the buttons, with a spacing of ~6/16" between each button, varying with 1/16" to allow for the math to come out properly. This was all marked in pencil, which created a grid with squares symbolizing the button placement. I then measured to the middle point of each square (6/16") to get the center to draw a dot to aim my hole saw for drilling.
I was able to track down a 15/16" hole saw on Amazon that worked perfectly and my measurements worked out to be about 95% accurate with a few holes being slightly off in alignment, but for a fully analog job (and also my first time ever attempting something like this) I'm more than pleased.
For transferring the electronics, I was originally going to go with traditional perf board, but ended up going with Perma-proto breadboard boards from Adafruit, as my skills aren't quite there for figuring out ideal circuit board wiring with power and ground rails yet. This made soldering a breeze and I recommend the boards to anyone doing some first time PCB population for a project.
I drilled some holes into the corners of the pieces of wood using an M3 drill bit to match the size of the stand-offs I had. I also drilled holes for the perf board stand-off holes.
After all the soldering and wood working was done, I began assembly of the final project. First, I attached the stand-offs using some M3 screws that I was able to procure at Lowes. Then, I hooked up the quick-connect wires to the arcade buttons. I marked 5V and GND with matching colored Sharpies to make the final plug-in process easier. Next came the plugging in of the quick-connect wires to the headers on the PCB. This created a bit more wire bulk than I planned on. I've used some velcro cable ties for now to try and control the Hydra beast of wires, but in the future I hope to actually fabricate a custom PCB for this project and more permanently attach the buttons which will cut down on the bulk. All that was left then was to attach the top part of the housing to the stand-offs and plug it in to my computer to drum out some beats. A video time lapse of the assembly and some final words on the project can be found on my channel here.
Overall, I couldn't be happier with this project. It marks the first time that I created a custom housing for a project and also soldered the project to perf (perma-proto) board instead of leaving it on a breadboard to eventually be ripped out to make way for another project. Also, as I stated at the beginning of this long winded story, this project has always been a dream of mine to create. I actually got into Arduino and open source because of the potential for music projects, so this project really marks a sentimental full circle journey for me with electronics, open source and making in general.


_3u05Tpwasz.png?auto=compress%2Cformat&w=40&h=40&fit=fillmax&bg=fff&dpr=2)
Comments