

Hardware components | ||||||
 |
| × | 1 | |||
| × | 1 | ||||
_4GxBoRGhr5.jpg?auto=compress%2Cformat&w=48&h=48&fit=fill&bg=ffffff) |
| × | 1 | |||
Take photo and upload them on tumblr using a PIR sensor as a trigger.
Configure your yun-shieldThere are two ways to configure a Yùn.
The first one is to upload the example YunFirstConfig and set the required parameters.
Open your Arduino IDE and go to example -> Bridge -> YunFirstConfig
If you are using a YunShield be sure to select the name of the board to which it is attached and not a Yun board!
Upload the sketch and open the Serial monitor. You will see a message as the one in the screenshot below.
Follow a few simple steps and set up a name, a password and a network for your board. Now you can connect your Yùn to internet!
The second way to configure your board is to do it via browser.
Before starting be sure your yun-shield is in access-mode. Check for the name of the yun in the available WiFi network on your computer. It should look like this
Arduino Yun-90A2DAF200DI
Connect to this network and on the browser type the address
192.168.240.1
Now you should be redirected to the configuration page of the yun, where you can set the name, the password and the WiFi network you want to connect.
Note that the default password is arduino
Done! Now your Yun-Shield has a name, a password and is connected to internet!
Taking photosFor this project we used a quickcam communicate stx. It is a cheap and linux-compatible webcam that we can connect to our yun-shield via USB.
Before having this working we need to download some drivers:
Open your terminal and connect to the yun-shield via ssh ( be sure your computer is connected to the same network of the yun-shield) and download the needed packages
ssh root@name_of_your_yun.local
opkg update
opkg install kmod-video-gspca-zc3xx
opkg install python-openssl
opkg install fswebcam
opkg install mjpg-streamer
Note that lots of webcams works with UVC drivers. In that case use the command:
opkg install kmod-video-uvc libwebcam libuvc
Now we can take pictures and store them using this command
fswebcam test.png
The picture will be saved as .png and will be named test.
To make things a little more organized we can create a folder in which photos will be saved, just type in the terminal (connected via ssh to the yun-shield) the command:
mkdir photos
Now to save photos in that folder use the command
fswebcam -r 640x480 photos/my_photo.jpg
We just took a photo with a 640x480 resolution, named it my_photo.jpg and saved it in the folder photos.
Upload photos to tumblrBefore uploading any photos we first need to create a tumblr application connected to our blog. To do so go to https://www.tumblr.com/oauth/apps and register a new application. We need this application to get all the tokens required to make an http POST request to tumblr.
Fill in the form with the application name, the description and the email contact. You can fill the remaining fields, such as the Default callback URL, with whatever link you want, we won't use them for this project.
Now you should have access to your OAuth Consumer Key and OAuth Consumer Secret. Save those tokens in a text file, we will need them in the next steps.
Now we want to obtain also the OAuth Token and the OAuth Token Secret
Go to the Tumblr API Console and authenticate your application using the tokens you already have, then on the top-right press the Show Keys button. You should see something like:
Now that we have our tokens we can write down the python code that will do all the work. You can copy and paste the code below or download it from the software section of this tutorial.
Remember to fill the blank fields with your credentials.
import glob
import json
import os
import  time
import urllib2
import urlparse
import oauth2
from poster.encode import multipart_encode
from poster.streaminghttp import register_openers

class APIError(StandardError):
   def __init__(self, msg, response=None):
       StandardError.__init__(self, msg)

class TumblrAPIv2:
   def __init__(self, consumer_key, consumer_secret, oauth_token, oauth_token_secret):
       self.consumer = oauth2.Consumer(consumer_key, consumer_secret)
       self.token = oauth2.Token(oauth_token, oauth_token_secret)
       self.url = "http://api.tumblr.com"

   def parse_response(self, result):
       content = json.loads(result)
       if 400 <= int(content["meta"]["status"]) <= 600:
           raise APIError(content["meta"]["msg"], result)
       return content["response"]

   def createPhotoPost(self, id, post):
       url = self.url + "/v2/blog/%s/post" %id

       img_file = post['data']
       del(post['data'])
       req = oauth2.Request.from_consumer_and_token(self.consumer,
                                                token=self.token,
                                                http_method="POST",
                                                http_url=url,
                                                parameters=post)
       req.sign_request(oauth2.SignatureMethod_HMAC_SHA1(), self.consumer, self.token)
       compiled_postdata = req.to_postdata()
       all_upload_params = urlparse.parse_qs(compiled_postdata, keep_blank_values=True)

       for key, val in all_upload_params.iteritems():
           all_upload_params[key] = val[0]

       all_upload_params['data'] = open(img_file, 'rb')
       datagen, headers = multipart_encode(all_upload_params)
       request = urllib2.Request(url, datagen, headers)

       try:
           respdata = urllib2.urlopen(request).read()
       except urllib2.HTTPError, ex:
           return 'Received error code: ', ex.code

       return self.parse_response(respdata)

register_openers()

#Insert here your tokens
CONSUMER_KEY = '****'
CONSUMER_SECRET = '****'
OAUTH_TOKEN = '****'
OAUTH_TOKEN_SECRET = '****'

DIR = 'photos/'
FILE_MASK = '*.jpg'
BLOG = '****' # put here the name of your blog i.e. arduino.tumblr.com


api = TumblrAPIv2(CONSUMER_KEY, CONSUMER_SECRET, OAUTH_TOKEN, OAUTH_TOKEN_SECRET)

for img in glob.glob( os.path.join(DIR, FILE_MASK) ):

   date  = time.gmtime(os.path.getmtime(img))
   post = {
       'type' : 'photo',
       'date' : time.strftime ("%Y-%m-%d %H:%M:%S", date),
       'data' : img,
       'tags' : "I am a tag",
       'caption' : "I am a caption"
   }

   try:
       response = api.createPhotoPost(BLOG,post)
       if 'id' in response:
           print response['id']
       else:
           print response
           break

   except APIError:
       print "Error"
       break

print "Done!"
In order to upload this script on the Yun_Shield we first need to know the IP address of our board. Connect via ssh and digit:
ifconfig
Now that we have the IP we can proceed uploading the script. You can use this command replacing your_path with the folder's path to reach the python script.
scp /your_path/YunTumblr.py root@your_ip_address:
Remeber to upload also the auth.py file that you can find in the software section:
scp /your_path/auth.py root@your_ip_address:
The last step is to download the python libraries. Connect via ssh to the yun shield and use these commands
ssh root@name_of_your_yun.local
opkg update
opkg install python-pip
pip install oauth2
pip install poster
We are done!!!
To test it out you can digit:
fswebcam -r 640x480 photos/my_photo.jpg
python YunTumblr.py
It can take a couple of minutes to upload them on tumblr but if everything worked fine you should have received the id number of the photo as a response.
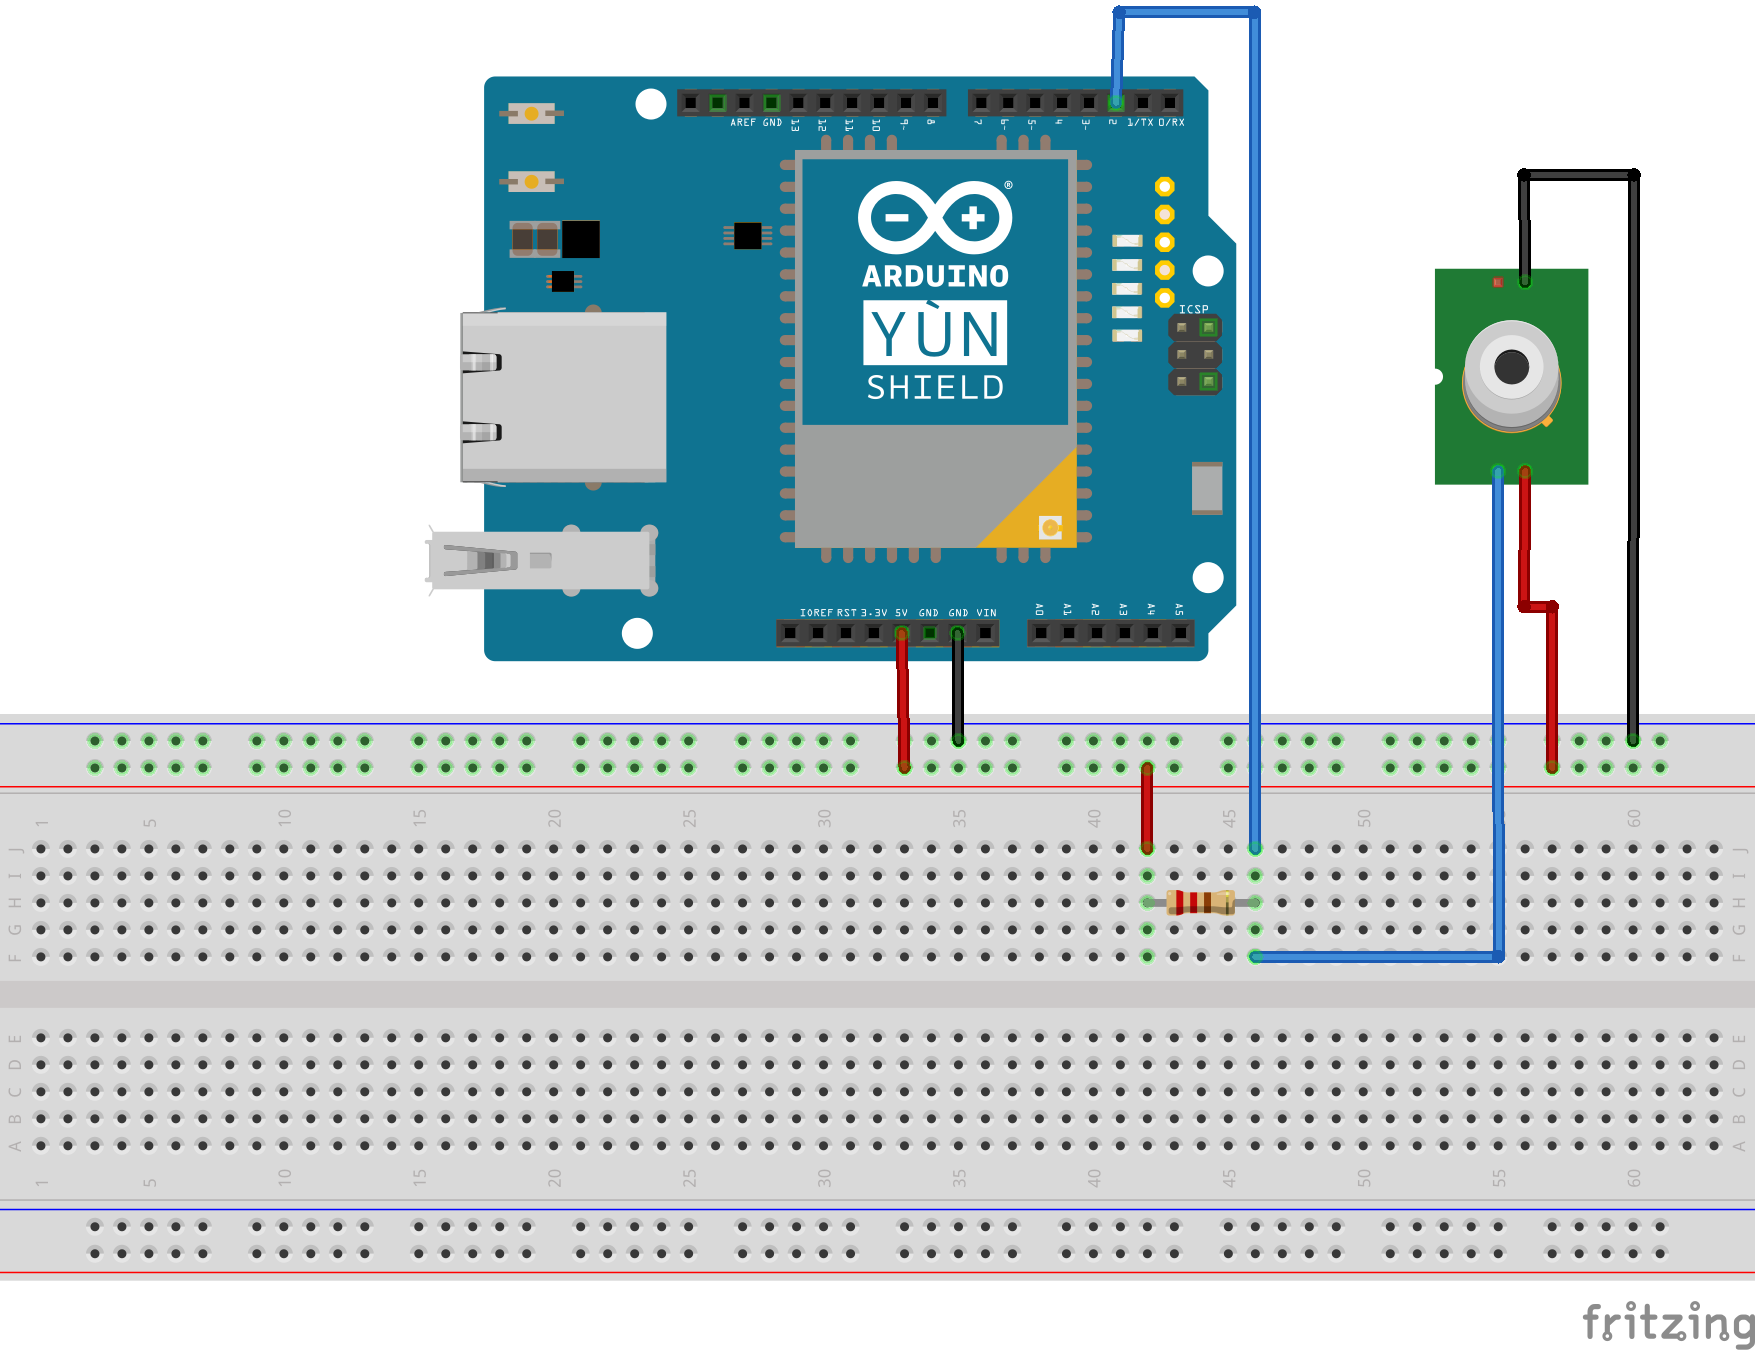
Normally all PIR sensors comes with three wires. The black one for the ground, the red one for the 5V and the coloured one for the data.
Note that sometimes the wire colours might change depending on the sensor!
Uploading sketches on a Yun Shield
The Yun Shield can be plugged to every Arduino/Genuino board.
Once you have plugged the shield, from the Arduino IDE you have to select the board to which the shield is attached to and not an Arduino Yun. For example, if you plugged the Yun Shield to an Arduino Leonardo, in the IDE you have to select
Tools/Board/Arduino Leonardo


Comments