


Hardware components | ||||||
 |
| × | 1 | |||
| × | 1 | ||||
| × | 1 | ||||
| × | 1 | ||||
| × | 1 | ||||
| × | 1 | ||||
| × | 1 | ||||
In the first article of this datalogger development series, you learned how to implement the functions to save the data and to display the data saved in memory. If you have not read the previous article, click on the following link and follow the full article: First article
In this article, you will understand how to implement the function to clear the data stored in device memory and learn how to implement an action confirmation screen for the user who wants to clear the memory.
The following video shows the process of creating the code for cleaning the data in the device memory.
This project was developed thanks to the support of the PCBWay Company of manufacturing electronic circuit boards.
The development of the projectAs shown in the first article, two functionalities were implemented: a button to save values in the internal memory and button to display the stored values. And in this new step, were implemented new functionality to clear the storing data in the EEPROM Memory.
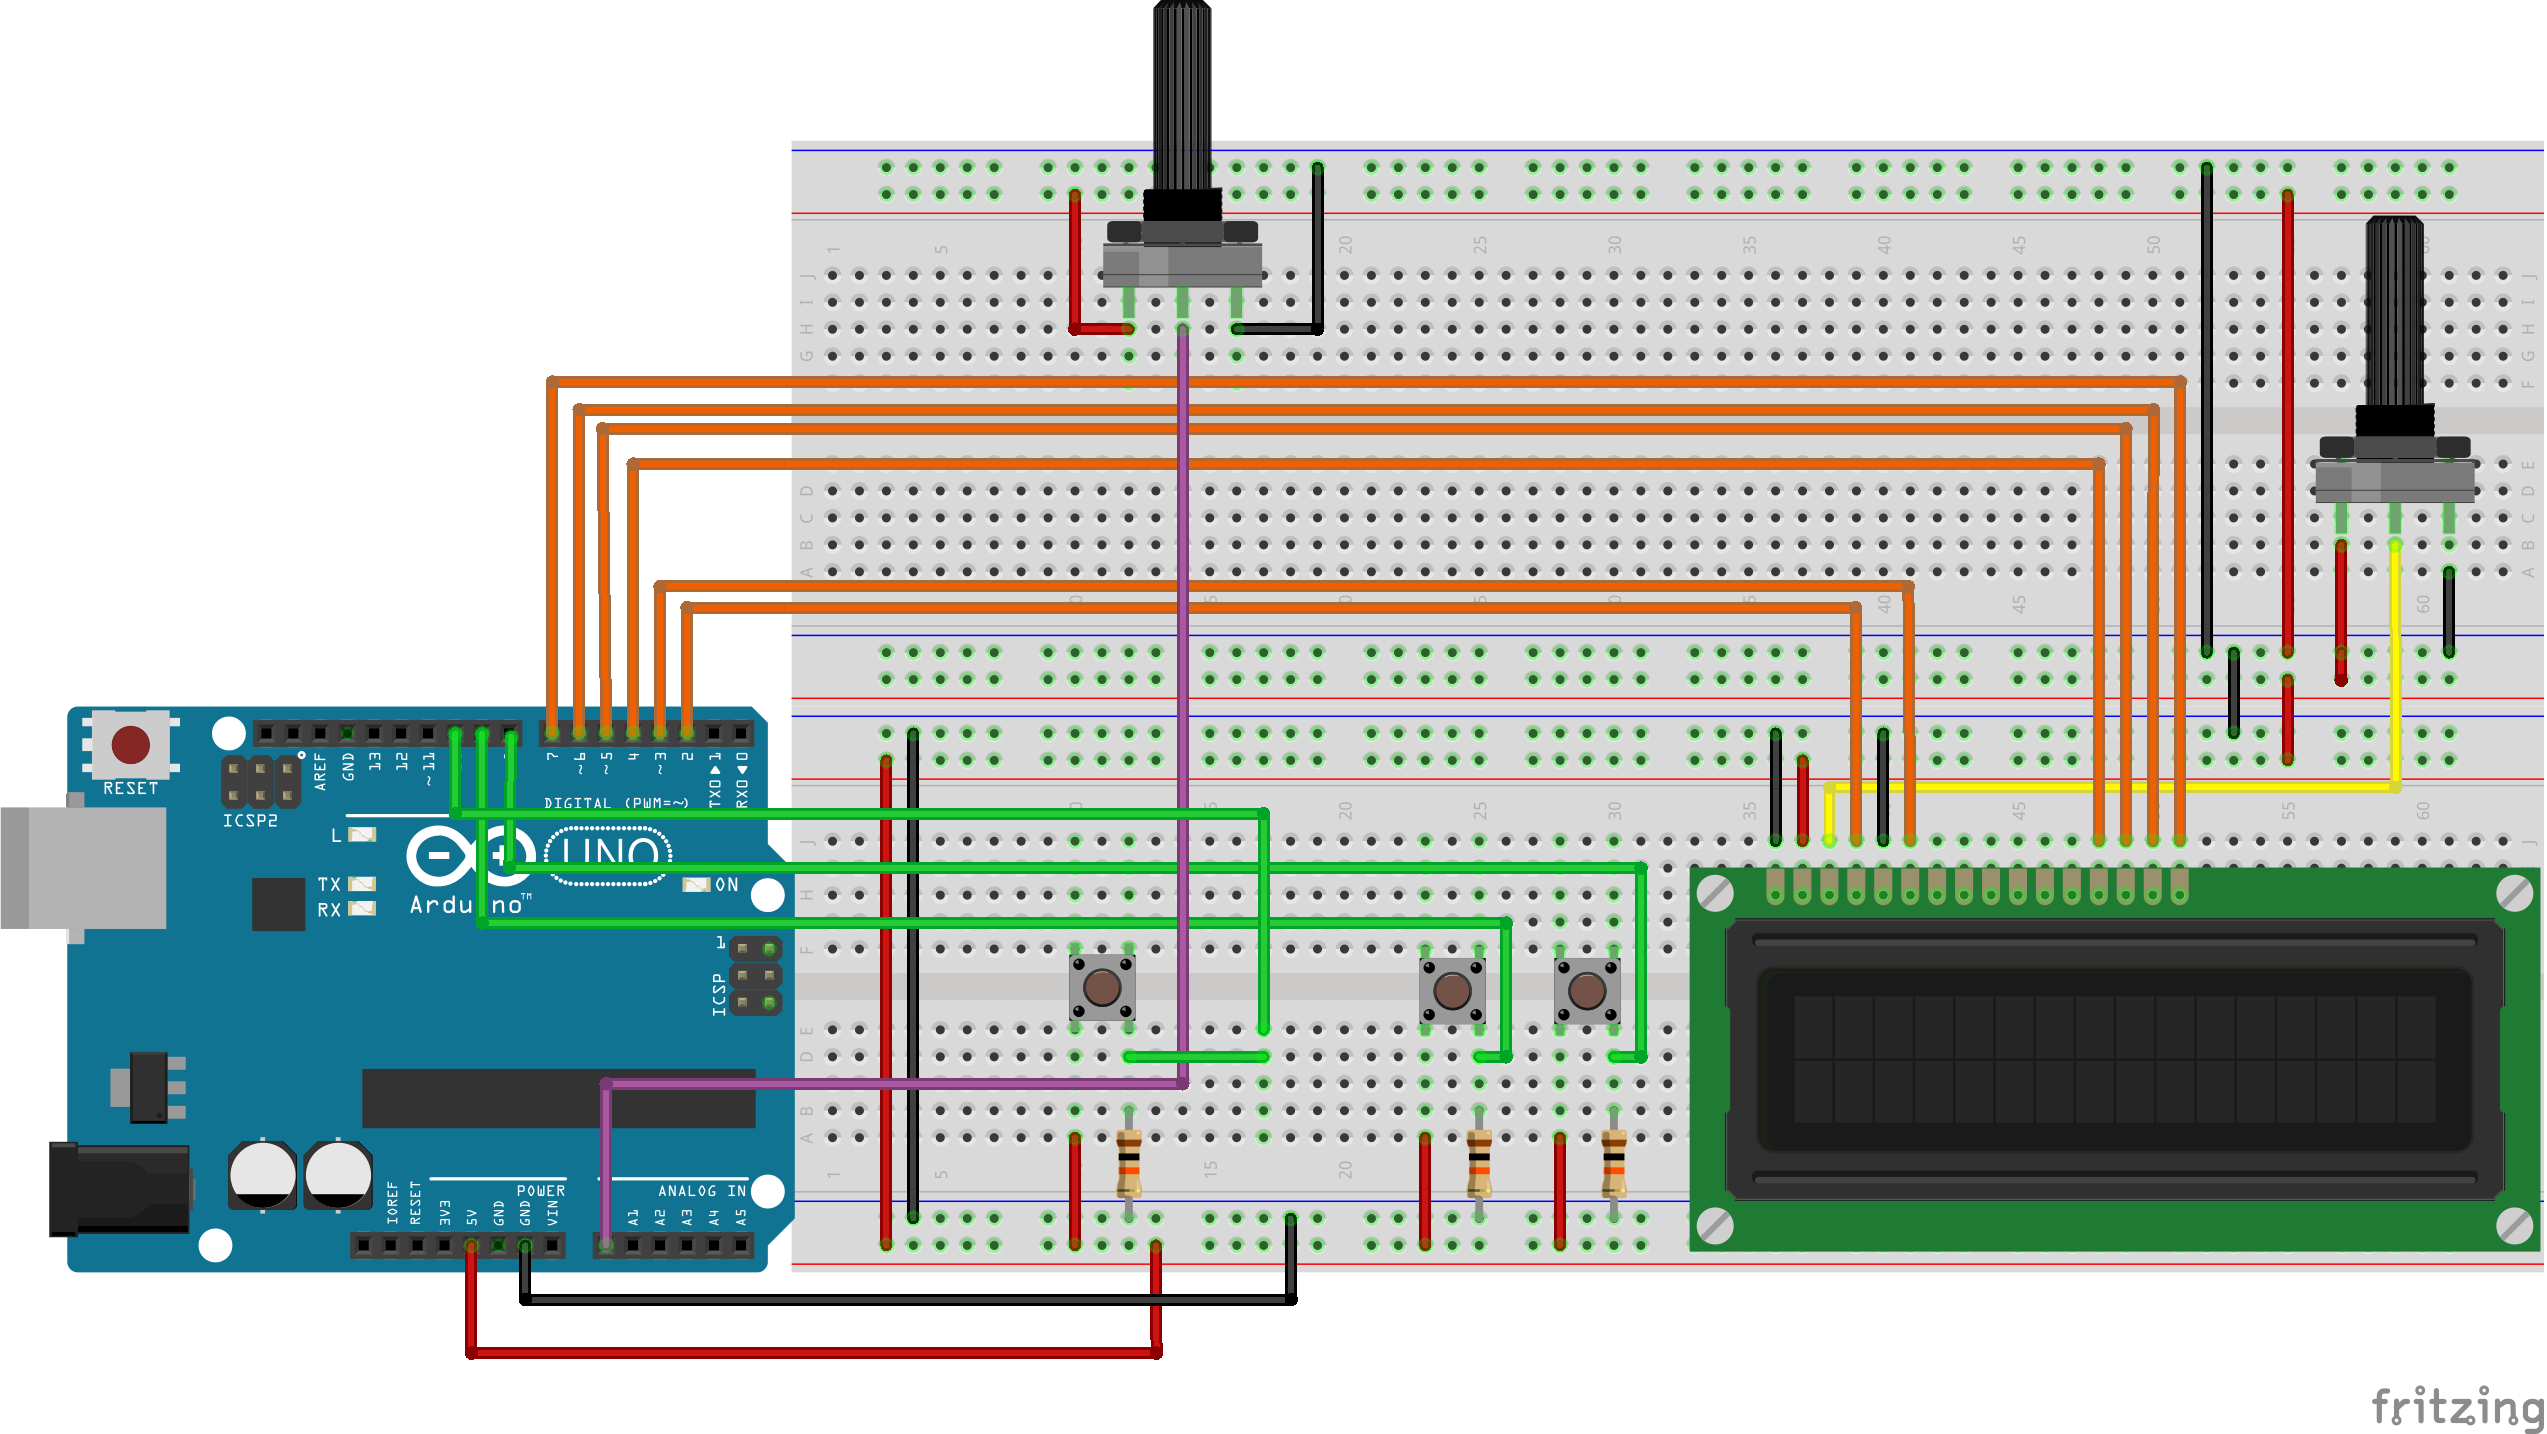
And as is possible see in Figure 1, was add a new switch button connected in the digital pin 10 of the Arduino UNO. From this connected button, the following code was implemented to clear the memory.
When the clear button is pressed will be shown the message on the LCD 16 x 2: "Clear Memory ?" and in the second line will be shown the options: "1 - Yes 2 - No".
After the message to be presented on the display, the variable "EstadoApaga" will be 1. This variable is used to ensure that the menu is displayed only once when the button is pressed.
This prevents data from being displayed repeatedly and has an unwanted display clean and exhibition effect on the user's screen.
//Condicoes referentes ao botao de limpar dados da memoria
   botaoLimpa = digitalRead(pinoBotaoLimpaMem);
   if(botaoLimpa == 1 && EstadoApaga == 0)
   {
       lcd.clear();
       lcd.setCursor(0,0);
       lcd.print("Limpar Memoria ?");
       lcd.setCursor(0,1);
       lcd.print("1 - Sim  2 - Nao");
       EstadoApaga = 1;
   }
To select the Yes and No option, we will use the buttons to save and display the values (Button 1 and Button 2).
if(botaoMostraValor == 1 && EstadoApaga == 1)
   {
       for(byte pos = 0; pos < 10; pos++)//Percorre as posicoes de memoria e apresenta ao usuario
           {
                EEPROM.write(pos,0); //Le o valor da posicao pos da memoria e mostra na tela do LCD
           }
           lcd.clear();
           lcd.setCursor(1,0);
           lcd.print("Memoria Limpa!");
           delay(1500);
           EstadoApaga = 0;
           cont = 0;
           EEPROM.write(MemCont, cont);
           //Imprime a mensagem Valor Digital: com o valor digital lido
           lcd.setCursor(1,0);
           lcd.print("Valor Digital:");
           lcd.setCursor(0,1);
           lcd.print("                ");
           lcd.setCursor(6,1);
           lcd.print(mapa);
   }
When the button 2 (Option 1 Yes - Button to show values) is pressed, the ten positions (position 0 until position 9) will be cleared and will be presented the "Clear Memory!" in the display.
And after, the digital value of the potentiometer or sensor will be presented again.
In the condition (botaoMostraValor == 1 && EstadoApaga ==1 ), the variable BotaoMostraValor is used to storing the value of the button ShowValue (Button 1) and the variable EstadoApaga is used to inform the condiction that the Menu is being to the user. At this moment the button 1 and button 2 will be used as other functionality.
And we have the other command:
EEPROM.write(MemCont, cont);The command is used to save the value of variable cont in position 120 (MemCont) of the EEPROM Memory. This will ensure that when you turn the device off and on again, the value to be recorded will start from position 0.
In the code is possible to see that variables "EstadoApaga" and "cont" will be to zero and this has an explanation.
The variable "EstadoApaga" will be zero for the program understand that don't is necessary present the Menu again and is used to avoid that the flow of code enter in the conditions of show values stored in the memory and save values on the memory, according is shown in the portion of the code below.
if(botaoMostraValor == 1 && estadoMostra == 0 && EstadoApaga == 0)
       {
       estadoMostra = 1;
       if(cont == 0)//Se cont for igual a 0, significa que a memoria esta sem dados armazenados
       {
           lcd.clear();
           lcd.setCursor(2,0);
           lcd.print("Sem Dados na");
           lcd.setCursor(4,1);
           lcd.print("Memoria");
           delay(1000);
           lcd.clear();
           //Imprime a mensagem Valor Digital: com o valor digital lido
           lcd.setCursor(1,0);
           lcd.print("Valor Digital:");
           lcd.setCursor(0,1);
           lcd.setCursor(0,1);
           lcd.print("                ");
           lcd.setCursor(6,1);
           lcd.print(mapa);
       }
       if(cont > 0)
       {
           lcd.clear(); //Limpa a tela do LCD
           for(byte pos = 0; pos < cont; pos++)//Percorre as posicoes de memoria e apresenta ao usuario
           {
             lcd.setCursor(2,0);
             lcd.print("Posicao:");
             lcd.setCursor(12,0);
             lcd.print(pos+1);
             lcd.setCursor(0,1);
             lcd.print("                ");
             lcd.setCursor(6,1);
             lcd.print(EEPROM.read(pos)); //Le o valor da posicao pos da memoria e mostra na tela do LCD
             delay(2500);//Aguarda tempo de 2,5 segundos, para o usuario visualizar
           }
           //Imprime a mensagem Valor Digital: com o valor digital lido
           lcd.setCursor(1,0);
           lcd.print("Valor Digital:");
           lcd.setCursor(0,1);
           lcd.setCursor(0,1);
           lcd.print("                ");
           lcd.setCursor(6,1);
           lcd.print(mapa);
       }
   }
   if(botaoGrava == 1 && estadoGrava == 0 && EstadoApaga == 0)
   {
         estadoGrava = 1;
         if(cont > 9)//Se cont for maior que 9, significa que a memoria esta cheia
         {
           cont = 10;
           //Imprimir mensagem no LCD
           lcd.clear();
           lcd.setCursor(1,0);
           lcd.print("Memoria Cheia");
           delay(1000);
           lcd.clear();
           //Imprime a mensagem Valor Digital: com o valor digital lido
           lcd.setCursor(1,0);
           lcd.print("Valor Digital:");
           lcd.setCursor(0,1);
           lcd.setCursor(0,1);
           lcd.print("                ");
           lcd.setCursor(6,1);
           lcd.print(mapa);
         }
         if(cont < 10)
         {
           EEPROM.write(cont, mapa);
           lcd.clear();
           lcd.setCursor(1,0);
           lcd.print("Valor Gravado");
           lcd.setCursor(3,1);
           lcd.print("Posicao");
           lcd.setCursor(12,1);
           lcd.print(cont+1);
           cont++;
           EEPROM.write(MemCont, cont);
           delay(1000);
           lcd.clear();
           //Imprime a mensagem Valor Digital: com o valor digital lido
           lcd.setCursor(1,0);
           lcd.print("Valor Digital:");
           lcd.setCursor(0,1);
           lcd.print("                ");
           lcd.setCursor(6,1);
           lcd.print(mapa);
         }
   }
And the variable cont will be zero because this variable is used to count the quantity of data that is storing in the memory.
And, when the values are cleaned of the memory is needs its value to be zero.
Now, I will explain button 2 for don't clear the data stored on the memory.
The following is the portion of code used when the user presses No (Button 1 - Save Value Button)
if(botaoGrava == 1 && EstadoApaga == 1)
   {
     do
     {
       botaoGrava = digitalRead(pinoBotaoGrava);
     }while(botaoGrava == 1);
      EstadoApaga = 0;
     //Imprime a mensagem Valor Digital: com o valor digital lido
      lcd.clear();
      lcd.setCursor(1,0);
      lcd.print("Valor Digital:");
      lcd.setCursor(0,1);
      lcd.print("                ");
      lcd.setCursor(6,1);
      lcd.print(mapa);
      delay(3000);
   }
In this portion of code it is possible to observe that while the button of option 2 - Not pressed, the code will loop until the button is released.
When the button is released, the PayStamp variable will be set to 0, to allow the Menu to be displayed again when the clear memory button is pressed.
After this, the read value of the sensor or potentiometer will be displayed on the LCD on the next line.
AcknowledgmentsI thank you for reading our article and the support of PCBWay to offer the printed circuit boards.
The Silícios Lab thanks the UTSOURCE to offer the electronic components to develop this project.


Comments