

Hardware components | ||||||
_wzec989qrF.jpg?auto=compress%2Cformat&w=48&h=48&fit=fill&bg=ffffff) |
| × | 1 | |||
 |
| × | 1 | |||
 |
| × | 1 | |||
Software apps and online services | ||||||
 |
| |||||
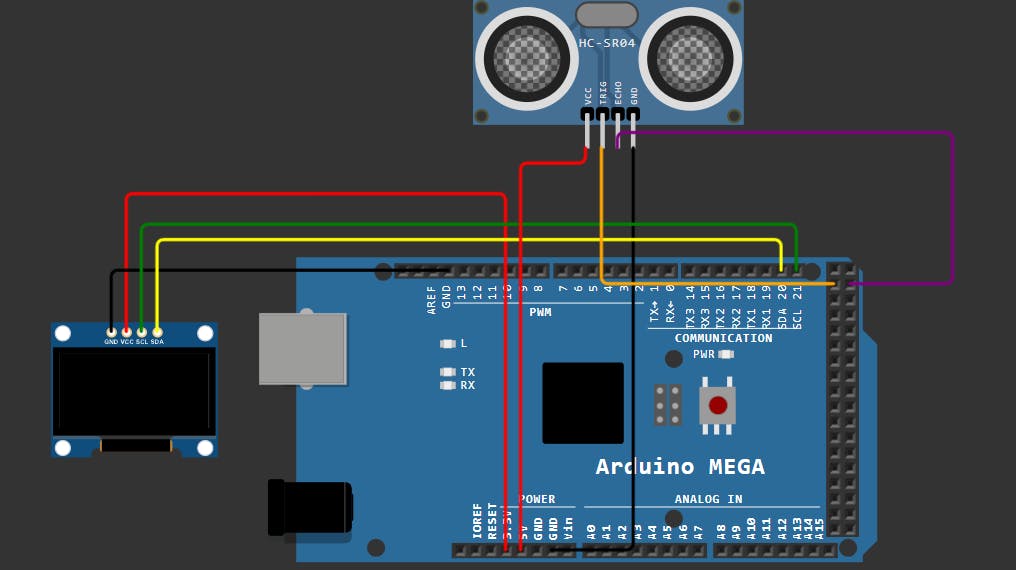
This project creates a real-time distance monitor by combining an HC-SR04 ultrasonic sensor with an SSD1306 OLED display controlled by an Arduino Mega.
How the Project WorksThe system operates on a simple "send and receive" principle:
Triggering: The Arduino sends a short electrical pulse to the ultrasonic sensor.
- Triggering: The Arduino sends a short electrical pulse to the ultrasonic sensor.
Sound Wave: The sensor converts this pulse into a high-frequency sound wave (ultrasonic) that travels through the air.
- Sound Wave: The sensor converts this pulse into a high-frequency sound wave (ultrasonic) that travels through the air.
Reflection: When the sound hits an object, it bounces back as an echo.
- Reflection: When the sound hits an object, it bounces back as an echo.
Measurement: The sensor detects the returning echo and sends a signal back to the Arduino. The Arduino measures how long the round trip took in microseconds.
- Measurement: The sensor detects the returning echo and sends a signal back to the Arduino. The Arduino measures how long the round trip took in microseconds.
Calculation: The code converts this time into centimeters using the speed of sound.
- Calculation: The code converts this time into centimeters using the speed of sound.
Display: The calculated distance is formatted and sent to the OLED screen via the I2C communication protocol (using pins 20 and 21).
- Display: The calculated distance is formatted and sent to the OLED screen via the I2C communication protocol (using pins 20 and 21).
The code is structured into three main sections:
1. Setup and InitializationLibraries: It includes the Adafruit_SSD1306 and Wire libraries to handle the complex communication needed for the OLED display.
- Libraries: It includes the
Adafruit_SSD1306andWirelibraries to handle the complex communication needed for the OLED display.
Pin Definitions: It assigns the Trigger pin to D22 and the Echo pin to D23.
- Pin Definitions: It assigns the Trigger pin to D22 and the Echo pin to D23.
Initialization: In setup(), it sets the pin modes and initializes the display. If the display isn't found at address 0x3C, the code stops to prevent errors.
- Initialization: In
setup(), it sets the pin modes and initializes the display. If the display isn't found at address0x3C, the code stops to prevent errors.
The Pulse: To get a reading, the code pulls the trigPin HIGH for 10 microseconds and then LOW again. This "pokes" the sensor to send a sound wave.
- The Pulse: To get a reading, the code pulls the
trigPinHIGH for 10 microseconds and then LOW again. This "pokes" the sensor to send a sound wave.
The Math: It uses pulseIn() to catch the echo. It multiplies the duration by 0.034 (the speed of sound in cm/us) and divides by 2 (because the sound traveled to the object and back).
- The Math: It uses
pulseIn()to catch the echo. It multiplies the duration by 0.034 (the speed of sound in cm/us) and divides by 2 (because the sound traveled to the object and back).
Clearing:display.clearDisplay() wipes the previous reading so numbers don't overlap.
- Clearing:
display.clearDisplay()wipes the previous reading so numbers don't overlap.
Formatting: It sets the text size to 2 and moves the "cursor" to the top-left corner.
- Formatting: It sets the text size to 2 and moves the "cursor" to the top-left corner.
Output: Finally, display.display() is called. Without this specific command, the data remains in the Arduino's memory and never actually appears on the screen
- Output: Finally,
display.display()is called. Without this specific command, the data remains in the Arduino's memory and never actually appears on the screen


Comments