


Hardware components | ||||||
| × | 1 | ||||
 |
| × | 1 | |||
| × | 1 | ||||
| × | 1 | ||||
 |
| × | 1 | |||
 |
| × | 1 | |||
 |
| × | 1 | |||
 |
| × | 1 | |||
 |
| × | 1 | |||
 |
| × | 1 | |||
| × | 1 | ||||
Software apps and online services | ||||||
 |
| |||||
 |
| |||||
Home security is an important concern for homeowners, especially when they are away from their houses.
Traditional security systems often depend on manual monitoring or standalone alarms. These systems may not provide remote information about suspicious activities.
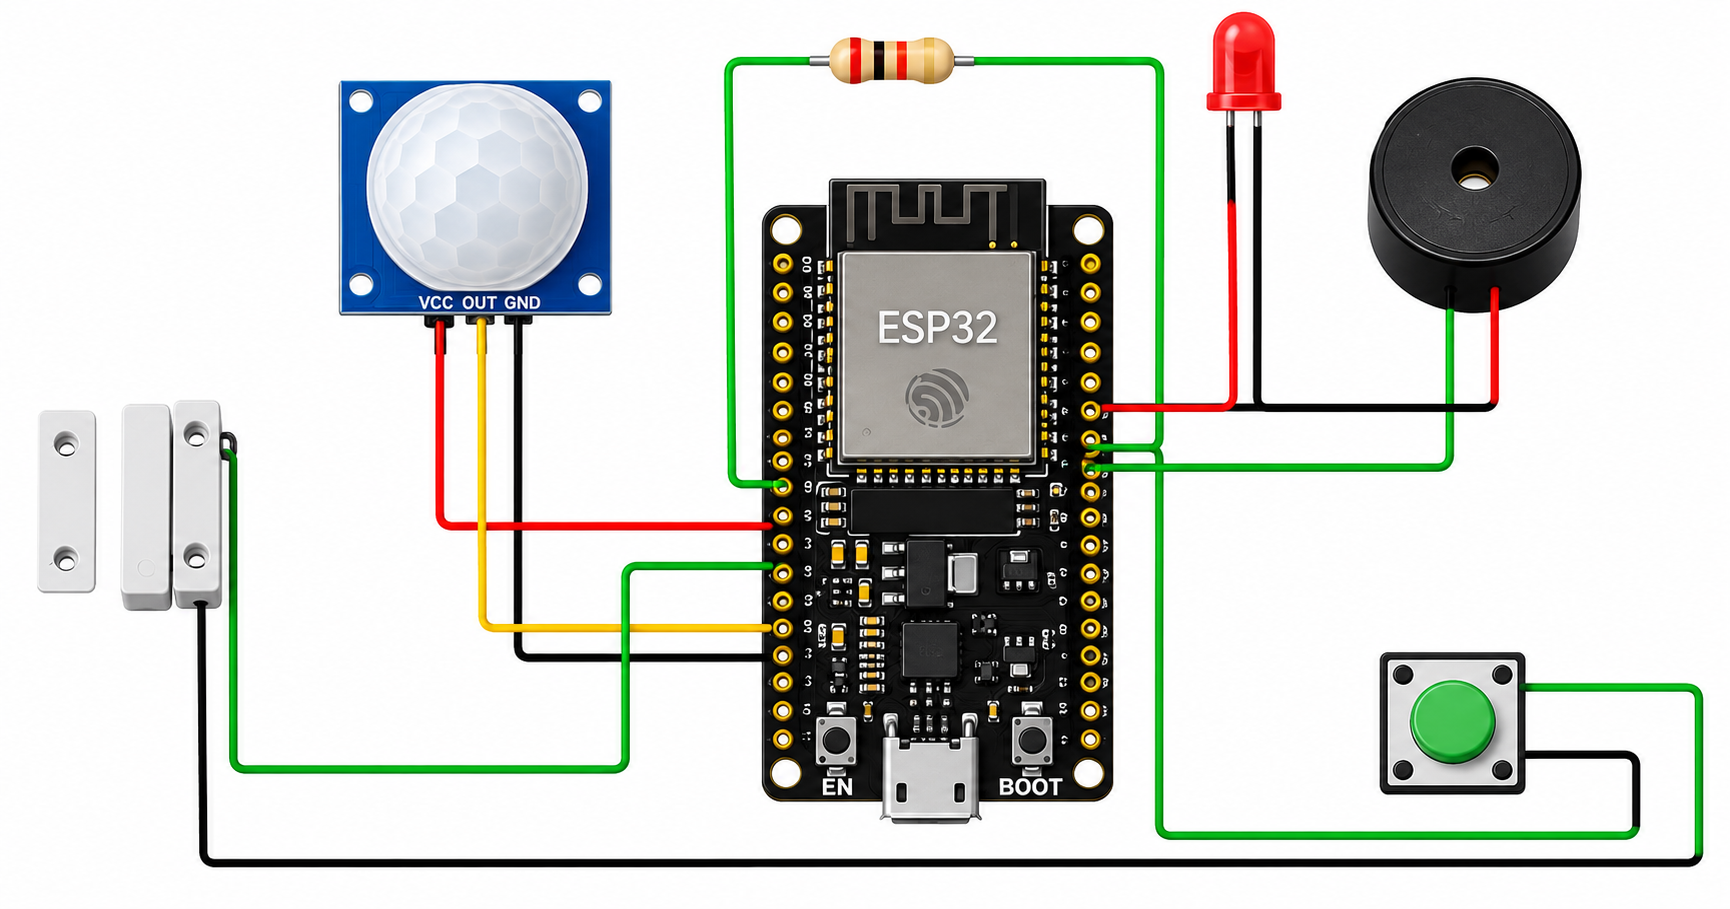
To overcome this limitation, the IoT-Based Home Security System uses an ESP32 microcontroller, PIR motion sensor, and magnetic door sensor to monitor home activity.
When motion is detected or a protected door is opened, the ESP32 processes the sensor signals and activates a buzzer alarm. It also sends security event information through Wi-Fi to the KiwisIoT Dashboard.
Users can monitor security conditions remotely and receive mobile notifications when suspicious activity is detected.
System Diagram:
Install:
ESP32 Board Package
- WiFi library (included with ESP32 board support)Code
- #include <WiFi.h>
#include <PubSubClient.h>
// Wi-Fi credentials
const char* ssid = "YOUR_WIFI_NAME";
const char* password = "YOUR_WIFI_PASSWORD";
// KiwisIoT MQTT configuration
const char* mqtt_server = "YOUR_MQTT_BROKER";
const int mqtt_port = YOUR_MQTT_PORT;
const char* mqtt_topic = "YOUR_DEVICE_TOPIC";
// ESP32 pin configuration
#define PIR_PIN 27
#define DOOR_PIN 26
#define BUZZER_PIN 25
#define LED_PIN 2
WiFiClient espClient;
PubSubClient client(espClient);
bool lastDoorState = HIGH;
bool lastPirState = LOW;
bool alarmActive = false;
unsigned long alarmStart = 0;
unsigned long lastPublish = 0;
const unsigned long ALARM_DURATION = 3000;
const unsigned long PUBLISH_INTERVAL = 10000;
void connectWiFi() {
WiFi.begin(ssid, password);
while (WiFi.status() != WL_CONNECTED) {
delay(500);
Serial.println("Connecting to WiFi...");
}
Serial.println("WiFi Connected");
}
void reconnectMQTT() {
while (!client.connected()) {
if (client.connect("HomeSecurityESP32")) {
Serial.println("MQTT Connected");
} else {
delay(2000);
}
}
}
void triggerAlarm(const char* eventName) {
Serial.print("SECURITY ALERT: ");
Serial.println(eventName);
alarmActive = true;
alarmStart = millis();
digitalWrite(BUZZER_PIN, HIGH);
digitalWrite(LED_PIN, HIGH);
if (client.connected()) {
char payload[160];
snprintf(payload, sizeof(payload),
"{\"security_event\":\"%s\", "
"\"alarm_status\":\"ON\", "
"\"system_status\":\"ARMED\"}",
eventName
);
client.publish(mqtt_topic, payload);
}
}
void setup() {
Serial.begin(115200);
pinMode(PIR_PIN, INPUT);
pinMode(DOOR_PIN, INPUT_PULLUP);
pinMode(BUZZER_PIN, OUTPUT);
pinMode(LED_PIN, OUTPUT);
digitalWrite(BUZZER_PIN, LOW);
digitalWrite(LED_PIN, LOW);
connectWiFi();
client.setServer(mqtt_server, mqtt_port);
// Allow PIR sensor to stabilize
Serial.println("PIR sensor warming up...");
delay(30000);
lastDoorState = digitalRead(DOOR_PIN);
lastPirState = digitalRead(PIR_PIN);
Serial.println("Home Security System Armed");
}
void loop() {
if (WiFi.status() != WL_CONNECTED) {
connectWiFi();
}
if (!client.connected()) {
reconnectMQTT();
}
client.loop();
bool pirState = digitalRead(PIR_PIN);
bool doorState = digitalRead(DOOR_PIN);
// Detect new motion
if (pirState == HIGH && lastPirState == LOW) {
triggerAlarm("MOTION_DETECTED");
}
// Reed switch opens when door opens
if (doorState == HIGH && lastDoorState == LOW) {
triggerAlarm("DOOR_OPENED");
}
lastPirState = pirState;
lastDoorState = doorState;
// Stop local alarm after 3 seconds
if (alarmActive &&
millis() - alarmStart >= ALARM_DURATION) {
digitalWrite(BUZZER_PIN, LOW);
digitalWrite(LED_PIN, LOW);
alarmActive = false;
}
// Publish periodic security status
if (millis() - lastPublish >= PUBLISH_INTERVAL) {
lastPublish = millis();
char payload[160];
snprintf(payload, sizeof(payload),
"{\"motion\":\"%s\", "
"\"door\":\"%s\", "
"\"alarm\":\"%s\", "
"\"system\":\"ARMED\"}",
pirState ? "DETECTED" : "CLEAR",
doorState ? "OPEN" : "CLOSED",
alarmActive ? "ON" : "OFF"
);
client.publish(mqtt_topic, payload);
}
delay(50);
}Connecting ESP32 to KiwisIoT Dashboard
KiwisIoT Dashboard is used to monitor security events and display the current home security status.
Step 1: Login to KiwisIoTOpen the KiwisIoT platform.
- Open the KiwisIoT platform.
- Sign in to your account.
- Sign in to your account.
- Navigate to the dashboard section.
Create a new dashboard with the name:
IoT-Based Home Security Monitoring
Step 3: Register the ESP32 DeviceOpen the device management section.
- Open the device management section.
- Register your ESP32 board.
- Obtain MQTT connection details.
- Copy the broker address and port.
- Configure the device authentication credentials.
- Copy the device topic.
Add these widgets to your dashboard:
The ESP32 sends example JSON telemetry:
{
  "motion": "DETECTED",
  "door": "OPEN",
  "alarm": "ON",
  "system": "ARMED"
}
Configure the KiwisIoT data integration to map these fields to the appropriate dashboard widgets.
Step 6: Verify the DeviceUpload the firmware and verify:
ESP32 is online.
- ESP32 is online.
- PIR sensor status updates.
Door status changes when opened.
- Door status changes when opened.
- Alarm indicator updates.
- Security events appear on the dashboard.
Exact widget names and MQTT data mapping depend on the KiwisIoT account and integration available.
Mobile Notification ConfigurationMobile notifications help homeowners know when a security event occurs, even when they are away.
Configure a supported notification rule in KiwisIoT or connect an external notification service.


Comments